Hi DIYers! Just last week, we announced some of the new system kits that we are now offering on our site. Well today, we have even more kits to announce. We have new system kits featuring the DSC PowerSeries NEO, the 2GIG GC3e, and the 345 MHz and 433 MHz Versions of the IQ Panel 2 Plus.
DSC PowerSeries NEO Kits
The DSC PowerSeries NEO is a hardwired alarm system with some powerful features. It is generally best used in commercial settings, as it isn't going to be as DIY-friendly as a wireless alarm system. But if you need a hardwired system, then a DSC PowerSeries NEO might be the way to go. We are offering kits around the 16-zone, 32-zone, 64-zone, and 128-zone DSC PowerSeries NEO Systems. You can choose between AT&T LTE and Verizon LTE for all of the kits.
DSC HS2016NK 3-1 AT&T LTE Kit
- 16-Zone DSC PowerSeries NEO
- DSC HS2LCDRF9 N NEO Keypad
- DSC TL880LEAT N AT&T LTE & IP Communicator
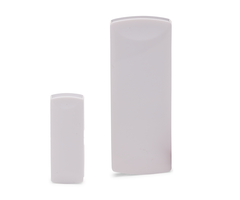
- Three (3) DSC PG9303 PowerG Door/Window Contacts
- One (1) DSC PG9914 PowerG Motion Sensor
- Honeywell LT-Cable
DSC HS2016NK 3-1 Verizon LTE Kit
- 16-Zone DSC PowerSeries NEO
- DSC HS2LCDRF9 N NEO Keypad
- DSC TL880LTVZ N Verizon LTE & IP Communicator
- Three (3) DSC PG9303 PowerG Door/Window Contacts
- One (1) DSC PG9914 PowerG Motion Sensor
- Honeywell LT-Cable
DSC HS2016NK 10-1 AT&T LTE Kit
- 16-Zone DSC PowerSeries NEO
- DSC HS2LCDRF9 N NEO Keypad
- DSC TL880LEAT N AT&T LTE & IP Communicator
- Ten (10) DSC PG9303 PowerG Door/Window Contacts
- One (1) DSC PG9914 PowerG Motion Sensor
- Honeywell LT-Cable
DSC HS2016NK 10-1 Verizon LTE Kit
- 16-Zone DSC PowerSeries NEO
- DSC HS2LCDRF9 N NEO Keypad
- DSC TL880LTVZ N Verizon LTE & IP Communicator
- Ten (10) DSC PG9303 PowerG Door/Window Contacts
- One (1) DSC PG9914 PowerG Motion Sensor
- Honeywell LT-Cable
DSC HS2032NK 3-1 AT&T LTE Kit
- 32-Zone DSC PowerSeries NEO
- DSC HS2LCDRF9 N NEO Keypad
- DSC TL880LEAT N AT&T LTE & IP Communicator
- Three (3) DSC PG9303 PowerG Door/Window Contacts
- One (1) DSC PG9914 PowerG Motion Sensor
- Honeywell LT-Cable
DSC HS2032NK 3-1 Verizon LTE Kit
- 32-Zone DSC PowerSeries NEO
- DSC HS2LCDRF9 N NEO Keypad
- DSC TL880LTVZ N Verizon LTE & IP Communicator
- Three (3) DSC PG9303 PowerG Door/Window Contacts
- One (1) DSC PG9914 PowerG Motion Sensor
- Honeywell LT-Cable
DSC HS2032NK 10-1 AT&T LTE Kit
- 32-Zone DSC PowerSeries NEO
- DSC HS2LCDRF9 N NEO Keypad
- DSC TL880LEAT N AT&T LTE & IP Communicator
- Ten (10) DSC PG9303 PowerG Door/Window Contacts
- One (1) DSC PG9914 PowerG Motion Sensor
- Honeywell LT-Cable
DSC HS2032NK 10-1 Verizon LTE Kit
- 32-Zone DSC PowerSeries NEO
- DSC HS2LCDRF9 N NEO Keypad
- DSC TL880LTVZ N Verizon LTE & IP Communicator
- Ten (10) DSC PG9303 PowerG Door/Window Contacts
- One (1) DSC PG9914 PowerG Motion Sensor
- Honeywell LT-Cable
DSC HS2064NK 3-1 AT&T LTE Kit
- 64-Zone DSC PowerSeries NEO
- DSC HS2LCDRF9 N NEO Keypad
- DSC TL880LEAT N AT&T LTE & IP Communicator
- Three (3) DSC PG9303 PowerG Door/Window Contacts
- One (1) DSC PG9914 PowerG Motion Sensor
- Honeywell LT-Cable
DSC HS2064NK 3-1 Verizon LTE Kit
- 64-Zone DSC PowerSeries NEO
- DSC HS2LCDRF9 N NEO Keypad
- DSC TL880LTVZ N Verizon LTE & IP Communicator
- Three (3) DSC PG9303 PowerG Door/Window Contacts
- One (1) DSC PG9914 PowerG Motion Sensor
- Honeywell LT-Cable
DSC HS2064NK 10-1 AT&T LTE Kit
- 64-Zone DSC PowerSeries NEO
- DSC HS2LCDRF9 N NEO Keypad
- DSC TL880LEAT N AT&T LTE & IP Communicator
- Ten (10) DSC PG9303 PowerG Door/Window Contacts
- One (1) DSC PG9914 PowerG Motion Sensor
- Honeywell LT-Cable
DSC HS2064NK 10-1 Verizon LTE Kit
- 64-Zone DSC PowerSeries NEO
- DSC HS2LCDRF9 N NEO Keypad
- DSC TL880LTVZ N Verizon LTE & IP Communicator
- Ten (10) DSC PG9303 PowerG Door/Window Contacts
- One (1) DSC PG9914 PowerG Motion Sensor
- Honeywell LT-Cable
DSC HS2128NK 3-1 AT&T LTE Kit
- 128-Zone DSC PowerSeries NEO
- DSC HS2LCDRF9 N NEO Keypad
- DSC TL880LEAT N AT&T LTE & IP Communicator
- Three (3) DSC PG9303 PowerG Door/Window Contacts
- One (1) DSC PG9914 PowerG Motion Sensor
- Honeywell LT-Cable
DSC HS2128NK 3-1 Verizon LTE Kit
- 128-Zone DSC PowerSeries NEO
- DSC HS2LCDRF9 N NEO Keypad
- DSC TL880LTVZ N Verizon LTE & IP Communicator
- Three (3) DSC PG9303 PowerG Door/Window Contacts
- One (1) DSC PG9914 PowerG Motion Sensor
- Honeywell LT-Cable
DSC HS2128NK 10-1 AT&T LTE Kit
- 128-Zone DSC PowerSeries NEO
- DSC HS2LCDRF9 N NEO Keypad
- DSC TL880LEAT N AT&T LTE & IP Communicator
- Ten (10) DSC PG9303 PowerG Door/Window Contacts
- One (1) DSC PG9914 PowerG Motion Sensor
- Honeywell LT-Cable
DSC HS2128NK 10-1 Verizon LTE Kit
- 128-Zone DSC PowerSeries NEO
- DSC HS2LCDRF9 N NEO Keypad
- DSC TL880LTVZ N Verizon LTE & IP Communicator
- Ten (10) DSC PG9303 PowerG Door/Window Contacts
- One (1) DSC PG9914 PowerG Motion Sensor
- Honeywell LT-Cable
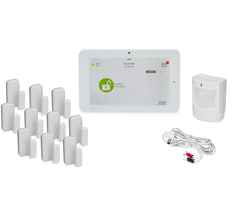
Qolsys IQ Panel 2 Plus Kits
Last week, we announced several "encrypted" Qolsys Kits that were based around the IQ Panel 2 Plus and PowerG Sensors. Today, we have some non-encrypted kits for the 345 MHz and 433 MHz IQ Panel 2 Plus models. Unlike the kits introduced last week, these kits use uni-directional "non-encrypted" sensors. We actually already had similar kits available for the 319.5 MHz IQ Panel 2 Plus, but now the 345 MHz and 433 MHz versions are joining the fray!
An added bonus about these kits - we actually do include an encrypted PowerG Motion Sensor. It's only the door/window contacts that aren't encrypted. These kits are good if you don't necessarily care about encryption, and you want to save money versus buying the fully encrypted kits.
Qolsys IQ Panel 2 Plus 345 MHz AT&T LTE 3-1 System Kit
- 345 MHz IQ Panel 2 Plus System w/ AT&T LTE
- Three (3) VERSA-2GIG Door/Window Contacts
- One (1) DSC PG9914 PowerG Motion Sensor
Qolsys IQ Panel 2 Plus 345 MHz Verizon LTE 3-1 System Kit
- 345 MHz IQ Panel 2 Plus System w/ Verizon LTE
- Three (3) VERSA-2GIG Door/Window Contacts
- One (1) DSC PG9914 PowerG Motion Sensor
Qolsys IQ Panel 2 Plus 345 MHz AT&T LTE 10-1 System Kit
- 345 MHz IQ Panel 2 Plus System w/ AT&T LTE
- Ten (10) VERSA-2GIG Door/Window Contacts
- One (1) DSC PG9914 PowerG Motion Sensor
Qolsys IQ Panel 2 Plus 345 MHz Verizon LTE 10-1 System Kit
- 345 MHz IQ Panel 2 Plus System w/ Verizon LTE
- Ten (10) VERSA-2GIG Door/Window Contacts
- One (1) DSC PG9914 PowerG Motion Sensor
Qolsys IQ Panel 2 Plus 433 MHz AT&T LTE 3-1 System Kit
- 433 MHz IQ Panel 2 Plus System w/ AT&T LTE
- Three (3) VERSA-DSC Door/Window Contacts
- One (1) DSC PG9914 PowerG Motion Sensor
Qolsys IQ Panel 2 Plus 433 MHz Verizon LTE 3-1 System Kit
- 433 MHz IQ Panel 2 Plus System w/ Verizon LTE
- Three (3) VERSA-DSC Door/Window Contacts
- One (1) DSC PG9914 PowerG Motion Sensor
Qolsys IQ Panel 2 Plus 433 MHz AT&T LTE 10-1 System Kit
- 433 MHz IQ Panel 2 Plus System w/ AT&T LTE
- Ten (10) VERSA-DSC Door/Window Contacts
ꞏOne (1) DSC PG9914 PowerG Motion Sensor
Qolsys IQ Panel 2 Plus 433 MHz Verizon LTE 10-1 System Kit
- 433 MHz IQ Panel 2 Plus System w/ Verizon LTE
- Ten (10) VERSA-DSC Door/Window Contacts
- One (1) DSC PG9914 PowerG Motion Sensor
2GIG GC3e AT&T LTE Kits
Last up, we have some new 2GIG GC3e Kits. As we announced yesterday, the 2GIG GC3e AT&T LTE Communicator is finally here, and that means mores GC3e Kits! These are just like the Verizon Kits we announced last week, only with a different communicator.
2GIG GC3e AT&T LTE 3-1 Kit
- 2GIG GC3e System
- 2GIG LTEA-A-GC3 AT&T LTE Communicator
- Three (3) 2GIG DW10e Door/Window Sensors
- One (1) 2GIG PIR1e Motion Sensor
- Honeywell LT-Cable
2GIG GC3e AT&T LTE 10-1 Kit
- 2GIG GC3e System
- 2GIG LTEA-A-GC3 AT&T LTE Communicator
- Three (3) 2GIG DW10e Door/Window Sensors
- One (1) 2GIG PIR1e Motion Sensor
- Honeywell LT-Cable
Reach Out To Us!
If you have any questions about these kits, or if you need help deciding on the best one, please reach out to us. The best way to contact us is at support@alarmgrid.com. Or if you prefer to call, you can reach us at (888) 818-7728 during our usual business hours of 9am to 8pm EST M-F. We look forward to hearing from you!


 In order to use this communicator, your 2GIG GC3 or 2GIG GC3e System must be running Firmware Version 3.2.3 or higher. This update can be pushed down to your panel from Alarm.com by your monitoring company for a small fee. Alarm Grid customers can contact us to do this. You can also apply the update locally at the panel using a USB drive. Updating locally is completely free. More information on how to apply the update locally can be found