A couple of weeks ago, we released a complete guide to door contact sensors. Today, we're taking a look at alarm window contacts. Admittedly, there's not much difference between door sensors and window sensors. Many can be used interchangeably. But there are a few tips to keep in mind.
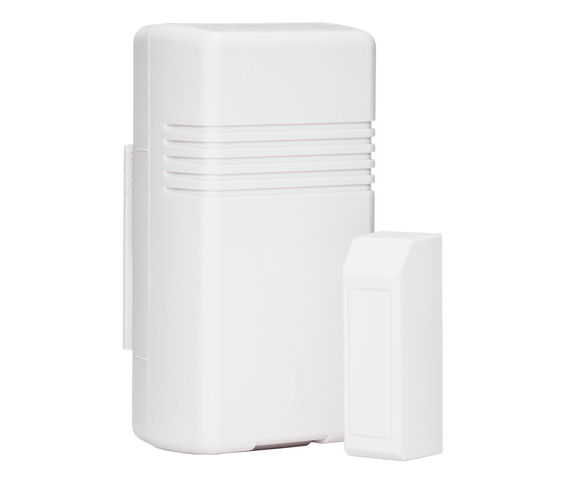
 First, let's review how alarm contacts actually work. It is the same general process for both doors and windows. These devices consist of two portions, those being a sensor and a magnet. When the sensor and magnet are in direct contact or very close proximity, a reed switch inside the sensor will remain closed. Once the magnet becomes separated from the sensor, the reed switch will be released, and the sensor will know to alert the system to let it know that the structure has been opened.
The key with window contacts is to place them so that when the window is opened, the magnet and the sensor will become separated. But when the structure is closed, the sensor are magnet will remain in direct or near-direct contact. It is almost always recommended to place the sensor on the stationary frame of the window and the magnet on the moving portion of the window that is opened and closed. This will prevent the more valuable sensor from being pushed around and potentially damaged. The magnet is designed to take much more abuse and use than the sensor itself. Positioning the sensor this way will also make it easier to wire the sensor if a hardwired contact is being used.
 One special note with window contacts is that they are only designed to let a system know when a window has been opened normally. If an intruder smashes a window to gain entry, they will avoid activating a window contact, as long as the sensor remains in contact with its magnet. This means that they might be able to gain entry without setting off an alarm. Fortunately, there are two other types of sensors that can be used to alert an alarm system to a broken window. These are glass break sensors and shock sensors. Glass break sensors detect the audible sound of a window being broken, while shock sensors detect the physical vibrations associated with a broken window. However, these sensors are used for intrusion support only. Unlike a standard window contact, they will not let the user know if the window has merely been left open by accident. But they are still recommended for users who want to know if a window has been broken. We generally prefer glass break sensors over shock sensors, since they tend to work more reliably. It can also be helpful to use monition detection sensors alongside standard window contacts to detect any movement in the building.

Just like door sensors, window sensors can be either surface-mounted or recessed. Another major distinction is whether they are wireless or hardwired. So really, window sensors can be grouped into four major types. These are wireless surface-mounted, wireless recessed, hardwired surface-mounted and hardwired recessed. Choosing the perfect variation for your window and the type of installation you want to perform is crucial for success. Fortunately, it's relatively easy to decide on the perfect type of window sensor for your needs.
Simply put, surface-mounted sensors are installed on the exterior surface of the window and its frame. This means that they will be visible when looking at window. However, these sensors are usually very small and discreet, so they won't normally be drawing direct attention to themselves. A major advantage to surface-mounted sensors is that they are very easy to install, since no holes necessarily need to be drilled. Instead, many surface-mounted sensors and magnets can be mounted using double-sided foam tape.
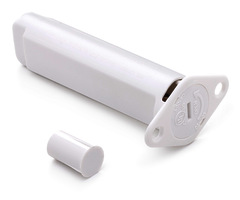
The other option is to use recessed sensors. These sensors are hidden inside the window and its frame so that they are out of view. To do this, holes must be drilled into both the window and its frame for the magnet and sensor. Using recessed sensors for windows is somewhat less common than it is for doors. This is because some windows don't have an effective solution for drilling a hole to insert a magnet. Additionally, some window manufacturers put disclaimers stating that drilling holes into the window will void its warranty. But if the window has space for a hole to be drilled so that the magnet can be accommodated, then a recessed window sensor can certainly work. Please note that recessed plunger switches aren't normally used with windows, but there's no definitive reason why they couldn't work in certain situations.
A special mention needs to go to the Honeywell 5800Micra. This is a recessed alarm contact specifically designed for use with windows. The advantage to the 5800Micra is that only one hole needs to be made in the window frame for the sensor. The magnet is small enough that it can be surface-mounted on the side or bottom of the window. It uses an adhesive backing to remain securely in place. This is a great way to achieve a recessed installation without having to void the manufacturer's warranty for your window. Please note that the Honeywell 5800Micra is a wireless sensor that operates at 345 MHz. It is part of the Honeywell 5800 Series, and it will only work with compatible systems.
 Users must also decide between wireless and hardwired sensors for their windows. Wireless sensors are much easier to install, since no wires need to be run. They are the recommended option for almost any DIY installer. Assuming that you have a wireless system with a wireless receiver, there is almost certainly a contact that will work for you. Just make sure that the sensor operates at a frequency that is compatible with your panel. The most common wireless frequencies at 319.5 MHz, 345 MHz, 433 MHz and 915 MHz. Additionally, the encrypted Honeywell SiX Series Contacts, the Honeywell SiXCT and Honeywell SiXMINICT operate at 2.4 GHz WIFI.
If you go with hardwired contacts, the installation will be more challenging, since wires must be run. This can sometimes be an impossible task for the typical DIY user. However, there are two distinct advantages that make hardwired window sensors suitable for certain applications. For one, having them integrate with the building can add to the property value. Users also appreciate the fact that they never need to replace batteries for hardwired sensors.
Below is a table that outlines many of the window contacts available for purchase on the Alarm Grid site. It's actually the same as the one posted for our door contacts guide, only with some minor tweaks for windows. Make special note of the Honeywell 5800Micra at the very bottom!
Sensor Name
|
Communication Frequency
|
Surface-Mounted or Recessed
|
Special Notes
|
|
VERSA-GE
|
319.5 MHz
|
Surface-Mounted
|
Same as 5800MINI, but for 319.5 MHz Systems.
|
|
VERSA-2GIG
|
345 MHz
|
Surface-Mounted
|
Same as 5800MINI, but will only work with 2GIG Systems, the Honeywell Lyric Controller, and the IQ Panel 2 Plus with 345 MHz Daughercard.
|
Honeywell 5800MINI
|
345 MHz
|
Surface-Mounted
|
Very popular slim sensor that is used with Honeywell Systems.
|
|
Honeywell SiXMINICT
|
2.4 GHz
|
Surface-Mounted
|
Encrypted 2.4 GHz Sensor designed for use with Lyric System only. It is smaller and more discreet than the similar SiXCT, but offers less range. Uses 128-bit AES encryption.
|
|
Honeywell SiXCT
|
2.4 GHz
|
Surface-Mounted
|
Encrypted 2.4 GHz Sensor designed for use with Lyric System only. Larger than the SiXMINICT, but offers superior range. Uses 128-bit AES encryption.
|
|
Qolsys IQ DW MINI-S
|
319.5 MHz
|
Surface-Mounted
|
Encrypted S-Line Sensor. Will only utilize encryption when used with an IQ Panel 2 or IQ Panel 2 Plus System. Otherwise operates as standard unencrypted sensor. Mini version of IQ Door Window-S.
|
|
Honeywell 5818MNL
|
345 MHz
|
Recessed
|
Recessed sensor from Honeywell 5800 Series. Requires 0.75" diameter hole that is 3" deep to be drilled in the window frame. Hole must also be drilled into the window for the magnet. |
|
Honeywell 5820L
|
345 MHz
|
Surface-Mounted
|
Slim Line sensor that is great for applications that require a thinner sensor.
|
|
2GIG DW10
|
345 MHz
|
Surface-Mounted
|
Door contact designed by 2GIG. Will only work with 2GIG Systems, the Honeywell Lyric Controller, and the IQ Panel 2 Plus with 345 MHz Daughtercard.
|
|
Honeywell 5816
|
345 MHz
|
Surface-Mounted
|
Honeywell's most popular wireless sensor! Also includes a wireless transmitter for a normally closed hardwired device.
|
|
DSC PG9945
|
915 MHz
|
Surface-Mounted
|
PowerG Sensor with up to 2km range. Also features an auxiliary input and wireless transmitter for a normally closed hardwired device. Uses 128-bit AES encryption.
|
|
Qolsys IQ Door Window-S
|
319.5 MHz
|
Surface-Mounted
|
Encrypted S-Line Sensor. Will only utilize encryption when used with an IQ Panel 2 or IQ Panel 2 Plus System. Otherwise operates as standard unencrypted sensor. Larger version of IQ DW MINI-S.
|
|
Interlogix TX-E221
|
319.5 MHz
|
Recessed
|
Relatively standard recessed sensor that works with 319.5 MHz systems.
|
|
2GIG DW20R
|
345 MHz
|
Recessed
|
Recessed contact from 2GIG. Will only work with 2GIG Systems, the Honeywell Lyric Controller, and the IQ Panel 2 Plus with 345 MHz Daughtercard.
|
|
DSC PG9975
|
915 MHz
|
Surface-Mounted
|
PowerG vanishing surface-mounted contact with thin profile. Great for any standard application where PowerG Sensors are supported.
|
|
Qolsys IQ Recessed Door-S
|
319.5 MHz
|
Recessed
|
Encrypted recessed sensor from Qolsys. Will only utilize encryption when used with an IQ Panel 2 or IQ Panel 2 Plus System. Otherwise operates as standard unencrypted sensor.
|
|
Qolsys IQ Mini
|
319.5 MHz
|
Surface-Mounted
|
Standard door and window contact from Qolsys. Same as IQ DW MINI-S, but without encryption features.
|
|
DSC WS4945
|
433 MHz
|
Surface-Mounted
|
Surface-mounted door contact for 433 MHz DSC Systems.
|
|
DSC EV-DW4975
|
433 MHz
|
Surface-Mounted
|
Slim line version of DSC WS4945.
|
|
DSC EV-DW4917
|
433 MHz
|
Recessed
|
Recessed contact for 433 MHz DSC Systems.
|
|
Qolsys IQ DW Standard
|
319.5 MHz
|
Surface-Mounted
|
Unencrypted version of Qolsys IQ Door Window-S.
|
|
Honeywell 951WG
|
Hardwired
|
Recessed
|
Recessed hardwired contact with leads. Measures 3/8" in diameter.
|
|
Honeywell PAL-T
|
Hardwired
|
Surface-Mounted
|
Currently the smallest hardwired surface-mounted contact offered from Alarm Grid.
|
|
Honeywell 7939WG
|
Hardwired
|
Surface-Mounted
|
Relatively standard hardwired surface-mounted contact manufactured by Honeywell.
|
|
Honeywell 944T
|
Hardwired
|
Recessed
|
Recessed hardwired contact with screw terminals. Measures 3/8" in diameter.
|
|
Honeywell 944TSP
|
Hardwired
|
Recessed
|
Recessed hardwired contact with screw terminals. Measures 3/4" in diameter.
|
|
Honeywell 7939-2
|
Hardwired
|
Surface-Mounted
|
Basically same as Honeywell 7939WG, but is Form C for normally closed or normally open wiring.
|
|
Honeywell 940
|
Hardwired
|
Surface-Mounted
|
Relatively standard hardwired surface-mounted contact manufactured by Honeywell.
|
|
Honeywell MPS5
|
Hardwired
|
Recessed
|
Recessed contact with leads and diameter of 1/4".
|
|
Honeywell 944SP
|
Hardwired
|
Recessed
|
Recessed contact with leads and diameter of 3/4".
|
| Honeywell 5800Micra |
345 MHz |
Recessed
|
One of our favorite recessed contacts, designed exclusively for windows! Magnet is surface-mounted and does not require a drilled hole. This can allow for a recessed installation without voiding the warranty for the window.
|
If you need any help deciding on the perfect window sensor, do not hesitate to reach out to us! You may email us at support@alarmgrid.com or call us at (888) 818-7728 during our normal business hours, which are 9am to 8pm EST M-F. We also encourage you to check out our monitoring page for more information about the services we offer. We look forward to hearing from you!
 When a customer hires an installer to setup their security equipment, it's very possible that they will spend hundreds or even thousands of dollars. This will depend on the installer itself and the extent of the installation. It can seem like a daunting task - the panel needs to be installed, the sensor need to be mounted, all wiring must be completed, and everything needs to be programmed.
  But what about mounting the panel? That has to be difficult, right? Wrong. Sure, you can drill holes and fish wires if you want to. But most of the wireless alarm panels used today can be attached to a simple desk mount. Just slide and click, and now your security panel can be rested conveniently on a desk or table for quick access. Suddenly your difficult and challenging installation has been reduced to something that could be completed by any member of your family in a matter of seconds.
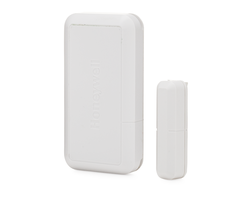 So now, you have a panel set up and sensors installed. How about programming the sensors to the panel? This is also easy. Every newly purchased panel comes with a default Installer Code that can be used to access programming. This is where new sensors are enrolled with the security system. Once you've programmed a sensor, configuring the others is mostly just a process of repetition. Sure, you might need to adjust a few settings, but this is simple.


 When a 5800 Series Sensor is activated, it sends a wireless 345 MHz signal to let the
  The Honeywell 5816OD takes its name from two places. The "5816" portion is a direct reference to Honeywell's most popular wireless sensor, the

 Before we get into general door contacts that would be used for most applications, we want to make special mention of some more unique sensors that would be used for specific setups.
 The 5800FLOOD is a great device for anyone who needs reliable monitoring for water leaks or potential flooding. The sign of a good