Qolsys has done it again, leading the industry with a first-to-market product that suits nearly any need. They've taken the IQ Panel 4 and merged it with the DSC PowerSeries NEO. The result is a hybrid system. From a small home to a school, church, or hospital the IQ Pro can protect them all.
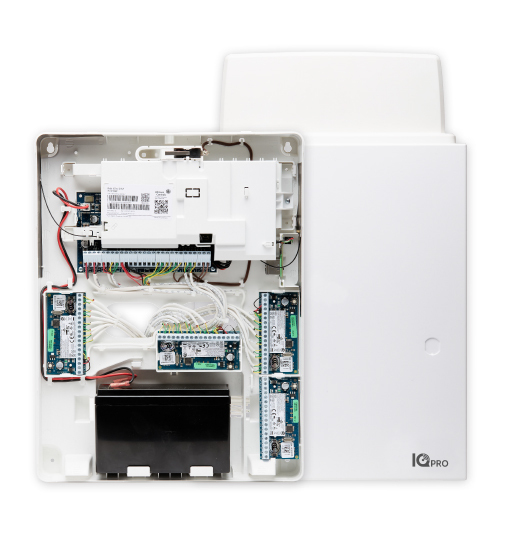
The Qolsys IQ Pro jumps right into the market with a Qualcomm SnapDragon 8 Core SOM (System On a Module) processor and 16GB of NAND Flash Memory. It supports up to 128 zones, 8 partitions, 1000 users, and 16 keypads (wired or wireless). All IQ Pro panels offer PowerG and some also have an optional, built-in legacy wireless receiver.
It also has Dual-Path LTE and WiFi or Ethernet internet communication capability. It is available with an AT&T, Verizon, or Telus(Canada) cellular option. Also, as pictured above, it comes in either a plastic enclosure (left front) or a metal enclosure (right rear). The metal enclosure is the only enclosure option that will accept an external antenna.
The IQ Pro communicates through Alarm.com. When dual-path communication is enabled, it will send every alarm signal through both available paths. The signal that reaches Alarm.com first is processed, and the slower signal is disregarded. In this way, Alarm.com always ensures that each individual signal uses the fastest available path to communicate.
For Alarm Grid customers, a plan that includes cellular communication is required to activate the IQ Pro. Use of the WIFI or Ethernet path is optional, but the LTE cellular communicator must be registered with Alarm.com in order to activate the system for any type of monitoring. With Alarm Grid's Self Monitoring, all signals are sent from Alarm.com to the end-user via text, email, push notification, or any combination of those options. There is no central station involved.
For Full Monitoring customers, each signal is sent to Alarm.com and they forward the signals to the appropriate central station, and to the customer via text, email, push notification, or some combination of those options. The Alarm.com website or app is also how the customer can log in and control their system, check system status, and control automation devices, including Z-Wave devices that are connected to the panel. Alarm.com also offers many third-party automation options, such as the use of MyQ garage doors, Rachio or Rainbird irrigation, Sonos whole-house speaker systems, and many more. Both Self Gold and Full Gold Alarm Grid customers will have remote control options. Customers who aren't interested in remote control and automation options can choose the Alarm Grid Cellular Alarm Monitoring Plan.
The IQ Pro panel can be expanded by adding hardwired zones, an addressable wired loop, and/or variable wireless options. Adding hardwired zones requires an HSM2108 module. Each of these modules added provides an additional eight (8) hardwired zones, up to the max of 128 total zones. An addressable wired loop is usually used in a situation where the wire run for the devices is longer than usual, and may be more spread out. If you are replacing a system that has some type of addressable loop in place, you can choose to keep those points protected with wired devices by purchasing the corresponding compatible MX device (see table below) or replace them with PowerG wireless sensors.
There are multiple keypad options. The panel can support up to a maximum of sixteen (16) hardwired, or DSC NEO touchscreens (with a firmware update to the keypad via SD card), up to five (5) wireless or PowerG IQ remotes, and up to three (3) WIFI IQ Remote touchscreens.
For those who only plan to use the PowerG long-range, encrypted sensors, there is the PowerG-only IQ Pro. Or in addition to PowerG, users can also choose either a 345 MHz Honeywell or 2GIG compatible, 319.5 MHz Qolsys or Interlogix/GE compatible, or 433 MHz legacy DSC compatible model. With each also having a choice between a metal or a plastic enclosure.
The IQ Pro can also support up to ten (10) PowerG PIR Cameras such as the PG9944 Outdoor Motion Camera, or the indoor PG9934P PIR Camera. It has four (4) onboard programmable outputs and is expandable with up to 148 outputs. These relays are customizable according to your needs.
The IQ Pro has incorporated an addressable MX loop. By adding an HSM3105 module to the system, you can build out an addressable loop with up to 124 devices. In low-power mode, the MX addressable loop will get its power from the IQ Pro Corbus, which is how the MX module connects to the panel. In this configuration, the HSM3105 can be mounted inside the IQ Pro cabinet or in an approved external cabinet. In this mode, the MX Loop can have a maximum current draw of 67mA at 40V (equivalent to 360mA @ 11.3V or 325mA @ 12.5V). Wiring between the IQ Pro and the HSM3105 must not exceed 3' (1m) using 22 gauge wire, regardless of which power mode is used.
There is also an option to add an HSM2300 or an HSM2204. The HSM2300 is a power supply module that provides an additional 1A of current. The HSM2204 is a power supply and PGM module combined. It can provide an additional 1A of current and four (4) high-current programmable outputs. When used with either power supply, the power supply and the HSM3105 should be mounted in an approved auxiliary enclosure next to the main panel. This configuration is called high-power mode where the power supply connects to the Corbus, and the HSM3105 connects to the power supply. The HSM2300 and HSM2204 can only provide up to 228mA @ 40V (1000mA @ 12.5V) or 260mA @ 40V (1000mA @ 11.3V).
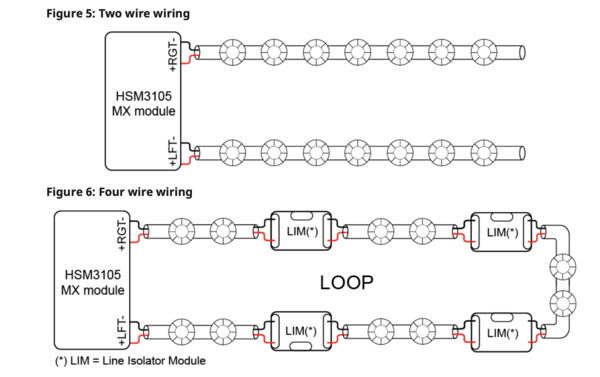
The HSM3105 has four (4) terminals for the MX Loop. This allows you to set it up in either a 4-wire "loop" configuration or a 2-wire "spur" configuration (see image below). The 4-wire loop configuration starts at one set of (+) and (-) terminals on the left side and terminates at the other set of (+) and (-) terminals on the right. The 2-wire spur configuration uses the left and/or right set of (+) and (-) terminals and terminates in the field at the last device.
Configuring the HSM3105 is done via the IQ Installer app, which is available as a free download from the Apple App Store or the Google Play Store. The family of MX devices includes a wide range of sensors to protect almost any environment. Each MX device uses the connection from the HSM3105 to get its power, whether the loop is in low-power or high-power mode.
MX Devices
Compatible Addressable Loop Devices
| Model #
|
Description
|
|
MX945
|
Universal Input
|
|
MX916
|
Smoke/Heat Detector
|
|
MX862
|
360 Ceiling Mount PIR
|
|
MX920
|
Line Isolator Module
|
|
MX922
|
Glass Break Detector
|
|
MX926
|
Smoke Detector
|
|
MX936
|
Heat Detector
|
|
MX975
|
Door/Window Contact
|
|
MX974
|
PIR w/ Pet Immunity
|
|
MXBASE
|
4" Fire Base
|
|
MX916KT
|
Smoke/Heat Detector w/ 4" MXBASE
|
|
MX926KT
|
Smoke Detector w/ 4" MXBASE
|
|
MX936KT
|
Heat Detector w/ 4" MXBASE
|
Qolsys IQ Pro Panels with Verizon LTE Communicator:
Qolsys IQ Pro Panels with AT&T LTE Communicator:
The Qolsys IQ Pro is sure to be a crowd pleaser! With support for PowerG wireless, legacy wireless, multiple keypad types, wired expansion when it's needed, dual-path communication, including LTE wireless, optional Bluetooth disarming, and support for Z-Wave Plus, it has just about every feature you could want in a modern alarm system. If you've been looking for the perfect system, you can stop, it's right here.