DIY Wireless Security Systems Posts

Posted By

Alarm.com has recently announced that they will soon be dropping support for the Internet Explorer 11 web browser. The new change is being made to improve the overall experience for Alarm.com end users. Alarm.com recommends using a supported web browser or the Alarm.com Mobile App.


Beginning on Tuesday, May 26, 2020, Alarm.com will display a pop-up message to anyone who logs in using Internet Explorer 11. The message will let them know to switch to a supported web browser. The user will then be able to use Alarm.com like normal. But a month later in late June, Alarm.com will stop supporting IE11 entirely. Anyone who tries to login using IE11 will be denied.

According to Alarm.com, the best web browsers to use with their platform are the latest versions of Google Chrome, Mozilla Firefox, Apple Safari, and Microsoft Edge. If you already use one of these web browsers, then you should have no problems using Alarm.com. Just make sure that you are running the latest version and make an upgrade if necessary.

If you have any questions about this change for Alarm.com, or if you are interested in starting monitoring service for use with Alarm.com, please email us at support@alarmgrid.com. Our team checks email from 9am to 8pm ET M-F. We look forward to hearing from you and helping you get the most out of Alarm.com.

Tags: , , , , , , , , , , , , , , , , ,

Comments


Posted By

Hi DIYers! Today, we're presenting our own guide for installing the Qolsys IQ Panel 2 Plus. This system is very easy to use, and it can be installed by virtually anyone using nothing more than a screwdriver! This is the perfect security system for your home, office, or apartment!

Qolsys iq panel 2 at and t wireless security system with at and Most of the information presented in this post can be found in the Qolsys IQ Panel 2 DIY Installation Manual. You are free to follow along with that manual, which can be found here. We also have three (3) videos that we will include along the way. Feel free to follow along with those as well. All of this information applies to both the original IQ Panel 2 and the newer IQ Panel 2 Plus. With that out of the way, let's get started!

The first thing you will want to do is power on the system. The Qolsys IQ Panel 2 Plus comes with everything you need to get started. Once you have opened up the box, you should locate the panel, the power supply transformer, the power wire, the panel back cover, and the table stand. You will also want to have a screwdriver on hand.


Start by connecting the spade lugs of the power cable to the transformer. The IQ Panel 2 Plus uses DC power, so you must make sure to follow polarity. That means connecting the positive (+) wire and negative (-) wire accordingly. The positive and negative ends on the IQ Panel 2 power cable are marked for this purpose. The positive (+) wire has grey dashes and ends in a red spade connector. The negative (-) wire is solid white without grey dashes and ends in a black spade connector. Make sure that the wires are connected with the proper terminals on the transformer. You can see the positive (+) and negative (-) terminals marked on the transformer. The connection should be nice and snug, but not overly tight.

From there, you can connect the other end of the power cable to the IQ Panel 2 Plus System. There is a simple barrel connection for this purpose. The transformer can then be plugged into a wall outlet. When applying the panel back cover, make sure to run both the power cable and the thin RF receiver cable out from the indentation on the back cover. The back cover should snap nicely into place. The convenient table stand can be installed by putting it into the keyhole slots on the back of the panel and then sliding up. You can power on the system by pressing and holding the side power button until the system LED remains lit.


After the system powers on and boots up, you will be greeted by the Setup Wizard. It is recommended that you go through the Setup Wizard, as it will walk you through the entire setup process. Note that some steps of the Wizard will require you to activate the system for monitoring service. This involves registering the panel's built-in cellular communicator with Alarm.com. This is optional for initial set up. You can always register the cellular communicator with Alarm.com later.

Remember that activating the system is something you will definitely want to do before too long, as that is the only way for it to send out signals to you and/or a central station. Remember that you will need to provide the IMEI Number for the system in order for your monitoring company to activate the cellular communicator. This can be found on a sticker on the back of the panel. It will also be shown as you move through the Wizard.

You will do several things as you go through the Setup Wizard. You will connect the system to a WIFI network, run an initial check for the system, add sensors, perform an initial sensor test, set up the built-in panel glass break sensor, add Z-Wave home automation devices, pair your phone for automatic Bluetooth disarming, pair secondary IQ Remote Keypads, and add system users. Remember that you will want to have a good idea of Sensor Groups when enrolling sensors. You can learn all about the IQ Panel 2 Sensor Groups in this helpful FAQ.


The last thing you will want to do is install your sensors. We only focused on door and window contacts and motion sensors, but many of the same principles apply across any sensor type. What's great about wireless sensors that are used with the IQ Panel 2 Plus is that they can be mounted without drilling holes into the wall or using any power tools. You can safely mount and secure these sensors using double-sided foam tape. Most wireless sensors come with their own double-sided tape for this purpose, or you can buy some off our site!

There are a few general tips when mounting these sensors. When mounting door and window contacts, you should have the magnet on the moving structure of the door or window, and the sensor itself on the door or window frame. Make sure the magnet is aligned with any indication marker shown on the sensor. Also remember to keep the magnet spacing gap in mind. Most Qolsys Door and Window Sensors allow for a magnet spacing gap of up to 0.75 inches.


As for motion sensors, you should have them mounted flat on a wall or corner-mounted. But keep in mind that only a flat-mount will allow you to install without drilling any holes. The motion sensor should be nice and level, and it should be installed at a height between 6 and 8 feet. Qolsys recommends 7.5 feet, which provides the best possible results. The motion sensor should not be facing any windows, vents, or air ducts. It should also not be facing any nearby furniture or stairwells if you have pets!

Most importantly, remember to test ALL your sensors after the final installation!


And that wraps up our Part 1 Guide for installing and using the Qolsys IQ Panel 2 Plus. Look forward to Part 2 coming soon! If you have any questions about the Qolsys IQ Panel 2 Plus or our monitoring service, please reach out to us by emailing support@alarmgrid.com. Remember that our support hours are from 9am to 8pm ET M-F. We look forward to hearing from you!

Tags: , , , , , , , , , , , , , , , , , , , , , , , , , , , , , ,

Comments


Posted By

If you have a security system, then you will want to make sure that it can detect intruders coming into your home. But predicting how an intruder will enter your home can be easier said than done. You need to be prepared for all situations. Here are the Top 5 ways intruders enter homes.

Alarm grid inside security stickers

Through the Front Door

It really shouldn't come as much of a surprise that many intruders simply walk right through a home's main point of entry - the front door. We've all forgotten to leave a door locked at some point. Many intruders will simply try the front door to see if it's unlocked. This is often associated with burglaries that aren't pre-meditated. Keep in mind that many burglars don't plan ahead of time. Instead, they just see a house that looks attractive, and walk in through the front door.

Arguably the most important sensors you should have enrolled with any security system are door contacts, and for good reason. These are the devices that will alert your system in case someone ever enters your home through the most obvious way. Door sensors are extremely easy to enroll, and there are so many different options available. You will have no trouble finding a door sensor that meets your needs and requirements.

Qolsys iq dw mini s encrypted wireless sensors for iq panel 2 qs

Breaking a Window

Not every intruder will enter your home in a "polite" manner. There are many burglars who won't hesitate to use brute force and smash in a glass window. And this can be more difficult to stop, as a locked window won't really stop an intruder from smashing. This isn't as common as walking in through an open door, but it certainly does happen, and you really should be prepared.

There are two sensor types that come to mind for detecting broken windows. The most obvious is a glass break sensor. These devices will actively listen for the sound of glass being broken, and they work great with nearly all types of windows. You might also consider installing motion sensors in rooms with windows. Then an intruder will be detected as soon as they enter through the window. It is always a good idea to back up a glass break sensors with a good motion sensor. There are instances where a glass break sensor cannot detect glass breaking. An example of this is when a bullet is fired through glass.

Honeywell sixgb wireless glass break detector

Through the Garage Door

Forgetting to close your garage door on an attached garage can provide easy access to your home. It can be easy to have that daily task slip your mind. There are many times when we get home tired after a long day, and just forget to close the garage door. Or maybe you forgot to close it as you were leaving for work. It happens to all of us. But a potential burglar walking by will see this as an opportunity!

Just like the other points of entry for your home, garage doors can be monitored. There are special garage door sensors available for this exact purpose. You might also consider getting a Z-Wave garage door controller for the system. This way, you can use Total Connect 2.0 or Alarm.com to close your garage door from pretty much anywhere. This is great if you ever forget to close it!

Honeywell 5822t wireless garage tilt sensor

Climbing a Tree or Fence

Okay, you might think this is a bit silly, but we're serious here. If you have a multi-story house, don't think that an intruder will hesitate to use your home's surrounding to gain entry to a higher floor. This could include climbing a tree or a large fence and then entering through an unlocked window. Like we said, it's best to be prepared for any and all situations.

There are a few things you might do to combat this. The most obvious is to always make sure all your windows are locked, even the ones that cannot be easily accessed. But you might also want one or more outdoor motion sensors to detect any movement that may occur around your home. Outdoor security cameras are also a great idea!

Interlogix tx 2810 01 4 internals wireless outdoor pir motion de

Skylights

If your home has skylight windows, don't rule them out as a point of entry for an intruder! These high up windows look great in a home, but they can be easy pickings for a burglar who can reach these points. This isn't something every homeowner will need to worry about, but do keep this possibility in mind if your house has this decorative feature.

Many of the previously mentioned devices are good for monitoring skylights. You can put motion sensors in a room with skylights for the system to detect if anyone comes in from high above. Glass skylights are also perfect for use with glass break detectors. And installing some security cameras in the room never hurts!

Alarm dot com adc v522ir indoor 1080p fixed camera with night vi

Alarm Grid is here to help you provide top-quality protection for your home. We have all the gear you need to make sure that your system can detect intruders from any point of entry. If you need help choosing equipment, or if you want to learn more about our monitoring services, please reach out to us. The best way to contact us is to email support@alarmgrid.com. You may also call us at (888) 818-7728. Remember that our support hours are from 9am to 8pm ET M-F. We look forward to hearing from you and helping you set up the perfect security system!

Tags: , , , ,

Comments


Posted By
Fill out my online form.

Hi DIYers! Last week, we sent a small team to Silicon Valley, California to check out the 2019 Qolsys Summit. Needless to say, we were absolutely blown away with what Qolsys will soon be offering. Today, we would like to focus on some of their new industry-changing products in the pipeline.


The biggest highlight of the Qolsys Summit was the opportunity to check out the newest upcoming panel from the company, the Qolsys IQ Hub. The IQ Hub represents the vision of Qolsys to bring home security closer and more accessible to the average consumer than ever before. This is truly the optimal system for any budget-conscious consumer who wants to bring state-of-the-art security and technology into their home. It is slated for a Q1 2020 release.

We do not have all the details on the Qolsys IQ Hub quite yet. But there is still a lot that we can talk about. The most obvious addition to the Qolsys IQ Hub is its prominent speaker on the front. Qolsys is expected to introduce some mind-blowing integrations for the system that will turn your alarm control panel into a compact entertainment center.

Remember that Alarm.com already offers an excellent Sonos integration. We are sure that the IQ Hub will take full advantage of this feature and truly put it to great use. Our team did get a chance to test the IQ Hub sound quality, and we can confirm it sounds just as good as any high-end portable speaker. This is highly impressive, and we expect many users to be thrilled that their alarm system can now essentially double as a party-starter.


The next aspect you will likely notice about the IQ Hub is its standout display screen. This is a 7" touchscreen display that appears to have even higher resolution than any existing security system on the market. We do not have the exact specifications on the screen just yet, but it certainly passes the eyeball test. And as you can see from the photo above, the slideshow feature returns. Get ready to show-off some of your best photos on the Qolsys IQ Hub!

As we mentioned earlier, Qolsys seems to be envisioning the IQ Hub as a way to make the home security market more accessible to the average consumer. The new system is not expected to replace the existing Qolsys IQ Panel 2 Plus, but it is anticipated to have a lower price point. We also expect many existing features to return to the IQ Hub, including built-in WIFI, Bluetooth connectivity, cellular LTE, and Z-Wave Plus functionality.

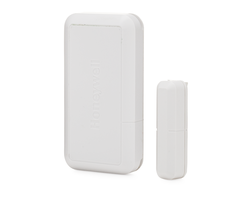
One thing that will not be returning to the IQ Hub is support for legacy sensors (e.g. 319.5 MHz, 345 MHz, and 433 MHz devices). The new system will be entirely PowerG, and you will need to use those sensors with the system. This is fine, as PowerG Sensors offer an impressive wireless range of up 2,000 feet when used with the IQ Hub in open air. They also utilize military grade 128-bit AES encryption in all their communication to ensure maximum wireless security.

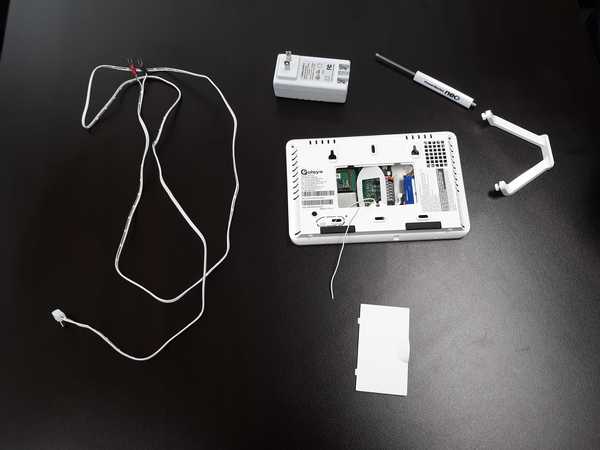
Another interesting note about the panel is that it is not designed to be opened up. This is a significant change from most existing security systems, where you will occasionally need to open up the panel to make hardware changes. The battery on the IQ Hub is sled-replaceable, and it can easily be swapped out by the end user with little effort. All of the hardware is built right in, so you will never have to make any changes in that regard. Talk about DIY friendly!


Qolsys made other various enhancements to the IQ Hub System. They touted an improved integrated camera, and it can even double as a motion sensor by detecting changes in pixelation. We also expect this feature to be used in conjunction with Alarm.com so that you can take a peak-in at your home while you're on the go. You will also notice the LED light on the front of the panel. This light changes colors to let you know the current system status. How cool!

The system also features a built-in microphone that you can use to get alerts regarding loud sounds. You can even adjust the minimum sound level required to trigger alerts. This is perfect for parents who want to know if their baby is fussing or for owners of rental properties who may want to be alerted if their guests are throwing a loud party. It's just another way that Qolsys is working hard to keep you connected with your home.

We do expect that there will be some hardware limitations of the IQ Hub when compared with the IQ Panel 2 Plus, especially when you consider the anticipated lower price point. Qolsys most likely reduced costs by dropping legacy sensor support. It's also possible that the IQ Hub will support fewer zones than the IQ Panel 2 Plus (128 zones). But we cannot confirm the exact number of zone on the IQ Hub at this time. The IQ Hub is also slightly larger than the existing IQ2+ due to the added speaker.

As stated earlier, the Qolsys IQ Hub is scheduled for a Q1 2020 release. This groundbreaking new system is sure to make some big waves in the security industry, and we are confident that it will help many new users get their start with home security. We can't wait for its release, and we hope you're excited too!


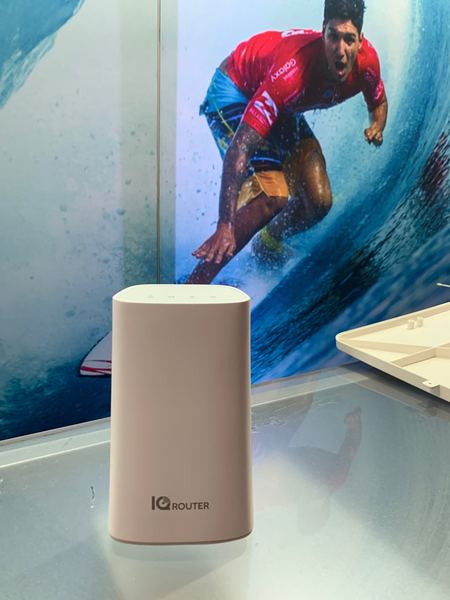
Qolsys also unveiled another interesting product at the event, the Qolsys IQ Router. At first glance, you might be wondering what's the big deal. What's so exciting about an IP router? Well Qolsys packed in some game-changing features that are sure to make the IQ Router the perfect addition to your IQ Hub or IQ Panel 2 Plus System. It is sure to make your life more convenient in many ways. And we can also confirm, it is dual-band with support for 2.4 GHz and 5 GHz!

At the basic level, the IQ Router is exactly what it sounds like, an internet router. It replaces the existing router for your home's IP network. But what you get with the router is pretty ingenious. Any Qolsys IQ Panel 2 System or Qolsys IQ Hub connected with the IQ Router can be accessed remotely by your alarm monitoring company for programming purposes. This is similar to what the DSC Iotega offers. But with the Qolsys Systems, it is optional rather than mandatory.

Of course, if you don't want your monitoring company accessing your panel, then you can disable the feature. But it's pretty nice if you want assistance with programming new devices. One thing you will certainly love is its ability to auto-discover your IQ Hub System and automatically enroll it with your WIFI network. You can even configure your IP settings right from the IQ Hub. This truly makes the IQ Hub the central controller for your entire network!

Another innovation from the IQ Router is the ability to auto-enroll guest WIFI devices. In other words you can get any visitors on your WIFI network, without making them enter a long, tedious password. The way this works is that your guest will request to join the network from their IP device. You will then approve the request from either your IQ Hub or an app on your phone. And just like that, your guest will be connected with your WIFI network. Super convenient!


As you will notice, the Qolsys IQ Router only has one (1) LAN port for connecting a hardwired ethernet device. This isn't a big deal, as most users might not even need one. If you need additional ports, then you can easily connect a network switch to the router and use it however you would like.

But one very exciting feature of the IQ Router is its ability to support up to eight (8) WIFI extenders or access points. This makes it truly suitable for even large commercial locations! The router facilitates a total mesh network to help ensure that all of your IP devices stay connected across even an incredibly expansive area. Whether your needs are big or small, you are sure to get great use out of the new IQ Router! Qolsys states that it should be out by the end of this year.

We would like to end this post with some smaller product announcements we heard at the Qolsys Summit. A PowerG 360-Degree Ceiling-Mount PIR Motion Sensor called the PG9862 was unveiled. This sensor is perfect for use in closets or in commercial locations where corner-mounting is not feasible. The PG9862 is available from Alarm Grid now, and you can get it right here.

Lastly, we heard rumors about a much-anticipated PowerG Wired to Wireless Converter. This is huge news, as it will allow you to takeover an existing hardwired system and use a Qolsys IQ Panel 2 Plus or Qolsys IQ Hub in its place. And of course, all your hardwired sensors will enjoy the amazing range and security of the PowerG wireless protocol. We do not have any other details on the PowerG Converter at this time, but we will definitely keep our eyes peeled.

We hope that you are eagerly awaiting all of these new products just like we are! This was truly an awesome event that Qolsys put on, and we are thankful that we got to be a part of it. We are hopeful that Qolsys hosts a similar gathering next year in 2020! For now, check out these new and upcoming products, and email us at support@alarmgrid.com if you have any questions or thoughts. Remember that our support hours are from 9am to 8pm EST M-F. As usual, we look forward to hearing from you!

Tags: , , , , , , , , , , , , , , , , , ,

Comments


Posted By

Hi DIYers! Just last week, we announced some of the new system kits that we are now offering on our site. Well today, we have even more kits to announce. We have new system kits featuring the DSC PowerSeries NEO, the 2GIG GC3e, and the 345 MHz and 433 MHz Versions of the IQ Panel 2 Plus.

Qolsys iq panel 2 at and t 10 1 kit alarm system kit w slash 10

DSC PowerSeries NEO Kits

The DSC PowerSeries NEO is a hardwired alarm system with some powerful features. It is generally best used in commercial settings, as it isn't going to be as DIY-friendly as a wireless alarm system. But if you need a hardwired system, then a DSC PowerSeries NEO might be the way to go. We are offering kits around the 16-zone, 32-zone, 64-zone, and 128-zone DSC PowerSeries NEO Systems. You can choose between AT&T LTE and Verizon LTE for all of the kits.


DSC HS2016NK 3-1 AT&T LTE Kit

  • 16-Zone DSC PowerSeries NEO
  • DSC HS2LCDRF9 N NEO Keypad
  • DSC TL880LEAT N AT&T LTE & IP Communicator
  • Three (3) DSC PG9303 PowerG Door/Window Contacts
  • One (1) DSC PG9914 PowerG Motion Sensor
  • Honeywell LT-Cable


DSC HS2016NK 3-1 Verizon LTE Kit

  • 16-Zone DSC PowerSeries NEO
  • DSC HS2LCDRF9 N NEO Keypad
  • DSC TL880LTVZ N Verizon LTE & IP Communicator
  • Three (3) DSC PG9303 PowerG Door/Window Contacts
  • One (1) DSC PG9914 PowerG Motion Sensor
  • Honeywell LT-Cable


DSC HS2016NK 10-1 AT&T LTE Kit
  • 16-Zone DSC PowerSeries NEO
  • DSC HS2LCDRF9 N NEO Keypad
  • DSC TL880LEAT N AT&T LTE & IP Communicator
  • Ten (10) DSC PG9303 PowerG Door/Window Contacts
  • One (1) DSC PG9914 PowerG Motion Sensor
  • Honeywell LT-Cable


DSC HS2016NK 10-1 Verizon LTE Kit
  • 16-Zone DSC PowerSeries NEO
  • DSC HS2LCDRF9 N NEO Keypad
  • DSC TL880LTVZ N Verizon LTE & IP Communicator
  • Ten (10) DSC PG9303 PowerG Door/Window Contacts
  • One (1) DSC PG9914 PowerG Motion Sensor
  • Honeywell LT-Cable


DSC HS2032NK 3-1 AT&T LTE Kit
  • 32-Zone DSC PowerSeries NEO
  • DSC HS2LCDRF9 N NEO Keypad
  • DSC TL880LEAT N AT&T LTE & IP Communicator
  • Three (3) DSC PG9303 PowerG Door/Window Contacts
  • One (1) DSC PG9914 PowerG Motion Sensor
  • Honeywell LT-Cable


DSC HS2032NK 3-1 Verizon LTE Kit
  • 32-Zone DSC PowerSeries NEO
  • DSC HS2LCDRF9 N NEO Keypad
  • DSC TL880LTVZ N Verizon LTE & IP Communicator
  • Three (3) DSC PG9303 PowerG Door/Window Contacts
  • One (1) DSC PG9914 PowerG Motion Sensor
  • Honeywell LT-Cable


DSC HS2032NK 10-1 AT&T LTE Kit
  • 32-Zone DSC PowerSeries NEO
  • DSC HS2LCDRF9 N NEO Keypad
  • DSC TL880LEAT N AT&T LTE & IP Communicator
  • Ten (10) DSC PG9303 PowerG Door/Window Contacts
  • One (1) DSC PG9914 PowerG Motion Sensor
  • Honeywell LT-Cable


DSC HS2032NK 10-1 Verizon LTE Kit
  • 32-Zone DSC PowerSeries NEO
  • DSC HS2LCDRF9 N NEO Keypad
  • DSC TL880LTVZ N Verizon LTE & IP Communicator
  • Ten (10) DSC PG9303 PowerG Door/Window Contacts
  • One (1) DSC PG9914 PowerG Motion Sensor
  • Honeywell LT-Cable


DSC HS2064NK 3-1 AT&T LTE Kit
  • 64-Zone DSC PowerSeries NEO
  • DSC HS2LCDRF9 N NEO Keypad
  • DSC TL880LEAT N AT&T LTE & IP Communicator
  • Three (3) DSC PG9303 PowerG Door/Window Contacts
  • One (1) DSC PG9914 PowerG Motion Sensor
  • Honeywell LT-Cable


DSC HS2064NK 3-1 Verizon LTE Kit
  • 64-Zone DSC PowerSeries NEO
  • DSC HS2LCDRF9 N NEO Keypad
  • DSC TL880LTVZ N Verizon LTE & IP Communicator
  • Three (3) DSC PG9303 PowerG Door/Window Contacts
  • One (1) DSC PG9914 PowerG Motion Sensor
  • Honeywell LT-Cable


DSC HS2064NK 10-1 AT&T LTE Kit
  • 64-Zone DSC PowerSeries NEO
  • DSC HS2LCDRF9 N NEO Keypad
  • DSC TL880LEAT N AT&T LTE & IP Communicator
  • Ten (10) DSC PG9303 PowerG Door/Window Contacts
  • One (1) DSC PG9914 PowerG Motion Sensor
  • Honeywell LT-Cable


DSC HS2064NK 10-1 Verizon LTE Kit
  • 64-Zone DSC PowerSeries NEO
  • DSC HS2LCDRF9 N NEO Keypad
  • DSC TL880LTVZ N Verizon LTE & IP Communicator
  • Ten (10) DSC PG9303 PowerG Door/Window Contacts
  • One (1) DSC PG9914 PowerG Motion Sensor
  • Honeywell LT-Cable


DSC HS2128NK 3-1 AT&T LTE Kit
  • 128-Zone DSC PowerSeries NEO
  • DSC HS2LCDRF9 N NEO Keypad
  • DSC TL880LEAT N AT&T LTE & IP Communicator
  • Three (3) DSC PG9303 PowerG Door/Window Contacts
  • One (1) DSC PG9914 PowerG Motion Sensor
  • Honeywell LT-Cable


DSC HS2128NK 3-1 Verizon LTE Kit
  • 128-Zone DSC PowerSeries NEO
  • DSC HS2LCDRF9 N NEO Keypad
  • DSC TL880LTVZ N Verizon LTE & IP Communicator
  • Three (3) DSC PG9303 PowerG Door/Window Contacts
  • One (1) DSC PG9914 PowerG Motion Sensor
  • Honeywell LT-Cable


DSC HS2128NK 10-1 AT&T LTE Kit
  • 128-Zone DSC PowerSeries NEO
  • DSC HS2LCDRF9 N NEO Keypad
  • DSC TL880LEAT N AT&T LTE & IP Communicator
  • Ten (10) DSC PG9303 PowerG Door/Window Contacts
  • One (1) DSC PG9914 PowerG Motion Sensor
  • Honeywell LT-Cable


DSC HS2128NK 10-1 Verizon LTE Kit
  • 128-Zone DSC PowerSeries NEO
  • DSC HS2LCDRF9 N NEO Keypad
  • DSC TL880LTVZ N Verizon LTE & IP Communicator
  • Ten (10) DSC PG9303 PowerG Door/Window Contacts
  • One (1) DSC PG9914 PowerG Motion Sensor
  • Honeywell LT-Cable


Qolsys IQ Panel 2 Plus Kits

Last week, we announced several "encrypted" Qolsys Kits that were based around the IQ Panel 2 Plus and PowerG Sensors. Today, we have some non-encrypted kits for the 345 MHz and 433 MHz IQ Panel 2 Plus models. Unlike the kits introduced last week, these kits use uni-directional "non-encrypted" sensors. We actually already had similar kits available for the 319.5 MHz IQ Panel 2 Plus, but now the 345 MHz and 433 MHz versions are joining the fray!

An added bonus about these kits - we actually do include an encrypted PowerG Motion Sensor. It's only the door/window contacts that aren't encrypted. These kits are good if you don't necessarily care about encryption, and you want to save money versus buying the fully encrypted kits.


Qolsys IQ Panel 2 Plus 345 MHz AT&T LTE 3-1 System Kit

  • 345 MHz IQ Panel 2 Plus System w/ AT&T LTE
  • Three (3) VERSA-2GIG Door/Window Contacts
  • One (1) DSC PG9914 PowerG Motion Sensor


Qolsys IQ Panel 2 Plus 345 MHz Verizon LTE 3-1 System Kit
  • 345 MHz IQ Panel 2 Plus System w/ Verizon LTE
  • Three (3) VERSA-2GIG Door/Window Contacts
  • One (1) DSC PG9914 PowerG Motion Sensor


Qolsys IQ Panel 2 Plus 345 MHz AT&T LTE 10-1 System Kit
  • 345 MHz IQ Panel 2 Plus System w/ AT&T LTE
  • Ten (10) VERSA-2GIG Door/Window Contacts
  • One (1) DSC PG9914 PowerG Motion Sensor


Qolsys IQ Panel 2 Plus 345 MHz Verizon LTE 10-1 System Kit
  • 345 MHz IQ Panel 2 Plus System w/ Verizon LTE
  • Ten (10) VERSA-2GIG Door/Window Contacts
  • One (1) DSC PG9914 PowerG Motion Sensor


Qolsys IQ Panel 2 Plus 433 MHz AT&T LTE 3-1 System Kit
  • 433 MHz IQ Panel 2 Plus System w/ AT&T LTE
  • Three (3) VERSA-DSC Door/Window Contacts
  • One (1) DSC PG9914 PowerG Motion Sensor


Qolsys IQ Panel 2 Plus 433 MHz Verizon LTE 3-1 System Kit

  • 433 MHz IQ Panel 2 Plus System w/ Verizon LTE
  • Three (3) VERSA-DSC Door/Window Contacts
  • One (1) DSC PG9914 PowerG Motion Sensor


Qolsys IQ Panel 2 Plus 433 MHz AT&T LTE 10-1 System Kit
  • 433 MHz IQ Panel 2 Plus System w/ AT&T LTE
  • Ten (10) VERSA-DSC Door/Window Contacts
  • One (1) DSC PG9914 PowerG Motion Sensor


Qolsys IQ Panel 2 Plus 433 MHz Verizon LTE 10-1 System Kit

  • 433 MHz IQ Panel 2 Plus System w/ Verizon LTE
  • Ten (10) VERSA-DSC Door/Window Contacts
  • One (1) DSC PG9914 PowerG Motion Sensor


2GIG GC3e AT&T LTE Kits

Last up, we have some new 2GIG GC3e Kits. As we announced yesterday, the 2GIG GC3e AT&T LTE Communicator is finally here, and that means mores GC3e Kits! These are just like the Verizon Kits we announced last week, only with a different communicator.


2GIG GC3e AT&T LTE 3-1 Kit
  • 2GIG GC3e System
  • 2GIG LTEA-A-GC3 AT&T LTE Communicator
  • Three (3) 2GIG DW10e Door/Window Sensors
  • One (1) 2GIG PIR1e Motion Sensor
  • Honeywell LT-Cable


2GIG GC3e AT&T LTE 10-1 Kit

  • 2GIG GC3e System
  • 2GIG LTEA-A-GC3 AT&T LTE Communicator
  • Three (3) 2GIG DW10e Door/Window Sensors
  • One (1) 2GIG PIR1e Motion Sensor
  • Honeywell LT-Cable


Reach Out To Us!

If you have any questions about these kits, or if you need help deciding on the best one, please reach out to us. The best way to contact us is at support@alarmgrid.com. Or if you prefer to call, you can reach us at (888) 818-7728 during our usual business hours of 9am to 8pm EST M-F. We look forward to hearing from you!

Tags: , , , , , , , , , , , , , , , , , , , , , , , , , , , , , , , , , ,

Comments


Posted By

Hi DIYers! Today, we wanted to let you know about some of the new security system kits that are available from the Alarm Grid website. We have new kits that feature the Resideo Lyric, the Qolsys IQ Panel 2 Plus (319.5 MHz, 345 MHz, and 433 MHz), the 2GIG GC3e and the 2GIG GC2e Systems.

Honeywell lyricpk10 lte enc encrypted at and t lte alarm system

Our system kits are perfect for anyone just getting started with alarm monitoring service. Each one includes a brand-new alarm panel, some door and window sensors, a motion sensor, an LTE cellular communicator, and a power cable. You can easily expand around any of these systems later on if needed. Just remember that you will need a monitoring plan to use one of these systems with Alarm Grid. A Gold Plan or higher is needed for cellular communication.

Now that you know a little bit about our kits, let's take a look at each new one individually:

Resideo Lyric w/ Verizon LTE Communicator Kits

Lyric Verizon-LTE 3-1 Kit


Lyric Verizon-LTE 10-1 Kit

  • Lyric System
  • LYRICLTE-V Verizon LTE Communicator
  • 10 Versa-2GIG Contacts
  • SiXPIR Motion
  • LT-Cable


Lyric Verizon-LTE 3-1 Encrypted Kit


Lyric Verizon-LTE 10-1 Encrypted Kit

  • Lyric System
  • LYRICLTE-V Verizon LTE Communicator
  • 10 SiXMINICT Contacts
  • SiXPIR Motion
  • LT-Cable


Qolsys IQ 319.5 MHz PowerG Kits

IQ Panel 2 319.5 MHz AT&T LTE 3-1 Kit


IQ Panel 2 319.5 MHz AT&T LTE 10-1 Kit
  • IQ Panel 2 Plus 319.5 MHz w/ AT&T LTE
  • 10 PG9303 PowerG Contacts
  • PG 9914 PowerG Motion


IQ Panel 2 319.5 MHz Verizon LTE 3-1 Kit


IQ Panel 2 319.5 MHz Verizon LTE 10-1 Kit
  • IQ Panel 2 Plus 319.5 MHz w/ Verizon LTE
  • 3 PG9303 PowerG Contacts
  • PG 9914 PowerG Motion


Qolsys IQ 345 MHz PowerG Kits

IQ Panel 2 345 MHz AT&T LTE 3-1 Kit


IQ Panel 2 345 MHz AT&T LTE 10-1 Kit

  • IQ Panel 2 Plus 345 MHz w/ AT&T LTE
  • 10 PG9303 PowerG Contacts
  • PG 9914 PowerG Motion


IQ Panel 2 345 MHz Verizon LTE 3-1 Kit


IQ Panel 2 345 MHz Verizon LTE 10-1 Kit

  • IQ Panel 2 Plus 345 MHz w/ Verizon LTE
  • 10 PG9303 PowerG Contacts
  • PG 9914 PowerG Motion


Qolsys IQ 433 MHz PowerG Kits

IQ Panel 2 433 MHz AT&T LTE 3-1 Kit


IQ Panel 2 433 MHz AT&T LTE 10-1 Kit

  • IQ Panel 2 Plus 433MHz w/ AT&T LTE
  • 10 PG9303 PowerG Contacts
  • PG 9914 PowerG Motion


IQ Panel 2 433 MHz Verizon LTE 3-1 Kit


IQ Panel 2 433 MHz Verizon LTE 10-1 Kit

  • IQ Panel 2 Plus 433 MHz w/ Verizon LTE
  • 10 PG9303 PowerG Contacts
  • PG 9914 PowerG Motion


2GIG GC3e Kits

2GIG GC3e Verizon-LTE 3-1 Kit


2GIG GC3e Verizon-LTE 10-1 Kit

  • 2GIG GC3e System
  • 2GIG LTEV-1-A-GC3 Verizon LTE Communicator
  • 10 2GIG DW10e Door and Window Sensors
  • 2GIG PIR1e Motion
  • LT Cable


2GIG GC2e Kits

2GIG GC3e Verizon-LTE 3-1 Kit


2GIG GC2e Verizon-LTE 10-1 Kit

  • 2GIG GC2e System
  • 2GIG LTEV1-A-GC2 Verizon LTE
  • Communicator
  • 10 2GIG DW10e Door and Window Sensors
  • 2GIG PIR1e Motion
  • LT Cable


All of these great kits are available from Alarm Grid right now. If you have any questions or need help choosing a system, please email us at support@alarmgrid.com. You may also call us during our regular business hours of 9am to 8pm EST M-F. We look forward to hearing from you!

Tags: , , , , , , , , , , , , , , , , , , , , , , , , , , , , , , , ,

Comments


Posted By

If you're looking to obtain alarm monitoring service for your home, then you can't go wrong with one of our home security system kits. Each kit has everything you need to get started. One of our highly-trained technicians will call you to active your system, and your home will be protected!

Honeywell lyricpk lte a wireless security system w slash at and

With an Alarm Grid Security System Kit, you can expect several essential components. You will receive a wireless alarm control panel that serves as the central hub for your system. This is where you can arm and disarm your system and make programming changes. You will also be able to access your system from an interactive service platform like Total Connect 2.0 or Alarm.com. This is great if you need to control your system while you are away or if you just want to make sure you remembered to arm your system before you left!

Each kit also includes door and window sensors and a motion detecting sensor. The door and window sensors will alert your security system if a door is opened, while the motion sensor will respond to a person moving throughout the area. We offer kits with varying numbers of sensors so that you can choose a kit that is the perfect size for your home or apartment! We also sell individual sensors if needed. You can start with a small security system now and then expand upon it later. Do whatever works for your home!

Users can also expect a Honeywell LT-Cable with each kit. This cable makes it super easy to provide power to your system with the included transformer. You won't need to strip or prepare any wires. The cable comes completely ready. You will just need a screwdriver to attach it. We also recommend choosing a kit that comes with a cellular communicator. This will serve as a reliable backup in case there is ever an internet outage in your home. If the internet goes down, your system will automatically switch to its cellular backup. Not all our kits include a cellular communicator, but we strongly recommend getting one!

Also, don't feel intimidated if you have never installed a security system before! Some other companies may not want you to believe it, but installing your own system is super easy! In fact, most wireless alarm systems can be set up using nothing more than a screwdriver. Wireless sensors can be mounted with double-sided foam tape, and wireless panel menus are easy to navigate. And our technicians will be there to help you every step of the way with online and phone support. Remember, you get free support as an Alarm Grid monitored customer. Before you know it, your brand-new system will be up and running!

Alarm Grid is your home for all your security system kits! If you need help choosing a system, please reach out to us! You may email support@alarmgrid.com or call (888) 818-7728 during our business hours of 9am to 8pm EST M-F. Just tell us about your home and what kind of monitoring service you want. Our planners will help you determine the best security system for your house or apartment. We are always happy to help, and we look forward to hearing from you!

Tags: , , , , , , , , , , ,

Comments


Posted By

If you're taking the leap into the exciting world of home security, one of the first decisions you will make is whether to hire a professional installer or to install the system yourself. While most new users still hire a professional, installing your own system is often the better option.

Honeywell lyric controller encrypted wireless security system

Many people mistakenly believe that a home security system is difficult to install and that it has to be done by a professional. But the industry has actually made great strides in recent years, and now alarm systems can be installed by almost anyone. DIY monitoring companies like Alarm Grid have helped to make this possible. We've shown the security industry why the DIY model is the right model for alarm systems. Now you too can install your own home or business security system! Simply obtain the equipment you need, either from our website or from somewhere else, and sign-up for one of our alarm monitoring plans to get started.

The key to setting up your own home security system without hiring a professional is to make the installation as easy as possible. Choose a wireless control panel and wireless sensors that don't require holes to be drilled. Most wireless panels can be rested on a desk or table with a compatible desk mount, and the sensors can be mounted using double-sided foam tape that often comes included. From there, you just need to program the sensors, which is super easy when you own your own system and know the proper access codes. Before you know it, you will be a true DIYer!

Honeywell sixminict wireless door slash window contact for lyric

Here are ten reasons why you should install alarm system instead of hiring a professional:

1. Understand Your System Better

When a professional installer sets up your own home or business security system, they usually aren't there to play teacher. They will often show you the bare minimum so that you can perform basic functions on the system. By setting up your own system, you can understand its features and capabilities better. This way, you can configure the system exactly to your liking to suit your lifestyle!

2. Choose Your Own Equipment

If you hire a professional, you might have little say over what equipment will be used in the installation. To have full control over what equipment is used, your best bet is to install the system yourself. If you need help choosing your equipment, Alarm Grid offers free support online and over the phone in planning home and business security systems. And with a DIY monitoring company like Alarm Grid, it doesn't matter where you find the equipment. If you can find it cheaper outside our website, go for it!

3. It's More Satisfying

We've discussed the IKEA Effect in the past and how customers who install their own equipment are more satisfied with the end result than if they had someone else do it for them. When you put in the time and effort to set up your own alarm system, it becomes much more valuable and personal to you than if you just throw money at someone to get the job done. Users who complete their own installation grow to love their alarm systems and the protection they provide for their families.

4. Save Money

This one is obvious. Installers charge hundreds or even thousands of dollars for most alarm system installations. Just check out the hourly rates for most outside installers. It's staggering! The truth is that you can install your own equipment just as well as a professional, all without having to spend a cent. So roll up those sleeves, get an Alarm Grid Tech on the phone, and save some money by installing your own system!

5. Feel Empowered

Installing your own alarm system is empowering. It offers a feeling of accomplishment in knowing that you did it yourself. You don't have to rely on others to install the system for you. Instead, you are self-sufficient and in control. Of course, if you ever do need some assistance, our technicians can walk you through the process online or over the phone. But you're the one in control of the project. You have the power!

6. Learn Something New

Many people enjoy learning new processes and tasks. Why not learn how to install and program a security system? It can actually be a fun and amusing challenge to take on for yourself, and it's knowledge that might come in handy later. After you've installed your own alarm system, you can add it to the list of things you know how to do. And it might make for interesting conversation to teach others about the system as well.


7. Make Your Own System Changes

Almost all alarm system users will need to make changes and adjustments to the settings at some point or another. For users who hire a professional, they often don't know the system's Installer Code, and they have to have an installer come out to their home or business to make the changes. But if you install your own system, you'll know the Installer Code so you can go right in and make your own changes in a matter of minutes. How cool is that?

8. Easily Move Your System

Are you planning to move to a new home? Do you need to take your business security system to a new office? If you set up your own system, this process is a breeze. Simply dismount your equipment, and set it up in your new location. You will need to contact your monitoring company and let them know about the address change, but the transition is seamless overall. Remember to test your sensors after moving them to your new home or business!

9. Complete Ownership

It's a common tactic for other security companies to offer a free installation and a free security system when signing-up for their monitoring services. The problem with this is that most of these companies offer proprietary equipment that will only work with their services. So while you might own the system, it's no good if you want to take it somewhere else. When you choose and set up your own equipment, it is usually non-proprietary, and you can take it to a different monitoring company if you want to.

10. Future Installations

Once you have installed your own alarm system, you can repeat the process and steps for any future installations you might complete. Perhaps you're setting up a security system for your office, or maybe you need one for a summer home. What you've learned from your first installation can easily apply to a second one. Take what you've learned, and put it into action!

Whether you're installing your own system for a home or business, Alarm Grid is here to help you every step of the way. We offer support online and over the phone so that you can get your system exactly the way you want it. To get started, sign-up for one of our monitoring plans with the orange button above.

If you have any questions, you can always email us at support@alarmgrid.com, you can call us during our normal business hours of 9am to 8pm EST M-F. We look forward to working with you and helping you complete your own security system installation!

Alarm grid inside security stickers

Tags: , , , ,

Comments


Posted By

Have you ever bought and set up your own furniture from IKEA? If you have, you probably felt pretty proud of your creation once it was ready to use. There's something to be said about building something yourself versus having a professional do it. And this is true for alarm systems as well.

Honeywell lyricpk10 lte enc encrypted at and t lte alarm system Researchers have often dubbed this phenomenon "The IKEA Effect". The basic concept is that a consumer will place a higher value on something they assembled themselves. The time investment and labor they put into their creation provides feelings of satisfaction, competence and accomplishment that just can't be obtained through a monetary purchase alone. By rolling up your sleeves, getting your hands a little dirty and working with something hands-on, you will psychologically gain a greater appreciation for your new purchase.

Of course, it's easy to apply this ideology to our own business model. Alarm Grid has always considered itself to be a true pioneer for the DIY security industry. One of our biggest goals is to try and help our customers understand their security systems. This way, they can make their own adjustments and changes, without having to rely on someone else to do it for them. Doing this offers feelings of empowerment, and it helps a person to truly understand how their system works and the type of monitoring service they are paying for every month.

Alarm grid inside security stickers

It's also important to understand that setting up your own security system in its entirety does not have to be a difficult process. It really depends on the type of system that is being used. Wireless systems are not challenging to install, and the programming options are actually very intuitive with just a little bit of assistance. Alarm Grid is happy to provide this support online or over the phone. You don't need to pay for an expensive installer to come out to your house when you can do just as good of a job on your own. Afterwards, you'll surely love your new alarm system you put in, and you will feel very proud that you actually did-it-yourself.

And if you want to make the job even easier, most new wireless panels support desk and table stands that eliminate the need for mounting. If you mount your wireless sensors with double-sided foam tape - it works great - you can set up a complete home security system using almost no tools. You might need a screwdriver to connect some wires and install some batteries, but that is it. Some great systems for this type of setup include the Qolsys IQ Panel 2 Plus and the Honeywell Lyric Controller.

Qolsys iq panel 2 classic kit verizon wireless security system wAlarm Grid is proud to be a true DIY security company for DIY users. We know that customers feel happier and are more empowered when they install their systems. If you haven't already joined the Alarm Grid family, now is a great time to get started. Just click the orange "Alarm Monitoring" button at the top of this page to see more information about our monitoring plans.

Tags: , ,

Comments


Posted By

Hi DIYers! We recently made a post that compared wireless systems with hardwired ones. We ultimately concluded that most end users are better-suited with a wireless system. If you have decided that you need a wireless home security system, this buyer's guide can help you review the options.

Remember, no matter which system you buy, you will need an alarm monitoring plan to go along with with it. Please review our alarm monitoring page for more information. Below are some of the best wireless security systems on the market today and what makes them so great:

Qolsys IQ Panel 2 Plus

Qolsys iq panel 2 plus verizon lte with powerg s line and legacy

The Qolsys IQ Panel 2 Plus is arguably the most robust alarm system on the market today. Each version provides support for PowerG 915 MHz Sensors and a choice of one legacy sensor type (319.5 MHz, 345 MHz or 433 MHz). The PowerG Sensors are particularly renowned for their ability to be used from up to 2,000 feet away from the IQ2+ System in open air. This is also one of the few wireless all-in-one panels with the ability to display the live feed for Alarm.com Security Cameras right from its screen. The panel also includes a built-in LTE cellular communicator (AT&T or Verizon) and a fully functional Z-Wave Plus Controller. In fact, this is one of the very few systems where virtually no add-ons are needed. However, the IQ Panel 2 Plus is one of the more expensive wireless panels available on the market. But users will certainly appreciate its sleek, modern design and superb functionality. The system uses Alarm.com as its interactive service platform, and it can readily connect with the service. All versions of the IQ Panel 2 Plus can be seen here.

Choose the IQ Panel 2 Plus if:

  • You want the remarkable signal range that comes with PowerG Sensors.
  • You want the ability to easily bring over existing wireless sensors (319.5 MHz, 345 MHz or 433 MHz) with your new security system.
  • You want the ability to view your security cameras right from your panel.
  • You don't mind paying top-dollar for an alarm system.

Honeywell Lyric Controller

Honeywell lyric controller encrypted wireless security system

The Honeywell Lyric Controller is still the flagship HomeKit security system from Honeywell, and the time-tested company has once-again produced an excellent panel. The Lyric is perhaps the best system on the market today for use with Apple HomeKit. It can pair natively with HomeKit in order to provide all of the functionality that a user would expect with the feature. The Lyric System also has its own lineup of encrypted sensors, called the Honeywell SiX Series. Additionally, it is backwards compatible with the Honeywell 5800 Series. Another factor that separates the Lyric from other systems is its ability to be used with Total Connect 2.0. This service is designed exclusively for Honeywell Alarm Systems, and it offers similar functionality to that of Alarm.com. The system's built-in WIFI card allows it to readily connect with the service. One downside to the Lyric is that it only includes a Z-Wave classic controller as opposed to a Z-Wave Plus controller. While it can support Z-Wave Plus devices, they will only have the capabilities of Z-Wave classic devices when used with this system. Please note, a separate Lyric Cellular Module is needed for cellular connectivity.

Choose the Lyric Controller if:

  • You plan to use your alarm system with Apple HomeKit.
  • You prefer using Total Connect 2.0 over Alarm.com.
  • You want to use encrypted Honeywell SiX Series Sensors.
  • You don't require a Z-Wave Plus controller.

2GIG GC3

2gig gc3 diy wireless security system w slash 7 screenThe 2GIG GC3 just gave itself a major upgrade in the form of partitioning support. This makes the GC3 the first ever AIO wireless system to support partitioning. 2GIG refers to this feature as "smart areas", and the system on the latest firmware, and up to four of these areas can be supported. Beyond that, the GC3 is also highly regarded for its strong build quality. That's not to say the other panels are lacking in that department, but the GC3 is perhaps the sturdiest system we have ever worked with. Its touchscreen controls are extremely responsive, and its full-color 7-inch display is a joy to look at. The system can use 2GIG 345 MHz Sensors and Honeywell 5800 Series Sensors. One weakness of the system is that it does not support any type of encrypted sensors at this time. But it does include a built-in Z-Wave Plus Controller for smart home devices. Like the IQ Panel 2 Plus, the system uses the Alarm.com service. But the user will need to buy a separate GC3 cellular communicator to use ADC.

Choose the GC3 if:

  • You need partitioning support.
  • You want a system with superb build-quality.
  • You want to use the Alarm.com platform.
  • You don't need encrypted wireless sensors.

2GIG GC2

2gig cp21 345 front

The 2GIG GC2 is our pick as a "budget" security system. We know that many people getting into home security will not need all of the advanced features that the state-of-the-art systems have to offer. That is where is the 2GIG GC2 comes into play. With the right support, it can still serve as an extremely viable option for many users. The panel features a 3.75" by 2.25" touchscreen with very responsive controls. This is considerably smaller than the 7-inch touchscreen displays of the other panels on this list, but it will work just fine for many users. The panel can support up to 60 wireless zones. Again, this is considerably less robust than the other systems, but it will be perfectly acceptable for most smaller and medium-sized homes. The system includes a Z-Wave classic controller for supporting smart home automation devices. In order to get the GC2 connected with Alarm.com, a separate GC2 cellular communicator is needed. Overall, if you're looking for a new security system at a reasonable price, you can't go wrong with the 2GIG GC2.

Choose the GC2 if:

  • You're shopping for a system on a budget.
  • You want a simple, yet capable alarm system.
  • You don't need support for as many wireless zones.
  • You don't need a larger touchscreen display.

If you still need help deciding on a wireless system, don't hesitate to reach out to us for support! You may email us any time at support@alarmgrid.com. Or you can call us at (888) 818-7728 from 9am to 8pm EST Monday thru Friday. We look forward to hearing from you!

Tags: , , , , , , , , , , , ,

Comments