IQ Panel 2 Kits Posts

Posted By

Here at Alarm Grid, we try to help as many people as possible with their alarm system. Sure, we hope it will lead folks to choose us for their alarm monitoring needs. But it's also because we're simply helpful people. An alarm in your home or business should help quell fears, not cause them.

We've begun what I think of as "Silly Season". You may be familiar with this term from Nascar, but for us in the alarm industry, this is the time when a lot of home buying and selling occurs. During this time, we get a lot of calls that go something like this, "I just moved into a home with an existing alarm. We haven't been using it, but somehow it got armed, and now it's going off, and I don't know the code to disarm it. Please help!"

Moving into a new home is exciting, but it's also stressful and can be overwhelming at times. So, I've (Ms. Manners) put together this guide to help you, the person who moved out of the home in this scenario, to leave behind your alarm system in a way that's as stress-free as possible for all parties involved.

Ms. Manners Says: Notify Your Alarm Company

If your alarm system is monitored, be sure to notify your alarm company that you are moving out and that the system is staying behind. This may seem obvious, but many people assume that if they stop paying their monitoring fees, the alarm company will know they no longer want service and will cancel it on their own. This is not the case for a number of reasons! There may be contracts involved. There could be liability issues. So for many reasons - not the least of which is it's the polite thing to do - any time you wish to stop monitoring service to a particular address, you should notify the alarm monitoring company as soon as possible.

By notifying the alarm company, you do several things. You give them an opportunity to reach out to the new homeowner and introduce themselves. Hopefully, if you've had a good experience with your monitoring company, you will also put in a good word about them to the new homeowner. Both of these things give the company a leg-up when it comes to courting a potential new customer, and it also gives the new homeowner information based on your real-life experience, not just an advertisement in a new homeowner's mailer.

By notifying the monitoring company, you can also help to prevent any unnecessary dispatching of the authorities to this address. As bad as the scenario above is for the poor, uninformed new homeowner, it's worse for the police, fire, or EMS personnel who may respond to the alarm, which we know is false.

Remember, the person who signed up for the monitoring service at the address in the scenario above no longer lives there. That means the monitoring station is going to be calling people who have no idea what may be going on at this address (which is also an annoyance for the person receiving the call). In this situation, it is likely that the monitoring station MUST dispatch because if they don't (and there is some type of emergency) there may be repercussions for them. A monitoring station is always going to adhere to the adage, "Better safe than sorry." After all, safety is their business.

Ms. Manners Says: Default Users, But Not Zones

When you sell a house and the alarm system with it, you may think it's a good idea to set the alarm system back to factory default to allow the new homeowner a chance to program it as they see fit. Resist this urge! In most cases, what was your Front Door is now going to be their Front Door. What was your Kitchen Window is now going to be their Kitchen Window. John's Bedroom Window may become Jane's Bedroom Window, but this is a pretty simple thing to change and doesn't really call for the entire system to be set back to factory default.

When it comes to user codes, though, it is best to set these back to factory defaults. This will prevent the new homeowner from finding out what codes you used. After all, we are creatures of habit, and there's a good chance you'll use those same codes in your next system. Also, if you set the codes for the Installer and Master users back to their default, the new homeowner should easily be able to find out what they are by doing a quick search online. Then, if they find themselves in the messy scenario discussed above, they'll be able to get themselves out of it. Being able to get yourself out of a jam like this one can do wonders for your self-confidence.

System Manufacturers and their Default Codes

Panel Manufacturer Installer Code Master Code
Honeywell Vista (Non-polling) 4112 1234
Honeywell All-in-One 4112 1234
2GIG GC2 1561 1111
2GIG GC3 1561 1111
Qolsys 1111 1234
Interlogix Simon XT 4321 1234
Interlogix Simon XTi & XTi-5 4321 1234
DSC Impassa 5555 1234

Use the information in the table above to set the codes in your panel back to their default values. If you don't see your panel listed, you can likely find the information you need with a quick online search. Performing this process is the single most helpful thing you can do for the new homeowner when it comes to the alarm system!

Ms. Manners Says: Leave Behind Good Notes

Any information you know about your alarm system, such as the manufacturer and model, the default installer code, and the default master code - each of which hopefully you have programmed into your panel by this time - will be helpful for the new homeowner. A list of zone numbers and their descriptions is also very much appreciated by a new homeowner. Leave them a note, tucked behind the keypad, or on a kitchen counter. Give them the sequence of keys to enter to disarm the system, or better yet, if you have the opportunity, show it to them, and then leave them a note to back up your demonstration.

If you're willing, leave them your contact information so they can contact you in the event that something unforeseen comes up. This is particularly important if your system is somewhat complex and has multiple home automation features integrated with it. I promise the last thing the new homeowner wants to do is bother you if they can avoid it. Everyone at Alarm Grid has talked with a frantic new homeowner who never even considered contacting the prior homeowner. It's usually something we suggest if we're unable to assist.

Fortunately, in most cases, we are able to assist, and we are happy to do so. This is just one of the many ways we make new friends here at Alarm Grid! I hope that anyone who is preparing to move out of a home and leave behind an alarm system will read this and use these suggestions to prepare.

If you happen to be moving into a home that already has an alarm system, and perhaps the previous homeowner didn't read this post, feel free to reach out to us. We're here Monday - Friday from 9:00 am to 8:00 pm Eastern Time. You can reach us via email, or by calling 888-818-7728.

Tags: , , , , , , , , , , , , , , , , , , , ,

Comments


Posted By

Alarm Grid has learned that Qolsys IQ Panel 2 and IQ Panel 2 Plus Firmware Version 2.5.5 is now available for download. The update mainly focuses on providing fixes for issues that affected earlier firmware versions. This is believed to be the final update before the eventual 2.6.0 release.


For a complete outline of Software Update 2.5.5 and what it includes, make sure to check out Technical Service Bulletin (TSB) # 210315 released by Qolsys. Although this update doesn't provide any new features or functions for the IQ2 or IQ2+, it does offer some important fixes to help ensure that your system functions as smoothly as possible and without issue. Additions for 2.5.5 include:

  • Fixes an issue involving PowerG device syncing in Versions 2.5.3 and 2.5.4. More information is available here.
  • Corrects a problem that caused certain IQ2 Help Videos in languages other than English to not play properly.
  • Applies the firmware2 patch fix to stop affected IQ2+ Systems from automatically rebooting. More information can be found here.
  • All of the new additions in 2.5.4 are also included in 2.5.5. This is important for users who may be skipping 2.5.4 and going right to 2.5.5.

Please note that at this time, the only way to update your IQ Panel 2 or IQ Panel 2 Plus System to 2.5.5 is via the Patch Tag method. Alarm dealers like Alarm Grid do not have access to the 2.5.5 Firmware at this time, and it is not possible to have the update pushed down to your panel from Alarm.com currently. We expect that to change in the coming days once Alarm.com vets the software to their satisfaction. This is also why we updated our IQ Panel 2 Plus Firmware Update Page to reflect Version 2.5.5, but pointed the download link back to this blog page. It is possible that Version 2.5.5 will not be made available for download, in which case the only way to achieve this version is to update using WIFI at the panel. If the panel is installed in an area where WIFI is not available, users should be able to use a cell phone or other hotspot to apply the update using the Patch Tag method.

Applying Firmware Version 2.5.5 to your IQ Panel 2 or IQ Panel 2 Plus via Patch Tag is quite simple. However, it must be mentioned that if your IQ2 or IQ2+ is currently on FW Version 2.5.0 or 2.5.1, then you need to stage upgrade to Version 2.5.3 first before then updating to the new 2.5.5 version. All IQ2 and IQ2+ Systems on versions other than 2.5.0 and 2.5.1 do not need to stage upgrade and can instead go directly to 2.5.5, as long as the panel is on at least Version 2.0.1.

Remember that you can check your IQ2 or IQ2+ firmware version by starting from the main system screen, pressing the small grey bar at the top, and then choosing Settings > Advanced Settings > enter Installer Code (default 1111) > About > Software. As long as your IQ2 or IQ2+ is on at least 2.0.1, and is on a version other than 2.5.0 or 2.5.1, you can go directly to 2.5.5.

As always, only IQ2 and IQ2+ Systems on Software Versions of 2.0.1 or higher can receive firmware updates. If you have a rare IQ2 System that is less than Version 2.0.1, you should strongly consider replacing the panel. This only applies to a very small number of IQ2 users, but it's still a warning we need to put out!

We have received word from Qolsys that the firmware2 patch fix portion of the update is extremely small in size - only about 500KB. But the entire 2.5.5 Software Package is much larger, at approximately 250MB in size. Most users upgrading shouldn't run into issues, but the large size may be undesirable for a user who is trying to apply the update using a hotspot on their cell phone because they do not have true WIFI service. We just wanted to point this out in case it affects anyone.

To prepare for the upgrade, make sure your IQ2 or IQ2+ is plugged in with its battery charged. It should be connected to a WIFI network. Then once you are are ready, do the following to upgrade to FW Version 2.5.5:

Start from the main screen of the IQ2 or IQ2+. Swipe the small grey bar at the top. Choose Settings > Advanced Settings > enter Installer Code (default 1111) > Upgrade Software > Patch Tag > enter iqpanel2.5.5 > OK > Upgrade Using Network.

Your system should then begin applying the update. According to Qolsys, the update should take about five (5) minutes to apply. We tested the update on an original IQ Panel 2 System in our office, and we were very impressed with how quickly the update was applied.


Got any questions about IQ Panel 2 Plus Firmware Update 2.5.5? Or maybe you have some hopes or a wishlist for the much anticipated IQ Panel 2 Firmware Update 2.6.0? Leave a comment down below and share your thoughts. We would love to hear from you! And remember to keep reading our blog for more security news on the way very soon!

Tags: , , , , , , , , , ,

Comments


Posted By

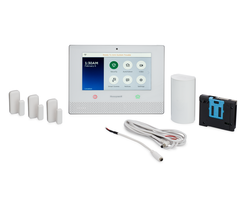
New products keep coming! We have two (2) new Qolsys IQ Panel 2 Plus Kits. There is the Qolsys QK9201-AK2P-840 with Verizon LTE and the Qolsys QK9202-AK2P-840 with AT&T LTE. Both are 2-1 PowerG Kits with a 319.5 MHz IQ2+ System, one (1) PG9914 Motion, and two (2) PG9303 Door/Window Contacts.

What makes these new kits different from our other IQ2+ System Kits is that these are 2-1 Kits (2 Door/Window Sensors + 1 Motion) with PowerG Sensors. Our other 2-1 offerings, the Qolsys QK9201-AK2C and the Qolsys QK9202-AK2C include Qolsys S-Line Sensors, rather than the PowerG Sensors included in these new kits. And all the other Qolsys IQ Panel 2 Plus PowerG Kits were in 3-1 or 10-1 sizes. But thanks to these new kits, you can now get a new 2-1 IQ2+ Kit with PowerG Sensors! These are fantastic wireless sensors that can work from up to 2,000 feet away from the IQ Panel 2 Plus System in open air, and they utilize 128-bit AES encryption for great security.

Your one choice with these two new kits is whether you want the 319.5 MHz IQ Panel 2 Plus w/ Verizon LTE or the 319.5 MHz IQ Panel 2 Plus w/ AT&T LTE. Other than the cellular carrier, these two kits are exactly the same. When deciding between AT&T and Verizon, just go with whichever network offers more reliable service in the area where the system will be used. Check coverage maps if you are unsure. Please note that we do not have 2-1 Qolsys IQ Panel 2 Plus Kits for the 345 MHz IQ Panel 2 Plus or the 433 MHz IQ Panel 2 Plus. Only the 319.5 Mhz version is available in a 2-1 kit.

With the Qolsys QK9201-AK2P-840 or Qolsys QK9202-AK2P-840, you get all of the same great benefits as any other brand-new IQ Panel 2 Plus System. This system supports up to 128 wireless zones, Z-Wave Plus technology, and a plethora of great features like optional automatic Bluetooth disarming, security camera live-streaming, four (4) configurable partitions, and so much more. By activating the system with a cellular monitoring plan that includes access to Alarm.com, you will be able to control the system from anywhere in the world using your phone.

We hope that you find these new 2-1 Qolsys IQ Panel 2 Plus PowerG Kits useful. They are great for any small home or apartment, where only a few sensors are needed. We also recommend these kits for previous Interlogix System users who are looking to upgrade to a newer 319.5 MHz system. Please comment below with your thoughts on these new kits. Remember to stay tuned to the Alarm Grid blog for more security news coming soon!

Tags: , , , , , , , , ,

Comments


Posted By

We have been made aware of a critical firmware issue affecting Qolsys IQ Panel 2 Plus Systems manufactured between Week 35 of 2020 (or Week 37 for some factory codes) and Week 05 of 2021. The issue causes systems to automatically reboot at times. We apologize for any resulting inconvenience.


According to Qolsys, all IQ panel 2 Plus Systems manufactured with a Date Code of G035 to G105 AND J037 to J105 are affected. This can be seen in digits 6 thru 9 of the system's Serial Number (SN) on the product box, on the back of the system, and in the Hardware portion of the About Menu in Advanced Settings.


If your system is affected, then you can download a special firmware update to correct the problem. In order to download this corrective firmware, your system must be one of the affected models (see above), and you must have the panel on Software Version 2.4.2 or higher (check the About Menu). You may also want to check out our Qolsys IQ Panel 2 Plus Firmware Update Page here if you need to update your system to 2.4.2 before running this patch.

If you meet the criteria, then you can perform the following steps to update the firmware:

1. Prepare IQ2+ System. Make sure your system meets the aforementioned criteria to receive the special update. In addition, have your system connected to WIFI. Your system should be plugged in for AC power, and it should not have a low battery.

Monitoring stations will eventually be able to push this upgrade over-the-air (OTA). If your system is in a location where WIFI is not available, the monitoring station should be able to push the update, but to do so via cellular data may incur a small fee. This will require that the panel is set up for monitoring service, including connectivity with Alarm.com.

2. Access Upgrade Software Menu. From the main system screen, swipe the small grey bar at the top, and choose Settings > Advanced Settings > enter the Installer Code (default 1111) > Upgrade Software. You are in the Upgrade Software Menu.

3. Enter Patch Tag. Find the Patch Tag field. Click on it, and enter firmware2. Make sure you enter firmware2 exactly. Press OK to confirm.

4. Apply the update. Choose "Upgrade Using Network". The update should then begin. It should take around five (5) minutes to complete, though it can take a bit longer in some cases. Do not touch the system during the update. The system should reboot once complete.

5. Verify the update. You can verify the update by repeating Step 2, except this time choose About > Software, instead of "Upgrade Software". The build number should display 0210219_sp1 to indicate a successful update.

This update should fix and/or prevent your IQ2+ System from randomly rebooting if it was part of the batch with the critical firmware issue. We hope that this helps any affected users overcome issues with the IQ2+ Systems. Make sure to stay tuned to the Alarm Grid blog for the latest news regarding Qolsys, the IQ Panel 2, and any other important security system news!

Tags: , , , , , , , , , , , ,

Comments


Posted By

You may recall that we made a post about a month ago discussing "issues" that have been affecting the IQ Panel 2 Plus and its ability to be used as a secondary Z-Wave controller. We have a rather extreme follow up today, as Qolsys has revealed that the system never supported the feature!


When we released the initial post on the subject, we were not aware of the true" extent" of the issue. We certainly didn't expect to find out that Qolsys never even made it possible for the feature to work. We won't dive super deep into the subject here, as there really isn't much to say, The raw truth is that you cannot use the IQ2 as a secondary Z-Wave controller.

It is possible to add a secondary Z-Wave controller to the IQ Panel 2 and have the IQ2 operate as the primary controller. But you can never make the IQ Panel 2 System a secondary Z-Wave controller. We apologize for any inconvenience or confusion that this may have caused. For a more in-depth look at the subject, we strongly recommend reading this comprehensive FAQ that explains the inability of the IQ2 to be used as a secondary controller in much greater detail.

Now, maybe you have explored the Qolsys IQ Panel 2 Advanced Z-Wave Settings Menus in glorious detail, just like we have. If you have, then you will know that secondary controller options do exist within the IQ2 menus. Based on that alone, you would think that there must be a way to get this type of setup to work, right? That's the problem. The menu options might be there, plain as day. But trust us, if you try to make the IQ2 a secondary Z-Wave controller, then it will not work,

What we need to do now is focus on the implications that arise from the system's inability to be used as a secondary controller. As a result of the IQ Panel 2 being unable to operate as a secondary Z-Wave controller, the system loses out on potential compatibility with a wide selection of automation hubs. This includes compatibility with Samsung SmartThings, Vera Smart Controllers, Nexia Smart Home Automation Systems, and much more. Seriously, while the IQ2 once had excellent prospects of pairing nicely with almost any centralized Z-Wave hub, those prospects are all but gone.

Fortunately, there are other alarm systems that do not share this same limitation of the Qolsys IQ Panel 2 and IQ Panel 2 Plus. Most notably, we will recommend the Honeywell Lyric Controller. The Lyric has proven on repeated occasions to "play nicely" as a secondary controller. One example can be seen in this FAQ, which explains the benefits of making the Lyric a secondary Z-Wave controller, while also helping users get started. If you are thinking about purchasing a new Honeywell Lyric Alarm System for its excellent versatility in smart home automation, then you may also want to check out this buying guide. Although that particular buying guide was written for the Lyric during a holiday buying season a couple of years prior, it is still relevant in helping new Lyric System users explore their options for getting the most out of the system.

If you have any questions about the Honeywell Lyric or any other popular alarm control panel, or if you want to learn more about our monitoring services, send an email to support@alarmgrid.com. We're here to check your emails from 9am to 8pm ET M-F. We look forward to hearing from you!

Tags: , , , , , , , , , , , ,

Comments


Posted By

We have received word that Qolsys has released Firmware Version 2.5.4 for the IQ Panel 2 and IQ Panel 2 Plus Systems. The main highlights for this latest firmware update include fixes with the Z-Wave S2 Encryption Protocol, plus fixes regarding the use of LiftMaster Garage Door Control.

We do have one thing to mention for users of the Qolsys IQ Panel 2 Solar Integration. If you are using the IQ2 Solar Integration then, DO NOT UPGRADE TO 2.5.4. Instead stay on 2.5.3. However, if you want to use the LiftMaster Garage Door Integration instead of the Solar Integration, then you should upgrade to 2.5.4, but you will LOSE the Solar Integration. On Version 2.5.4, it is IMPOSSIBLE to use BOTH the Solar Integration AND the LiftMaster Integration. Qolsys has said that this will be fixed in Firmware Version 2.6.0, which should hopefully be available in the coming months. For now, if the Solar Integration is more important to you than a LiftMaster Integration, then just STAY ON 2.5.3. This ONLY applies to users of the Solar Integration. If you do not care about the Solar Integration, or if the LiftMaster Integration is more important to you, then UPGRADE TO 2.5.4. All things considered, MOST USERS WILL WANT TO UPGRADE TO 2.5.4. Keep in mind that there is NO WAY TO DOWNGRADE TO A LOWER FIRMWARE VERSION AFTER UPGRADING.

Before we get into all of the exciting new changes for IQ2 Firmware Update 2.5.4, we will first explain how to apply the firmware update to your Qolsys IQ Panel 2 or IQ Panel 2 Plus System. To get started, there are a few prerequisites to keep in mind. Your Qolsys IQ Panel 2 or IQ Panel 2 Plus must be on at least Firmware Version 2.0.1 or higher to apply the update. It must also be connected to WIFI, it should be receiving AC power from its plug-in transformer, and it should not have a low battery condition.

Now, this may get a bit confusing, but stick with us. Depending on which firmware version your IQ2 is currently running, it may be necessary to update in stages to get to 2.5.4. Start by considering which firmware version your system is currently running, and then take the appropriate action(s) based on what is outlined below. The important thing to remember is that your IQ2 must be already on 2.52 or 2.5.3 OR between 2.0.1 and 2.4.2 to upgrade directly to 2.5.4. If that applies to your system, then just go directly to 2.5.4.

For users on Version 2.5.0 or 2.5.1, things become a bit tricky. For these users, you need to upgrade to 2.5.2 or 2.5.3 first before you can get to 2.5.4. We recommend just updating to 2.5.2 and then going to 2.5.4, skipping 2.5.3. For information on updating to Version 2.5.2, please refer to this blog post. Once you are on 2.5.2 or 2.5.3, you can then follow the steps listed below.

Once you are on 2.5.2 or 2.5.3, or between 2.0.1 and 2.4.2, do the following:

  • Start from the main screen of the IQ Panel 2 or IQ Panel 2 Plus.
  • Swipe down the small grey bar at the top.
  • Choose Settings > Advanced Settings.
  • Enter your Installer Code. Remember that this code is 1111 by default.
  • Choose Upgrade Software.
  • Find Patch Tag, and enter iqpanel2.5.4. You must enter the patch tag EXACTLY AS DISPLAYED. Choose OK.
  • Press Upgrade Using Network. If all the requirements have been met, the update will start.

Now, with that out of the way, we can start talking about what's new to 2.5.4. Here is a list of everything you can expect!

  • An issue involving the 6.81.03 Z-wave Firmware Version, also referred to as the 6.81 Z-Wave SDK, has been fixed. The issue caused Schlage Z-Wave Plus Door Locks and the Honeywell T6 PRO Z-Wave Plus Thermostat to not function properly when S2 encryption was used. These devices should now work properly when enrolled using the S2 protocol.
  • Corrections have been made to an issue that arose in Firmware Version 2.5.3 involving the use of LiftMaster Garage Door Control. The integration would not function properly from the panel UI. More information can be found in this document from Qolsys. Also, please see the message regarding the loss of the Solar Integration in 2.5.4 in the notes outlined above.
  • An issue involving the LED status light on PowerG Smoke and Heat Detectors, namely the DSC PG9936, has been fixed. Previously, the status light would not reset after an alarm had been cleared when using Installer Mode or Test Mode on the panel. More information on the issue is available in this document released by Qolsys.
  • The PowerG Radio Firmware has been upgraded to Version 80.34. This upgrade is designed to improve wireless communication, particularly when using multiple DSC PG9WLSHW8 PowerG Wired to Wireless Converter units.
  • Z-Wave Plus 500-Series Z-Wave Switches from Cooper and Eaton are now supported by the IQ Panel 2. The newly supported switches include RF9601, RF9617, RF9640-N, and RF9642-Z.
  • An issue involving PowerG Shock Sensors, namely the DSC PG9935, has been fixed. The issue occurred following a 15 minute placement test mode timeout. There have been further improvements made for false alarm prevention when shock sensors are paired as two (2) separate zones on the system.
  • The 2.5.4 Update now allows PowerG Keypads, namely the DSC WS9LCDWF9, to sound Fire Alarms triggered in other system partitions, provided that the Global Fire Setting is enabled. Please see this FAQ for more information.
  • PowerG Keypads, namely the DSC WS9LCDWF9, can now show special characters on their LCD screens if they are used as part of a Zone Description on the main Qolsys IQ Panel 2 Plus System.
  • The Energy Optimizer for the system is now available locally on the IQ Panel 2. This is used to set Z-Wave thermostats and Z-Wave Plug-In Switches to reduce their energy usage during peak consumption hours. This feature should NOT be used alongside Alarm.com Thermostat Schedules. It is also NOT compatible with the "Give Back, Get Back" program offered by Alarm.com.
  • Certain improvements have been made to the Help Videos as part of the Easy Install Wizard for the system.
  • There have been small changes to facilitate support of Canadian ULC-S304 for Level II Residential and Level II Commercial Listings.
  • A new setting for ULC Commercial Power Restoration is now available.
  • PowerG Image Sensors, namely the DSC PG9934P and DSC PG9944, now take a picture upon the activation of a Fire Alarm or a Carbon Monoxide Alarm, for EU IQ Panel 2 Systems Only. Most United States users will not have this change applied. Furthermore, image sensors learned into Sensor Group 25 will also produce pictures if triggered while the panel is armed.
  • If the EN Grade 2 Security Settings is Enabled, then User Codes will be hidden with dots, rather than showing the entered numeric code.

If you have any questions about Qolsys IQ Panel 2 Firmware Update 2.5.4, or if you are an Alarm Grid monitored customer needing help upgrading to Version 2.5.4, please email us at support@alarmgrid.com for assistance. This email is also good to use if you are interested in starting new monitoring service with Alarm Grid. Our support and planner teams are available from 9am to 8pm ET M-F. We look forward to hearing from you.

Tags: , , , , , , , , , , , , ,

Comments


Posted By

Hi DIYers! This is Part 2 of our Qolsys IQ Panel 2 Plus Install Guide. Today, we will be focusing on a variety of topics, mostly arming the system, bypassing sensors, adjusting arming settings, Bluetooth disarming, adjusting user codes, the system messaging center, and panic buttons.

Qolsys iq panel 2 at and t wireless security system with at and If you want to start from the beginning, you can find Part 1 of this series right here.

This install guide of ours is designed to follow the manual for the system. If you want to follow along with the manual for the system, then it is available here. Just keep in mind that the order in which we present information may be different from the manual. The processes shown here fully apply whether you are using an original Qolsys IQ Panel 2, or a newer Qolsys IQ Panel 2 Plus System. Today, we will have two (2) videos to accompany this content. With that out of the way, let's begin!

Our Part 4 video focuses primarily on Arming/Disarming the Qolsys IQ Panel 2. When you arm your system, you are putting it into a secure state. Many Sensor Groups for the Qolsys IQ Panel 2 are only active when the system is in an armed state. We recommend reviewing the Sensor Groups so that you know how different sensors will respond when the system is activated.

Qolsys iq dw mini s encrypted wireless sensors for iq panel 2 qs

To keep things simple, you will generally use Arm Away when all occupants plan to be away from the premises. When the system is in this state, there should be nobody inside the building, and nobody should be around to activate Interior Sensors. If someone will still be inside the building, but you want to put the perimeter protection points into a secure state, then you can put the system into Arm Stay mode. This way, the system will not go into alarm if Interior Sensors are activated. However, the system will still respond to Perimeter Zones and Entry/Exit Zones.

You will also likely want to adjust the various arming settings for your Qolsys IQ Panel 2 System. There is an entire menu in system settings for this purpose. You may also want to adjust your Entry Delays and Exit Delays. In the simplest terms, Entry Delay is how long you have to disarm the system after activating an Entry/Exit Zone before an alarm will occur. Exit Delay is how long you have to vacate the premises when Arming Away before the arming setting will go into effect. Once the Arm Away setting has gone into effect, then activating an Entry/Exit Zone will trigger the Entry Delay countdown, and you will need to disarm within that time period. It is also important to understand that there are both Normal Entry/Exit Delays and Long Entry/Exit Delays. The Long Entry/Exit Delays are important to adjust if you are using any zones with Sensor Group 12 - Entry/Exit - Long Delay. Use this zone type for a door that you may sometimes use to enter or exit but that is further from the system, and so requires a longer delay period. If you do not have any zones like this, then the Long Entry/Exit Delays are irrelevant.

One convenient feature for the Qolsys IQ Panel 2 is automatic Bluetooth disarming. If enabled, this will have the system automatically disarm when you bring your phone within Bluetooth range of the system. The way that this works is that the system expects you to bring your phone with you when you arm the system and leave for the day. When you return later on, you will bring your phone back with you. The system will automatically receive the Bluetooth signal from your phone, and it will disarm without you needing to enter a code. Remember, this feature only works if you enable it. This will require you to program your phone with the Qolsys IQ Panel 2 System as a Bluetooth device. You will also want to make sure you adjust the Bluetooth settings for the panel accordingly.

Our Part 5 video covers some miscellaneous tips for the Qolsys IQ Panel 2 System. Specifically, we cover system codes, the messaging center, and system panic buttons. Setting up user codes is something you will likely do if someone new is now using the panel, and they need their own code. Likewise, you may want to delete a code if someone is no longer permitted to use your system. At the very least, you should change the system Master Code (also called Admin) away from its default of 1234. Keeping this code at 1234 is a major security risk!

The messaging center for the Qolsys IQ Panel 2 is a great way to see if any events occurred on your system while you were away. These events can include things like someone making an incorrect code entry, a system trouble that occurred, an alarm on the system, and so much more. You can conveniently access this section right from the main screen of your IQ Panel 2. If you see that your messaging center has a notification, then you should check it as soon as you can so that you can see what occurred on your system. Once you "acknowledge" the notifications, the messages will clear.

Lastly, there is a section of the main screen of the IQ Panel 2 where you can trigger emergency panics. These include Police Panics, Fire Alarms, and Auxiliary Medical Panics. Additionally, you can activate Police and Medical Panics as "silent" so that no audible siren occurs when the alarm is triggered. Keep in mind that these panics are really only useful if you have your IQ Panel 2 monitored with central station monitoring service. The central station will receive the incoming alert and know to take action immediately. If you only have self-monitoring service, then a notification for the alarm will still be sent to you via text and/or email notification. But if you already knowingly triggered one of the system panic buttons, then that isn't very useful. However, for users with central station service, these panic buttons can be a quick and easy way to get help during an emergency.


We hope that these videos help you get started with your new Qolsys IQ Panel 2 Plus System! Remember, you can always email us at support@alarmgrid.com if you have any further questions or if you need further assistance. Our support hours are from 9am to 8pm ET M-F. We look forward to hearing from you!

Tags: , , , , , , , , , , ,

Comments


Posted By

Hi DIYers! Today, we're presenting our own guide for installing the Qolsys IQ Panel 2 Plus. This system is very easy to use, and it can be installed by virtually anyone using nothing more than a screwdriver! This is the perfect security system for your home, office, or apartment!

Qolsys iq panel 2 at and t wireless security system with at and Most of the information presented in this post can be found in the Qolsys IQ Panel 2 DIY Installation Manual. You are free to follow along with that manual, which can be found here. We also have three (3) videos that we will include along the way. Feel free to follow along with those as well. All of this information applies to both the original IQ Panel 2 and the newer IQ Panel 2 Plus. With that out of the way, let's get started!

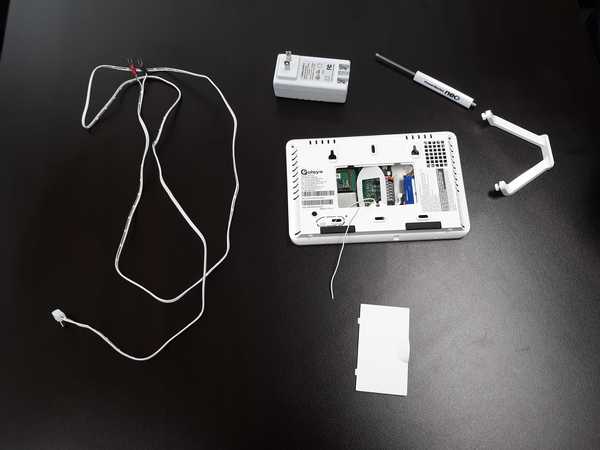
The first thing you will want to do is power on the system. The Qolsys IQ Panel 2 Plus comes with everything you need to get started. Once you have opened up the box, you should locate the panel, the power supply transformer, the power wire, the panel back cover, and the table stand. You will also want to have a screwdriver on hand.


Start by connecting the spade lugs of the power cable to the transformer. The IQ Panel 2 Plus uses DC power, so you must make sure to follow polarity. That means connecting the positive (+) wire and negative (-) wire accordingly. The positive and negative ends on the IQ Panel 2 power cable are marked for this purpose. The positive (+) wire has grey dashes and ends in a red spade connector. The negative (-) wire is solid white without grey dashes and ends in a black spade connector. Make sure that the wires are connected with the proper terminals on the transformer. You can see the positive (+) and negative (-) terminals marked on the transformer. The connection should be nice and snug, but not overly tight.

From there, you can connect the other end of the power cable to the IQ Panel 2 Plus System. There is a simple barrel connection for this purpose. The transformer can then be plugged into a wall outlet. When applying the panel back cover, make sure to run both the power cable and the thin RF receiver cable out from the indentation on the back cover. The back cover should snap nicely into place. The convenient table stand can be installed by putting it into the keyhole slots on the back of the panel and then sliding up. You can power on the system by pressing and holding the side power button until the system LED remains lit.


After the system powers on and boots up, you will be greeted by the Setup Wizard. It is recommended that you go through the Setup Wizard, as it will walk you through the entire setup process. Note that some steps of the Wizard will require you to activate the system for monitoring service. This involves registering the panel's built-in cellular communicator with Alarm.com. This is optional for initial set up. You can always register the cellular communicator with Alarm.com later.

Remember that activating the system is something you will definitely want to do before too long, as that is the only way for it to send out signals to you and/or a central station. Remember that you will need to provide the IMEI Number for the system in order for your monitoring company to activate the cellular communicator. This can be found on a sticker on the back of the panel. It will also be shown as you move through the Wizard.

You will do several things as you go through the Setup Wizard. You will connect the system to a WIFI network, run an initial check for the system, add sensors, perform an initial sensor test, set up the built-in panel glass break sensor, add Z-Wave home automation devices, pair your phone for automatic Bluetooth disarming, pair secondary IQ Remote Keypads, and add system users. Remember that you will want to have a good idea of Sensor Groups when enrolling sensors. You can learn all about the IQ Panel 2 Sensor Groups in this helpful FAQ.


The last thing you will want to do is install your sensors. We only focused on door and window contacts and motion sensors, but many of the same principles apply across any sensor type. What's great about wireless sensors that are used with the IQ Panel 2 Plus is that they can be mounted without drilling holes into the wall or using any power tools. You can safely mount and secure these sensors using double-sided foam tape. Most wireless sensors come with their own double-sided tape for this purpose, or you can buy some off our site!

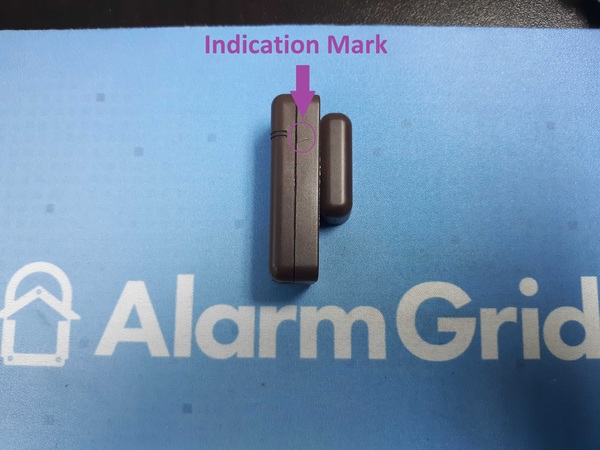
There are a few general tips when mounting these sensors. When mounting door and window contacts, you should have the magnet on the moving structure of the door or window, and the sensor itself on the door or window frame. Make sure the magnet is aligned with any indication marker shown on the sensor. Also remember to keep the magnet spacing gap in mind. Most Qolsys Door and Window Sensors allow for a magnet spacing gap of up to 0.75 inches.


As for motion sensors, you should have them mounted flat on a wall or corner-mounted. But keep in mind that only a flat-mount will allow you to install without drilling any holes. The motion sensor should be nice and level, and it should be installed at a height between 6 and 8 feet. Qolsys recommends 7.5 feet, which provides the best possible results. The motion sensor should not be facing any windows, vents, or air ducts. It should also not be facing any nearby furniture or stairwells if you have pets!

Most importantly, remember to test ALL your sensors after the final installation!


And that wraps up our Part 1 Guide for installing and using the Qolsys IQ Panel 2 Plus. Look forward to Part 2 coming soon! If you have any questions about the Qolsys IQ Panel 2 Plus or our monitoring service, please reach out to us by emailing support@alarmgrid.com. Remember that our support hours are from 9am to 8pm ET M-F. We look forward to hearing from you!

Tags: , , , , , , , , , , , , , , , , , , , , , , , , , , , , , ,

Comments


Posted By

Hi DIYers! We are happy to announce that we are now selling encrypted IQ Panel 2 Plus Kits. Each kit includes a brand-new IQ Panel 2 Plus with built-in LTE communicator, two (2) IQ DW MINI-S Encrypted Contacts, a single IQ Motion-S Encrypted Motion Sensor, a transformer and a power cable.

Qolsys iq panel 2 plus at and t lte with powerg s line and legac

Last week, we announced that we are now offering IQ Panel 2 Plus Kits that feature the Versa-GE Door and Window Contacts. While these are excellent door and window sensors, they do not offer encrypted communication. Users who want added security will want to use encrypted sensors whenever possible.

The encrypted sensors included with the encrypted IQ Panel 2 Plus Kits use rolling code encryption. When these sensors are enrolled with compatible encrypted systems, they become synced with the panel. This allows a rolling code to be established. Only the panel and that exact sensor will know what the next rolling code transmission will be.

Currently, we are offering two versions of the encrypted IQ Panel 2 Plus Kits. There is an AT&T LTE option and a Verizon LTE option. Both kits are listed below:

The version of the IQ Panel 2 Plus included in these kits is compatible with the Qolsys S-Line Sensors that use this rolling code encryption. Additionally, it is also compatible with the PowerG Sensors that use 128-bit AES encryption. Both the PowerG Sensors and the Qolsys S-Line Sensors are nearly immune to wireless takeover attacks.

Encrypted sensors like these are perfect for users who want protection against possible hacking attempts. The included system is also backwards compatible with non-encrypted 319.5 MHz sensors. This includes the legacy Qolsys and Interlogix/GE Sensors. Each encrypted Qolsys IQ Panel 2 Plus Kit listed on our site comes pre-packaged by Qolsys. As a result, we cannot make substitutions for these kits.

At this time, we do not have kits for the 345 MHz IQ Panel 2 Plus or the 433 MHz IQ Panel 2 Plus. If you want either of those systems, you will have to purchase all the components individually. The only encrypted sensors that can be used with those systems are the PowerG Sensors. Both systems include a transformer and a prepared cable for providing power.

We are sure that many customers will love these new encrypted kits! If you have any questions please email us at support@alarmgrid.com. You may also call us at (888) 818-7728 from 9am to 8pm EST M-F to speak to one of our alarm system planners. We look forward to helping you design the perfect system for your home!

Tags: , , , , , , ,

Comments


Posted By

If you're looking to obtain alarm monitoring service for your home, then you can't go wrong with one of our home security system kits. Each kit has everything you need to get started. One of our highly-trained technicians will call you to active your system, and your home will be protected!

Honeywell lyricpk lte a wireless security system w slash at and

With an Alarm Grid Security System Kit, you can expect several essential components. You will receive a wireless alarm control panel that serves as the central hub for your system. This is where you can arm and disarm your system and make programming changes. You will also be able to access your system from an interactive service platform like Total Connect 2.0 or Alarm.com. This is great if you need to control your system while you are away or if you just want to make sure you remembered to arm your system before you left!

Each kit also includes door and window sensors and a motion detecting sensor. The door and window sensors will alert your security system if a door is opened, while the motion sensor will respond to a person moving throughout the area. We offer kits with varying numbers of sensors so that you can choose a kit that is the perfect size for your home or apartment! We also sell individual sensors if needed. You can start with a small security system now and then expand upon it later. Do whatever works for your home!

Users can also expect a Honeywell LT-Cable with each kit. This cable makes it super easy to provide power to your system with the included transformer. You won't need to strip or prepare any wires. The cable comes completely ready. You will just need a screwdriver to attach it. We also recommend choosing a kit that comes with a cellular communicator. This will serve as a reliable backup in case there is ever an internet outage in your home. If the internet goes down, your system will automatically switch to its cellular backup. Not all our kits include a cellular communicator, but we strongly recommend getting one!

Also, don't feel intimidated if you have never installed a security system before! Some other companies may not want you to believe it, but installing your own system is super easy! In fact, most wireless alarm systems can be set up using nothing more than a screwdriver. Wireless sensors can be mounted with double-sided foam tape, and wireless panel menus are easy to navigate. And our technicians will be there to help you every step of the way with online and phone support. Remember, you get free support as an Alarm Grid monitored customer. Before you know it, your brand-new system will be up and running!

Alarm Grid is your home for all your security system kits! If you need help choosing a system, please reach out to us! You may email support@alarmgrid.com or call (888) 818-7728 during our business hours of 9am to 8pm EST M-F. Just tell us about your home and what kind of monitoring service you want. Our planners will help you determine the best security system for your house or apartment. We are always happy to help, and we look forward to hearing from you!

Tags: , , , , , , , , , , ,

Comments