Promotional Posts

Posted By

Hi DIYers! Today, we're presenting our own guide for installing the Qolsys IQ Panel 2 Plus. This system is very easy to use, and it can be installed by virtually anyone using nothing more than a screwdriver! This is the perfect security system for your home, office, or apartment!

Qolsys iq panel 2 at and t wireless security system with at and Most of the information presented in this post can be found in the Qolsys IQ Panel 2 DIY Installation Manual. You are free to follow along with that manual, which can be found here. We also have three (3) videos that we will include along the way. Feel free to follow along with those as well. All of this information applies to both the original IQ Panel 2 and the newer IQ Panel 2 Plus. With that out of the way, let's get started!

The first thing you will want to do is power on the system. The Qolsys IQ Panel 2 Plus comes with everything you need to get started. Once you have opened up the box, you should locate the panel, the power supply transformer, the power wire, the panel back cover, and the table stand. You will also want to have a screwdriver on hand.


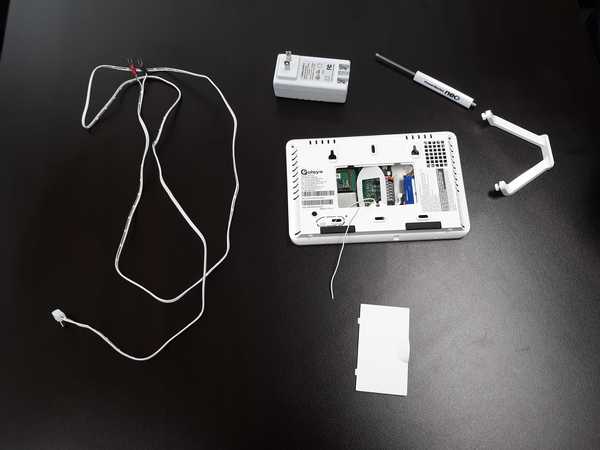
Start by connecting the spade lugs of the power cable to the transformer. The IQ Panel 2 Plus uses DC power, so you must make sure to follow polarity. That means connecting the positive (+) wire and negative (-) wire accordingly. The positive and negative ends on the IQ Panel 2 power cable are marked for this purpose. The positive (+) wire has grey dashes and ends in a red spade connector. The negative (-) wire is solid white without grey dashes and ends in a black spade connector. Make sure that the wires are connected with the proper terminals on the transformer. You can see the positive (+) and negative (-) terminals marked on the transformer. The connection should be nice and snug, but not overly tight.

From there, you can connect the other end of the power cable to the IQ Panel 2 Plus System. There is a simple barrel connection for this purpose. The transformer can then be plugged into a wall outlet. When applying the panel back cover, make sure to run both the power cable and the thin RF receiver cable out from the indentation on the back cover. The back cover should snap nicely into place. The convenient table stand can be installed by putting it into the keyhole slots on the back of the panel and then sliding up. You can power on the system by pressing and holding the side power button until the system LED remains lit.


After the system powers on and boots up, you will be greeted by the Setup Wizard. It is recommended that you go through the Setup Wizard, as it will walk you through the entire setup process. Note that some steps of the Wizard will require you to activate the system for monitoring service. This involves registering the panel's built-in cellular communicator with Alarm.com. This is optional for initial set up. You can always register the cellular communicator with Alarm.com later.

Remember that activating the system is something you will definitely want to do before too long, as that is the only way for it to send out signals to you and/or a central station. Remember that you will need to provide the IMEI Number for the system in order for your monitoring company to activate the cellular communicator. This can be found on a sticker on the back of the panel. It will also be shown as you move through the Wizard.

You will do several things as you go through the Setup Wizard. You will connect the system to a WIFI network, run an initial check for the system, add sensors, perform an initial sensor test, set up the built-in panel glass break sensor, add Z-Wave home automation devices, pair your phone for automatic Bluetooth disarming, pair secondary IQ Remote Keypads, and add system users. Remember that you will want to have a good idea of Sensor Groups when enrolling sensors. You can learn all about the IQ Panel 2 Sensor Groups in this helpful FAQ.


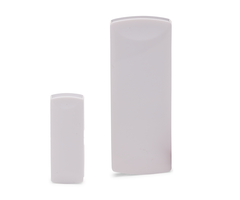
The last thing you will want to do is install your sensors. We only focused on door and window contacts and motion sensors, but many of the same principles apply across any sensor type. What's great about wireless sensors that are used with the IQ Panel 2 Plus is that they can be mounted without drilling holes into the wall or using any power tools. You can safely mount and secure these sensors using double-sided foam tape. Most wireless sensors come with their own double-sided tape for this purpose, or you can buy some off our site!

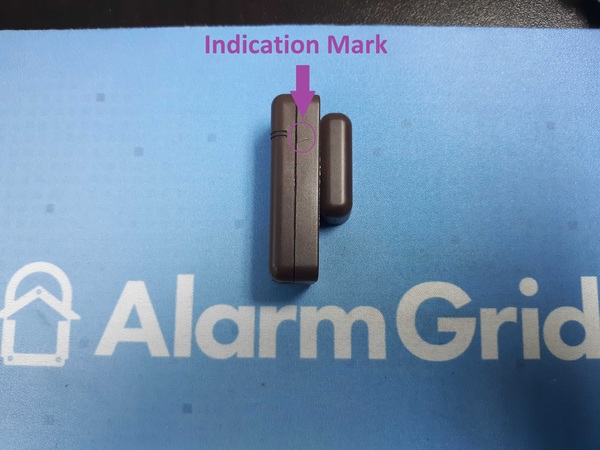
There are a few general tips when mounting these sensors. When mounting door and window contacts, you should have the magnet on the moving structure of the door or window, and the sensor itself on the door or window frame. Make sure the magnet is aligned with any indication marker shown on the sensor. Also remember to keep the magnet spacing gap in mind. Most Qolsys Door and Window Sensors allow for a magnet spacing gap of up to 0.75 inches.


As for motion sensors, you should have them mounted flat on a wall or corner-mounted. But keep in mind that only a flat-mount will allow you to install without drilling any holes. The motion sensor should be nice and level, and it should be installed at a height between 6 and 8 feet. Qolsys recommends 7.5 feet, which provides the best possible results. The motion sensor should not be facing any windows, vents, or air ducts. It should also not be facing any nearby furniture or stairwells if you have pets!

Most importantly, remember to test ALL your sensors after the final installation!


And that wraps up our Part 1 Guide for installing and using the Qolsys IQ Panel 2 Plus. Look forward to Part 2 coming soon! If you have any questions about the Qolsys IQ Panel 2 Plus or our monitoring service, please reach out to us by emailing support@alarmgrid.com. Remember that our support hours are from 9am to 8pm ET M-F. We look forward to hearing from you!

Tags: , , , , , , , , , , , , , , , , , , , , , , , , , , , , , ,

Comments


Posted By

Hi DIYers! We have an exciting new offering to tell you about today. The Alarm.com ADC-SVR122 Stream Video Recorder is now available in a 2TB storage option. This is in addition to the existing 500MB and 1TB storage options. You can buy the 2TB ADC-SVR122 from the Alarm Grid website now!

Alarm dot com adc svr122 stream video recorder

If you don't know about the Alarm.com Stream Video Recorder (SVR), it's a device that allows you to store digital recordings for Alarm.com Security Cameras. You need an SVR device if you want to establish a set recording schedule for your ADC Cameras. This includes a 24-hour continuous recording schedule.

Any footage stored on an Alarm.com SVR device can be accessed remotely through the Alarm.com website or mobile app. Additionally, you can also view stored video locally at the SVR itself using an HDMI monitor and a USB mouse. For more information on how the Alarm.com SVR works, please check this FAQ.

Just like the existing SVR-122 models, the new 2TB model supports up to eight (8) Alarm.com Cameras, HDMI live-streaming, and remote viewing for any stored clips. Remember that you need a monitoring plan with video surveillance and access to Alarm.com to use the SVR-122. For Alarm Grid Customers, this can be a Platinum Level Plan (Self or Full) or a Video-Only Plan.

If you have any questions about the ADC-SVR122 or any of our products or services, please reach out to us! The best way to contact us is to email support@alarmgrid.com. We will check your email at our earliest convenience and reply back as soon as possible. Remember that our support hours are from 9am to 8pm ET M-F. We look forward to hearing from you!

Tags: , , , ,

Comments


Posted By

Hi DIYers! We are very happy to announce that we have some exceptional new products from Alarm.com. There is a new Z-Wave Plus smart water valve, an upgraded ethernet-to-WIFI bridge for Alarm.com PoE Cameras, and a digital doorbell adapter for use with SkyBell Video Doorbell Cameras.


The first new product we will be discussing today is the Alarm.com ADC-SWV100 Smart Water Valve. This smart water valve uses Z-Wave Plus technology to communicate with your security system or Z-Wave hub. It allows you to remotely shut-off your main water line from virtually anywhere. This can be very convenient if a flood or leak occurs while you are away. The device is perfect for pairing with flood sensors that you have enrolled with your alarm panel. You can even set up smart scenes to have the device shut-off the water automatically whenever a flood sensor detects a leak.

Although the ADC-SWV100 was built with Alarm.com in mind, the versatile device can really be used with any Z-Wave controller that supports smart water valves. This includes Honeywell Alarm Systems that use the Total Connect 2.0 platform. One important thing to note is that if you use this device with Alarm.com, then you will need to have your monitoring company enable the Water Management Add-On Package for your account. If you have monitoring service with Alarm Grid, then we will do this for no additional monthly charge.


Next up we have the Alarm.com ADC-W110 Ethernet-to-WIFI Bridge. This accessory lets you take a hardwired ethernet device and have it communicate wirelessly across a local WIFI network. The device is great for use with compatible Alarm.com Cameras that use power over ethernet, also known as PoE. By using the ADC-W110, you can eliminate the need to run an ethernet cable from the IP router to the camera.

What's super convenient is that both power and IP data are supplied from the ADC-W110. You just need to connect the PoE camera with the ADC-W110 using an ethernet cable. The ADC-W110 will then take care of the rest! This device is actually a newer version of the older ADC-W100, which as of late October 2019 is still available. Keep in mind that you will still need to connect the ADC-W110 with a wall outlet for power.

Lastly, we have the Alarm.com ADC-VACC-DB-A SkyBell Digital Doorbell Adapter. This adapter makes any SkyBell Doorbell Camera with a digital doorbell chime. Normally the SkyBell devices only work with mechanical doorbell chimes. We actually created an FAQ that will help you get started using the SkyBell Digital Doorbell Adapter with your digital doorbell chime. You can check it out right here.

If you have any questions about these new products, or if you would like to learn more about our monitoring services or Alarm.com, please reach out to us! The best way to contact us is to email support@alarmgrid.com. We will review your email at our earliest convenience and reply back as soon as possible. Remember that our support hours for responding to emails are from 9am to 8pm ET M-F. We look forward to hearing from you!

Tags: , , , , , , , , ,

Comments


Posted By

Hi DIYers! Today, we're taking a quick look at the new DSC PG9936 PowerG Smoke & Heat Detector. This device is great for anyone looking for a reliable fire-safety sensor for use with a PowerG-compatible System. The new sensor offers some impressive features, and it is super easy to use!


The DSC PG9936 replaces the older DSC PG9916. The new model features an updated designed and enhanced detection for improved functionality. However, most of the specs from the PG9916 return to the PG9936. If you have an existing PG9916, then it will continue to work just fine. But it's great to see a new smoke and heat detector available!

For smoke detection, the PG9936 uses photoelectric technology. This is arguably the most consistent and more reliable smoke detection method available, and it will help ensure that any fire is detected as quickly as possible. The sensor also features a built-in 135°F fixed temperature heat sensor for redundancy. This will give you peace of mind in knowing that any fire will be properly detected.

Any system that supports PowerG can use the DSC PG9936 Sensor. This includes any Qolsys IQ Panel 2 Plus and any DSC PowerSeries NEO with added PowerG Receiver. It can be easily auto-enrolled by putting the panel into its enrollment mode and then powering on the PG9936 by inserting its batteries. You are welcome to check out the PG9936 Install Guide for more information.

Also returning to the DSC PG9936 is one-go-all-go support. This means that if the sensor is activated, all other PowerG Smoke Detectors paired with the panel will also activate. This is very important for ensuring that everyone in the building is properly alerted to the fire. Remember that each PowerG Smoke Detector has an 85 dB sounder for alerting building occupants.

Each PG9936 uses three (3) AAA batteries for power (included), and has a three (3) battery life on average. The sensor features a tri-colored LED status light for assisting with enrollment and troubleshooting. It measures five (5) inches across and is 2.5 inches deep. There is a test button on the device for easy testing when needed. Remember to place your system on test mode first!

You can get the PG9936 from the Alarm Grid website right now! If you have any questions about the DSC PG9936 Smoke & Heat Detector or any of our other products, please email us at support@alarmgrid.com. Our support team checks emails between 9am and 8pm ET M-F. We look forward to hearing from you!

Tags: , , , , , , , ,

Comments


Posted By

Hi DIYers! Today, we are happy to unveil the Honeywell Home VISTA-21iPLTE. This is the newest hardwired system from the VISTA Series by Resideo, and it is essentially replacing the existing VISTA-21iP System. The big addition is its ability to support special plug-in LTE communicators.


The Honeywell Home VISTA-21iPLTE is actually the same as a VISTA-21iP System, except that the 21iPLTE board has been upgraded to support new plug-in LTE communicators. This includes the Honeywell Home LTE-21V with Verizon LTE (available now).

This new plug-in module is just like the older Honeywell VISTA-GSM4G Communicator, which is conveniently plugged into the VISTA-21iP board. The only difference is that the LTE-21V supports LTE connectivity. This is important for anyone looking to use cellular communication with a security system.

The reason you want to use an LTE communicator with your alarm system is that it offers superior speed and reliability when compared with older 3G and CDMA networks. Also, these older networks are in the process of being shut down. By going with LTE, you are providing a long-term solution for your panel.

Just like the existing VISTA-21iP, the new VISTA-21iPLTE has a built-in IP communicator, which is basically the equivalent of a Honeywell 7847i Communicator. Even if you don't add a cell module to the VISTA-21iPLTE, you will still be able to connect it with AlarmNet for IP monitoring and access to Total Connect 2.0.

Honeywell vista gsm4g alarmnet vista 21ip cellular alarm monitor

But, adding a cellular communicator is very important for dealing with internet outages. If the internet goes out and you don't have a cellular backup, then your 21iPLTE will lose connectivity with the AlarmNet360 Servers. Maintaining this connection is necessary for properly utilizing any monitoring service. This makes cellular backup crucial!

By connecting your VISTA-21iPLTE Panel with AlarmNet360, you will also be able to control your system through Total Connect 2.0. This is an interactive monitoring and automation platform that you can access from nearly anywhere using your phone. Make sure you choose a monitoring plan with TC2 service!

If you plan to use cellular communication with your VISTA-21iPLTE and Alarm Grid, then you will need a Gold or Platinum Level Plan (Self or Full). This is needed to activate the cellular radio and connect it with AlarmNet360. You can find more information about all our monitoring plans on our monitoring page.

Once you have access to Total Connect 2.0, you will be able to control your 21iPLTE System from any location with network access. You can use Total Connect 2.0 to arm and disarm, check current system status, control Z-Wave devices (controller required), view IP cameras (video monitoring required), and so much more!

Honeywell vista 21ip internet alarm control panel open

As far as functionality is concerned, the VISTA-21iPLTE is just like like a VISTA-21iP. Other than the added support for the LTE-21V, they are the same panel. As a result, almost any specification that applies to the VISTA-21iP also applies to the VISTA-21iPLTE.

The VISTA-21iPLTE is capable of supporting up to 64 total zones. However, you can only use eight (8) hardwired zones out of the box. To use additional wired zones, you will need to add Honeywell 4219 Expansion Modules. To use wireless sensors, you will need a wireless receiver, such as the 6160RF Keypad.

By adding up to five (5) 4219 Expansion Modules, you can use up to 48 hardwired zones on the VISTA-21iPLTE. Keep in mind that Zones 2 through 8 support zone doubling. Zone 1 is a special zone for use with 2-wire smokes. That is why it does not support zone doubling, although it can be used as a burglary or environmental zone if 2-wire smokes are not needed. You can have up to 16 2-wire smokes on the zone.

Adding a compatible wireless receiver will let you use wireless 345 MHz sensors from the Honeywell 5800 Series. A standard wireless receiver will only support uni-directional (one-way) devices. But a wireless transceiver like the 6160RF will also let you use bi-directional devices. Up to 56 wireless zones can be used. The number of available wireless zones depends on the number of wired expansion zones being used.

It is important to keep in mind that the total number of zones (wired and wireless) can never exceed 64. Additionally, zones 49 through 64 on a VISTA-21iPLTE are designated as key fob zones. But you can use these zones with any wireless sensor, as long as you have a wireless receiver added.

Honeywell 6160rf alphanumeric alarm keypad with integrated transceiver

There are also some other accessories you can add to a VISTA-21iPLTE System. First and foremost, you will want a keypad for controlling the system. As stated earlier, the Honeywell 6160RF is a great option. If you don't plan to use wireless sensors, then the standard Honeywell 6160 will work just as well.

You might also consider getting a touchscreen keypad for the system. These can be easier to use than push-button keypads. But just remember that only push-button keypads can backdoor into programming. The new Honeywell 6290W is a great option. Or you could go with the Tuxedo Touch which will also add Z-Wave functionality.

There are limits to the number of keypads you can use with the system. Up to eight (8) push-button keypads can be added. Touchscreen keypads count as AUI devices, and the VISTA-21iPLTE will only support a max of four (4) of these. Keep in mind that the Total Connect 2.0 service also counts as an AUI device!

Speaking of Z-Wave, a Z-Wave controller is needed if you want to use Z-Wave devices with the system. Adding a Tuxedo Touch is a great way to add Z-Wave capabilities. If you already have a keypad, then the standalone Honeywell VAM was an option, but it has recently been discontinued. Remember, you can control all Z-Wave devices through TC2.

Ultratech 1240 alarm control panel battery backup 12v 4 dot 5ah

Lastly, the system comes with its own transformer for supplying power. You will still need to supply a backup battery like the UltraTech IM-1250F1. Power cabling is not included with the VISTA-21iPLTE system, so you must add your own. We recommend using 18-gauge wiring, or even better, a Honeywell LT-Cable.

We would also like to mention that the VISTA-21iPLTE supports two (2) partitions, along with a third common partition. It also supports other miscellaneous features like Quick Arming, Scheduling, up to 48 unique user codes, 100-event event log, two (2) low-current trigger outputs, chime functionality, and more.

The VISTA-21iPLTE System and the LTE-21V LTE Communicator are both available for purchase now from the Alarm Grid website. This system is great for anyone looking for a simple, yet effective hardwired panel. It will certainly serve as a long-lasting addition to your home or business and help keep you safe.

If you have any questions about the system, please email us at support@alarmgrid.com. We will check your email at our earliest convenience and reply as soon as possible. You may also call us at (888) 818-7728. Remember that our support hours are 9 am to 8 pm EST M-F. We look forward to hearing from you!

Tags: , , , , , , , , ,

Comments


Posted By

Hi DIYers! Today, we are promoting a new add-on package available for Alarm.com users. Alarm Grid is now proud to offer the Alarm.com Wellness Platform for customers receiving service from Alarm.com. This robust add-on is perfect for anyone with an elderly or mobility challenged loved one.


If you have an elderly, disabled, or mobility challenged loved one, then you are likely aware of the challenges involved. On one hand, you want to respect their privacy and allow them to live as independently as possible. But you also want to make sure that they are kept safe and that they can get help if needed. We have seen many offerings through the years that help users accomplish this goal. But the Alarm.com Wellness Platform might the most complete yet.

Just last week, we talked about some of the new Alarm.com wellness sensors. It seems Alarm.com is really pushing this market with their all-new wellness platform. This is more than just an emergency alert button or an occupancy sensor. This is an entire platform and user interface (UI) designed to monitor your loved one's activity and let you know about any unusual occurrences. This is yet another great way to take advantage of your Alarm.com Security System.

The Alarm.com Wellness Platform provides you with many great features that are perfect for monitoring your loved one. You can receive text and/or email alerts from the platform so that you are kept informed about any important activity. Below are just some of the ways you can use the platform:

  • Establish patterns of your loved one's usual activity, and receive alerts if activity occurs at an unusual time.
  • Make sure your loved one is active and moving around like normal.
  • Receive alerts regarding any strange or suspicious wandering or activity at odd hours.
  • Set automated security and smart home functions to make your loved one's life easier.
  • Integrate with personal emergency response pendants to know if your loved one needs help.
  • Monitor your loved one's activity, including how long they stay in bed, remain seated, or spend time outside.
  • Create an organized method for keeping track of caregivers and knowing when they come and go.

Once you have your Alarm.com account enabled for the wellness platform, you can start creating specific wellness alerts regarding the activity you want to monitor. This will allow you to know that your loved one is alright, while still maintaining their independence and privacy. Alarm.com has also released a variety of products designed to be used with the platform. At this time, we are offering the following Alarm.com Wellness Products:

The Alarm.com Wellness Platform is also great for pairing with fall pendants. These pendants go above and beyond the typical medical alert button. These devices feature built-in accelerometers that will trigger an emergency medical response upon sensing a fall. This way, your loved one will still receive help even if they fall and are unable to press the button themselves. We currently have two (2) fall pendants available:

We also want to give a special shout-out to the Qolsys IQ Panel 2 Plus for its innovations in the wellness arena. As part of Firmware Version 2.4.0, the panel offers a Wellness Menu that allows for nurses and/or caregivers to check-in/out as needed. You can easily integrate this feature with the Alarm.com Wellness Platform as well. This Wellness Menu also offers a big auxiliary panic button in case of an emergency. You can enable the menu from within Installer Settings.


In order to use the Alarm.com Wellness Platform, you must first have a monitoring plan that includes Alarm.com service. If you are monitored with Alarm Grid, you will need a Gold or Platinum Level Plan (Self or Full). More information is available on our monitoring page. From there, you will also need your monitoring company to enable the Wellness Platform add-on package on your account. Please note that enabling this service may result in an increase to your monthly monitoring fee.

If you are an Alarm Grid customer and you are looking to add this service to your account, we recommend emailing us at support@alarmgrid.com for more information. You may also email us if you have any questions about this platform. Remember that our support hours are from 9am to 8pm EST M-F. Keep that in mind if you email us outside of our usual business hours. We look forward to hearing from you and answering your questions about the ADC Wellness Platform!

Tags: , , , , , , , , , , , , , ,

Comments


Posted By

Hi DIYers! Today, we're going to talk about a new product from Resideo, the Honeywell Home 6290W 7" Touchscreen Keypad. This is the newest keypad for Honeywell VISTA Systems. It offers some exciting new features and a beautiful, sleek design that is sure to impress. Let's check it out!


Countless users have had Honeywell VISTA Security systems in their homes and businesses for many years. And it's no surprise considering what great alarm systems they are. But we hear all the time of users wanting to find a way to upgrade from a regular push-button keypad. Resideo has recognized this, and they have continued to offer various touchscreen keypads for their VISTA Systems. The newest of these is the Honeywell Home 6290W.

The Honeywell Home 6290W features an eye-catching, modern design that is sure to fit in nicely with any decor. We expect this clean, straightforward look to be used with future security systems as well. The keypad's 7" Wide Super VGA touchscreen, 1024 x 600 resolution, and backlit display all help to make this keypad easy to use and navigate. You will surely appreciate the keypad's tablet-like design and its thin profile that leaves it less than 1" off the wall when mounted.

There is a lot to love about the performance of the keypad as well. The keypad features a console mode that allows you to operate the device like you would for an Alphanumeric Keypad. This is great for deep-level programming. However, you will still want to keep your push-button keypad around in case you ever need to backdoor the system. Other features include quick arming, WIFI connectivity for firmware updates, a digital picture frame function, and full voice and chime.

The Honeywell Home 6290W Keypad is available from Alarm Grid now! If you have any questions about this keypad, please reach out to us by emailing support@alarmgrid.com. Keep in mind that our support hours are Monday thru Friday, 9am to 8pm EST. We look forward to hearing from you!

Tags: , , , ,

Comments


Posted By

Hi DIYers! Today, we're taking a look at one of our favorite PowerG Sensors, the DSC PG9312. This is an outdoor contact that is perfect for use on any gates, fences, barn doors, patio doors, and more. It is truly a versatile and effective PowerG Sensor. We are sure you will be impressed!


Many users want some way of monitoring outdoor openings and structures. After all, you don't want a stranger opening your fence and lurking around your backyard! That is why alarm manufacturers started making outdoor contacts. These sensors are just like regular door and window sensors, except they have weather-resistant exteriors that prevent dust and moisture from getting inside. They also have larger magnet spacing gap allowances to accommodate for the various fences and gates that they are commonly used with.

With the DSC PG9312, users with PowerG Systems finally have the outdoor door and window contact sensor they have been looking for. This sensor boasts all of the fantastic capabilities that PowerG Sensors are known for. It has a wireless communication range of up to 2km depending on the system when used in an open air environment. All of its communications utilize military-grade encryption that prevents any wireless hacking or takeover attempts. This also makes the sensor immune to any RF jamming techniques.

There are also some excellent features exclusive to the PG9312. Its magnet spacing gap is up to 1.75 inches when installed on non-metal surfaces. This increases the versatility of the sensor and allows you to use it on virtually any outdoor structure. Its magnet spacing gap when mounted on metal surfaces is still 1.25 inches, which is impressive in its own right. You can mount it to a round pole if needed using straps (not included). The sensor can also operate as a wireless transmitter for NC and NO contacts. You will want to use a 5.6k Ohm 1/2 watt resistor (Green, Blue, Red, Gold) if doing this.

There are some important notes about compatibility with this sensor. If you are planning to use the sensor with an IQ Panel 2 Plus, the system will need to be running Firmware Version 2.4.0 or higher. Older IQ2+ Firmware had an issue that made this particular sensor incompatible. Fortunately, it was fixed in version 2.4.0. Additionally, you can only choose one function for the sensor on an IQ2+ (contact reed switch, NC transmitter, NO transmitter). This selection is determined in zone programming. Other compatible systems like the DSC PowerSeries NEO and Iotega will let you use multiple functions with one sensor.

We made an FAQ to answer any additional questions you might have about using the PG9312 with an IQ Panel 2 Plus. You can check that out right here. We also have a guide to help you enroll it with an IQ2+. Otherwise, if you have any further questions about the PG9312, then please reach out us! The best way to contact us is through email at support@alarmgrid.com. We will check your email at our earliest convenience and reply back as soon as possible. We look forward to hearing from you!

Tags: , , , ,

Comments


Posted By

Hi DIYers! Today, we're taking a look at the new Interlogix Encrypted Sensors. There are three (3) sensors in this TX+ lineup. There is the Interlogix TX+DWS Door/Window Contact, the Interlogix TX+PIR Pet Immune Motion Sensor, and the Interlogix TX+2WAYFOB Key Fob. All are available now!

Interlogix tx e201 brown wireless door slash window sensor


First, we would like to give some background on these Interlogix TX+ Sensors. The wireless communication range for these sensors is listed at 500 feet when used in open air. They operate at an encrypted 319.5 MHz frequency, similar to the Qolsys S-Line Sensors. You can technically use these Interlogix TX+ Sensors with any 319.5 MHz system. This includes the Qolsys IQ Panel 2 Plus w/ 319.5 MHz Daughtercard and all of the Wireless Interlogix Panels.

However, these sensors will only utilize encrypted communication when paired with the Interlogix Simon XTi-5i System. If you don't know about this system, we actually started carrying it last month. Among its new features is the ability to support encrypted sensors. At the time, there weren't any encrypted sensors out for the system yet. Well now there are! When paired with any other compatible system, they will operate as non-encrypted wireless sensors.

The sensors themselves are straightforward and simple. The Interlogix TX+DWS Contact has a thin profile, and it will work great on nearly any door, window or cabinet. The Interlogix TX+PIR Motion Sensor offers a coverage area of 40 feet by 40 feet, as well as pet immunity for small animals weighing up to 80 pounds. Lastly, the Interlogix TX+2WAYFOB is a four (4) button key fob with buttons for arming, disarming, automation, and triggering an auxiliary panic.

We believe these sensors are a must-have for anyone with an Interlogix Simon XTi-5i System. Now you can take full advantage of the encrypted communication that the system offers! If you have any questions or if you want to learn more about these sensors, please reach out to us. The best way to contact us is to email support@alarmgrid.com. We will check your email at our earliest convenience and reply back as soon as soon as we can. We look forward to hearing from you!

Tags: , , , , , , , , ,

Comments


Posted By

Hi DIYers! We are happy to announce that we have some new wellness sensors available from Alarm.com. These are great for use with elderly or mobility challenged loved ones. There is an Alarm.com Bed Sensor and an Alarm.com Chair Sensor available on our website. Both operate at 319.5 MHz.


Having peace of mind in knowing that your elderly or mobility challenged loved one is alright can be very important. That is why Alarm.com created these new wellness sensors. They both work in a similar manner. The bed sensor will let you know when your loved one gets in and out of bed. The chair sensor will let you know when they sit down and get up from their usual chair. Both will activate upon sensing 50+ pounds of weight.

These wellness sensors are known as "occupancy sensors". We don't talk about these sensors fairly often, but they are relatively easy to understand. When your loved one is sitting down or in bed, the sensor will be in an "occupied" state. And when the bed or chair is empty, the sensor will enter a "vacant" state. Your system will announce whenever there is a change in status for the sensor.

But the real beauty in these sensors comes in their ability to be used with the Alarm.com platform. You can get text and/or email alerts regarding any sensor activity. It is also possible to configure notifications so that you only get alerts during certain times of day. This way you can set a schedule based around your loved one's usual activity.

The bed sensor is quite useful when paired with the "Sensor Left Open" notification. You might set up a notification to be sent if your loved one is out of bed for more than an hour. And you can also set a time frame so that notifications are only sent during periods when they are almost certainly in bed, say between midnight and 6am. That way, if your loved one gets out of bed in the middle of the night and suffers a fall and is unable to make it back, you will get an alert.

Even better is the new Alarm.com Wellness Platform that allows for even more detailed notifications. You might set up alerts to be sent if your loved one never gets out of bed in the morning, or if they have remained seated for an unusually long period of time. We hope to show-off the feature in greater detail sometime soon. For now, just be aware that it is available upon request for Alarm.com users. Remember, Alarm Grid customers need a Gold Plan or higher to use ADC.

At this time, we are only offering 319.5 MHz versions of the bed and chair sensors. You will need a compatible 319.5 MHz system to use them. Examples include the Qolsys IQ Panel 2 Plus w/ 319.5 MHz Daughtercard and the Interlogix Simon Alarm Panels. For the IQ2, we recommend using Sensor Group 25 - Local Safety Sensor and an Occupancy Sensor Type. For an Interlogix Panel, you should use either Sensor Group 40 (chime) or 27 (no chime).

We expect other wireless frequencies to be available sometime in the near future. We will let you know once we have them available. If you have any questions about these new sensors or the new Alarm.com Wellness Platform, please reach out to us! The best way to contact us is to email support@alarmgrid.com. We will check your email at our earliest convenience and reply back as soon as possible. We look forward to hearing from you!

Tags: , , , , , , ,

Comments