Limited Availability on the New IQ Panel 5 Family
Posted ByUpdate: All versions and kits now available!!
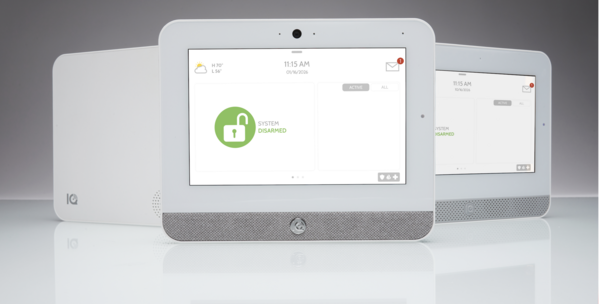
The IQ Panel 5 family has officially arrived, and we now have stock available on every model. The IQ Panel 5 family represents a major step forward in security system technology, featuring the Qualcomm DragonWing quad-core processor, Android 14, and built-in PowerG wireless support across all panel variants.
Stock is now available on every panel in the IQ5 family with the exception of the IQ5 Hub with AT&T LTE. As manufacturing ramps up, this panel will become available. We'll update this post when that happens.
IQ Panel 5 Family Variations
As the rollout continues, we will see additional variations become available. You can see a list of all of them below:
| SKU | Product Description | Available Date |
|---|---|---|
| IQP5017 | IQ Panel 5, Verizon LTE, PowerG | Available Now |
| IQP5018 | IQ Panel 5, AT&T LTE, PowerG | Available Now |
| IQH5017 | IQ5 Hub, Verizon LTE, PowerG | Available Now |
| IQH5018 | IQ5 Hub, AT&T LTE, PowerG | Available Now |
| IQN5017 | IQ5 NS, Verizon LTE, PowerG | Available Now |
| IQN5018 | IQ5 NS, AT&T LTE, PowerG | Available Now |
If you click any of the product links above for items that are not yet available, the product page will appear with a placeholder price. Once these items become available, we will update the pricing and this blog. You can bookmark this post and check back anytime to see the latest availability for the panel variation that interests you.
Daughter Cards
All IQ Panel 5 family panels come with PowerG built-in. If you need to support legacy wireless sensors from an existing system, you can add an optional daughter card. These are the same cards used with the IQ Panel 4 and are available now:
| SKU | Description | Status |
|---|---|---|
| QC0001-840 | 319.5 MHz Daughter Card (Interlogix/GE/Qolsys) | Available Now |
| QC0005-840 | 345 MHz Daughter Card (Honeywell/2GIG) | Available Now |
| QC0004-840 | 433 MHz Daughter Card (DSC) | Available Now |
Accessories
Each IQ Panel 5 family system includes a SmartMount wall mount bracket in the box. The table stand is sold separately and works with all three panel models:
| SKU | Description | Status |
|---|---|---|
| IQ5ST | IQ5 Table Stand (fits IQ Panel 5, IQ5 Hub, and IQ5 NS) | Available Now |
IQ Panel 5 Family Kits
Looking to get everything you need in one package? Our starter kits bundle a panel with the new PowerG+ sensors, the updated line of PowerG sensors featuring a sleeker, more modern design while delivering the same long-range, encrypted wireless performance PowerG is known for.
3-1 Kits are perfect for smaller homes or apartments. Each kit includes one panel, three PGP9303 door/window sensors, and one PGP9914 motion sensor.
10-1 Kits are ideal for larger homes with more entry points. Each kit includes one panel, ten PGP9303 door/window sensors, and one PGP9914 motion sensor.
IQ Panel 5 Kits:
| SKU | Description | Status |
|---|---|---|
| IQ5PK3-V | IQ Panel 5 Verizon LTE 3-1 Kit | Available Now |
| IQ5PK10-V | IQ Panel 5 Verizon LTE 10-1 Kit | Available Now |
| IQ5PK3-A | IQ Panel 5 AT&T LTE 3-1 Kit | Available Now |
| IQ5PK10-A | IQ Panel 5 AT&T LTE 10-1 Kit | Available Now |
IQ Hub Kits:
| SKU | Description | Status |
|---|---|---|
| IQ5HK3-V | IQ5 Hub Verizon LTE 3-1 Kit | Available Now |
| IQ5HK10-V | IQ5 Hub Verizon LTE 10-1 Kit | Available Now |
| IQ5HK3-A | IQ5 Hub AT&T LTE 3-1 Kit | Available Now |
| IQ5HK10-A | IQ5 Hub AT&T LTE 10-1 Kit | Available Now |
IQ5 NS Kits:
| SKU | Description | Status |
|---|---|---|
| IQ5NK3-V | IQ5 NS Verizon LTE 3-1 Kit | Available Now |
| IQ5NK10-V | IQ5 NS Verizon LTE 10-1 Kit | Available Now |
| IQ5NK3-A | IQ5 NS AT&T LTE 3-1 Kit | Available Now |
| IQ5NK10-A | IQ5 NS AT&T LTE 10-1 Kit | Available Now |
What is the IQ Panel 5 Family?
Like the IQ Panel 4 family, the IQ Panel 5 comes in three distinct variants designed to meet different installation needs and budgets:
IQ Panel 5 is the flagship model with a 7-inch HD touchscreen, built-in 13MP PortraitView camera for disarm photos, built-in glass break detection, dual microphones, and all the advanced features you would expect from a top-tier panel. The camera automatically captures photos without requiring manual tilt adjustment.
IQ5 Hub delivers the same 7-inch touchscreen experience and software interface as the IQ Panel 5 at a more accessible price point. It shares the same processor, operating system, and a similar feature set, making it an excellent choice for customers who want full touchscreen functionality without the flagship price.
IQ5 NS (No Screen) eliminates the touchscreen entirely. This panel is designed to be mounted out of sight and configured through the IQ Installer app available on iOS or Android. Status is conveyed through LED indicators: green for disarmed, red for armed. The IQ5 NS is ideal for installations where the panel will be hidden in a closet or utility room, and users prefer to control their system through the Alarm.com app, an IQ Remote keypad, or a third-party automation system like Control4.
IQ Panel 5 Family Comparison Chart
| Comparison Chart | IQ5 NS No Screen |
IQ5 Hub Cost-Effective |
IQ Panel 5 Flagship |
|---|---|---|---|
| Hardware | |||
| 7” Touchscreen | x | ✓ | ✓ |
| LTE & WiFi Dual-Path Communication Built-in | ✓ | ✓ | ✓ |
| PowerG + Built-in | ✓ | ✓ | ✓ |
| Bluetooth 5.0 + LE (Bluetooth Touchless Disarming) | ✓ | ✓ | ✓ |
| Microphones | x | 1 | 2 |
| PortraitView Panel Camera Built-in | x | x | ✓ |
| Panel Glass Break/Motion Built-in | x | x | ✓ |
| 24-Hour Lithium Polymer Backup Battery Pre-installed | ✓ | ✓ | ✓ |
| Software | |||
| Live View, Live Answer | x | ✓ | ✓ |
| IQ Installer Interface | ✓ | ✓ | ✓ |
| Full Alarm.com Integration | ✓ | ✓ | ✓ |
| Security | |||
| Speakers | 1 | 1 | 2 |
| 1 Piezo Siren | ✓ | ✓ | ✓ |
| Up to 242 User Codes | ✓ | ✓ | ✓ |
| PowerG + Wireless | ✓ | ✓ | ✓ |
| Compatible with IQ Hardwire PowerG | ✓ | ✓ | ✓ |
| 2-Way Voice | x | x | ✓ |
| Residential Certifications (UL 1023, 985, ULC-S545, ULC-S304) | ✓ | ✓ | ✓ |
| Commercial Certifications (UL 2610, ULC-S545, ULC-S304) | ✓ | ✓ | ✓ |
Key Improvements Over Previous Generations
All IQ Panel 5 family panels run on the Qualcomm DragonWing processor with Android 14, a significant upgrade from previous generations. The panels include Z-Wave 800-series modules with Z-Wave Long Range support, Bluetooth 5.0 + LE for touchless disarming, and LTE + WIFI dual-path communication. The hardware design has been refined with improved power supply, tamper switch, and SmartMount backplate for easier installation.
One major change from the IQ Panel 4 is how legacy RF sensor support is handled. The IQ Panel 5 family uses PowerG as the built-in wireless protocol. Legacy RF frequency support for 319.5 MHz (Interlogix/GE/Qolsys), 345 MHz (Honeywell/2GIG), or 433 MHz (legacy DSC) sensors is added through optional daughter cards rather than being built into separate panel SKUs. This simplifies the product lineup while still allowing easy takeovers of existing sensor installations.
Each panel supports up to 128 PowerG security devices, up to 128 legacy RF sensors (with daughter card), up to 167 Z-Wave devices, up to 100 PowerG automation devices, up to 242 user codes, and up to 4 partitions.
Choosing the Right Panel
Choose the IQ Panel 5 if you want the complete flagship experience with all available features, including the built-in camera for disarm photos, glass break detection, Live View and Live Answer for video doorbell cameras, Photo Frame, and weather display.
Choose the IQ5 Hub if you want the full touchscreen experience at a more accessible price point. The IQ5 Hub uses the same software interface and delivers the same capabilities as the IQ Panel 5.
Choose the IQ5 NS if you plan to mount the panel out of sight and control your system entirely through the Alarm.com app or an IQ Remote secondary keypad. This panel is also perfect for high-end automation integration. The IQ5 NS does not have a touchscreen, camera, glass break detection, or weather display, but it offers the same powerful processor and connectivity options at a lower cost.
Questions?
If you have questions about which panel from the IQ5 family is right for your installation, or if you need help setting up your new system, the Alarm Grid support team is here to help. Contact us Monday - Friday from 9:00 AM to 8:00 PM Eastern Time at 888-818-7728, or email us at support@alarmgrid.com. You can also visit our site and take advantage of our live chat option.