Monitor Your Loved One Using Alarm.com Wellness
Posted By Michael GorisHi DIYers! Today, we are promoting a new add-on package available for Alarm.com users. Alarm Grid is now proud to offer the Alarm.com Wellness Platform for customers receiving service from Alarm.com. This robust add-on is perfect for anyone with an elderly or mobility challenged loved one.
![]()
If you have an elderly, disabled, or mobility challenged loved one, then you are likely aware of the challenges involved. On one hand, you want to respect their privacy and allow them to live as independently as possible. But you also want to make sure that they are kept safe and that they can get help if needed. We have seen many offerings through the years that help users accomplish this goal. But the Alarm.com Wellness Platform might the most complete yet.
Just last week, we talked about some of the new Alarm.com wellness sensors. It seems Alarm.com is really pushing this market with their all-new wellness platform. This is more than just an emergency alert button or an occupancy sensor. This is an entire platform and user interface (UI) designed to monitor your loved one's activity and let you know about any unusual occurrences. This is yet another great way to take advantage of your Alarm.com Security System.
The Alarm.com Wellness Platform provides you with many great features that are perfect for monitoring your loved one. You can receive text and/or email alerts from the platform so that you are kept informed about any important activity. Below are just some of the ways you can use the platform:
- Establish patterns of your loved one's usual activity, and receive alerts if activity occurs at an unusual time.
- Make sure your loved one is active and moving around like normal.
- Receive alerts regarding any strange or suspicious wandering or activity at odd hours.
- Set automated security and smart home functions to make your loved one's life easier.
- Integrate with personal emergency response pendants to know if your loved one needs help.
- Monitor your loved one's activity, including how long they stay in bed, remain seated, or spend time outside.
- Create an organized method for keeping track of caregivers and knowing when they come and go.
Once you have your Alarm.com account enabled for the wellness platform, you can start creating specific wellness alerts regarding the activity you want to monitor. This will allow you to know that your loved one is alright, while still maintaining their independence and privacy. Alarm.com has also released a variety of products designed to be used with the platform. At this time, we are offering the following Alarm.com Wellness Products:
- Alarm.com 319.5 MHz Bed Sensor
- Alarm.com 345 MHz Bed Sensor
- Alarm.com 433 MHz Bed Sensor
- Alarm.com 319.5 MHz Chair Sensor
- Alarm.com 319.5 MHz Emergency Button
- Alarm.com 345 MHz Emergency Button
- Alarm.com 433 MHz Emergency Button
The Alarm.com Wellness Platform is also great for pairing with fall pendants. These pendants go above and beyond the typical medical alert button. These devices feature built-in accelerometers that will trigger an emergency medical response upon sensing a fall. This way, your loved one will still receive help even if they fall and are unable to press the button themselves. We currently have two (2) fall pendants available:
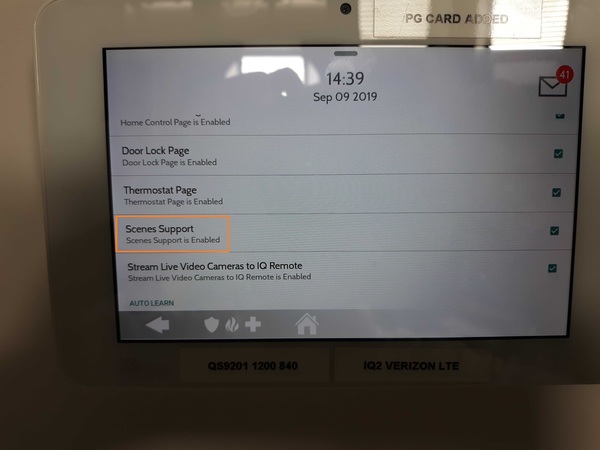
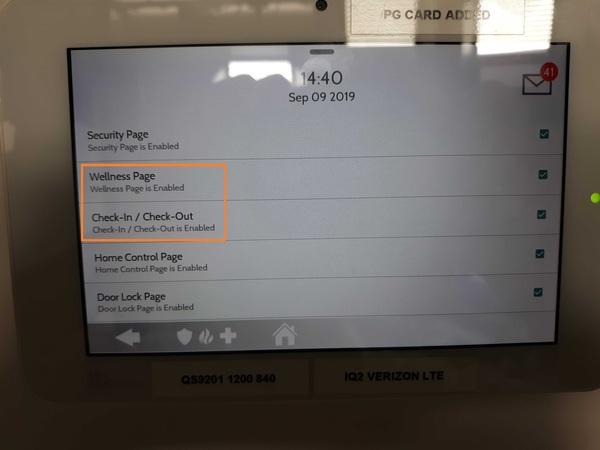
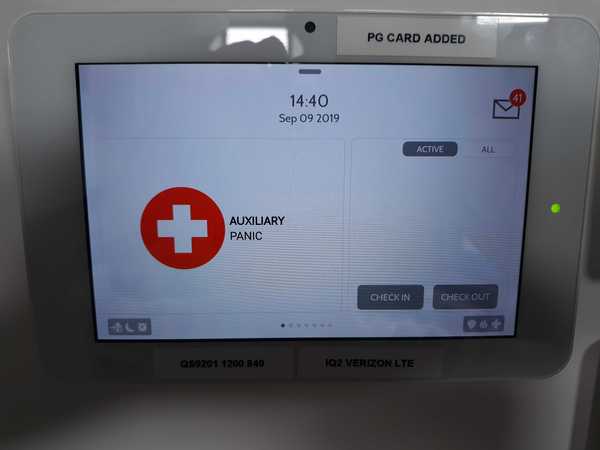
We also want to give a special shout-out to the Qolsys IQ Panel 2 Plus for its innovations in the wellness arena. As part of Firmware Version 2.4.0, the panel offers a Wellness Menu that allows for nurses and/or caregivers to check-in/out as needed. You can easily integrate this feature with the Alarm.com Wellness Platform as well. This Wellness Menu also offers a big auxiliary panic button in case of an emergency. You can enable the menu from within Installer Settings.
In order to use the Alarm.com Wellness Platform, you must first have a monitoring plan that includes Alarm.com service. If you are monitored with Alarm Grid, you will need a Gold or Platinum Level Plan (Self or Full). More information is available on our monitoring page. From there, you will also need your monitoring company to enable the Wellness Platform add-on package on your account. Please note that enabling this service may result in an increase to your monthly monitoring fee.
If you are an Alarm Grid customer and you are looking to add this service to your account, we recommend emailing us at support@alarmgrid.com for more information. You may also email us if you have any questions about this platform. Remember that our support hours are from 9am to 8pm EST M-F. Keep that in mind if you email us outside of our usual business hours. We look forward to hearing from you and answering your questions about the ADC Wellness Platform!