With 2019 now on its last days, we thought it would be a nice time to go back and look at what the security industry experienced this past year. As usual, we were there for it all, and we have so much to look back on. We hope that you enjoy this comprehensive year in review from Alarm Grid.
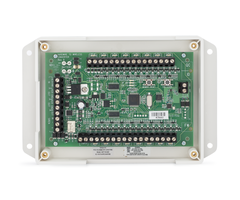
January 16 - Qolsys Releases the Qolsys IQ Hardwire 16-F
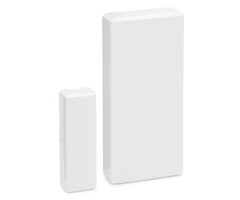
Qolsys made some big waves in January with their IQ Hardwire 16-F. This product is the first wired to wireless converter to support 2-wire smoke detectors. The module can also function as a wireless siren relay for a hardwired siren. The IQ Hardwire 16-F works with most 319.5 MHz wireless systems, including the Qolsys IQ Panel 2 Plus w/ Legacy Qolsys & Interlogix Daughtercard.
 January 24 - Gabe from Security Baron Reviews the Honeywell Lyric Controller
We were delighted in January when Gabe from Security Baron gave a comprehensive review of our Lyric AT&T LTE 3-1 Kit. This is a compete system kit that includes a brand-new Honeywell Lyric Controller, three (3) VERSA-2GIG Door/Window Contacts, a Honeywell SiXPIR Motion Sensor, a Honeywell LYRICLTE-A AT&T LTE Communicator and a Honeywell LT-Cable for providing power.
February 7 - Privacy When Disarmed for Total Connect 2.0
Total Connect 2.0 introduced a helpful new feature called "Privacy When Disarmed", which stops Total Connect IP Cameras from recording and capturing clips while a user's system is Disarmed. This feature is perfect for users who don't want to receive frequent notifications that occur from camera activity while they are on-site. Only Honeywell HD Cameras support this feature.
February 18 - Qolsys IQ Panel 2 Facial Recognition
Firmware Update 2.3.0 brought a major boost to the IQ Panel 2 and IQ Panel 2 Plus Systems, as users could now use the panel's built-in camera for disarm photos and facial recognition. The user can set up Alarm.com text and/or email notifications whenever an unrecognized face disarms the system. This feature is great for receiving alerts about possible suspicious system activity.

February 20 - MAC Prefix Update for Honeywell SiX Sensors
Honeywell SiX Series Sensors for the Honeywell Lyric Controller received an updated MAC prefix. This meant that they were only compatible with the system's latest firmware version. This is another reason why it's important to always keep your system running on the latest firmware. For more information on the latest Lyric Firmware, please check here. Please also review how to update the firmware.

March 20 - Lyric Firmware Update MR8
Resideo released Firmware Update MR8 for the Lyric System. The update brought a few changes to the system. The WIFI indicator in the panel's upper-left corner will now show a red X if IP connectivity goes down. SiX Series Sensors now have a shorter RF transmission supervision interval. And the SiX Programming Menu now shows every enrolled SiX Sensor for easy access.

March 21 - Verified Response Repealed in San Jose, CA
The city of San Jose, CA repealed its verified response policy. This makes it easier for a central station operator to send out authorities during an emergency event. This was a big win for Alarm Grid monitored customers who receive central station monitoring service from Criticom. We hope that more cities will follow the lead set by San Jose in repealing verified response laws moving forward.

March 27 - Honeywell LYNXTOUCH-MSD Updater Tool
Resideo released the Honeywell LYNXTOUCH-MSD Updater Tool, which is used for updating the firmware version of a Honeywell LYNX Touch Panel. At first, the updater tool was only compatible with the Honeywell L5210 and Honeywell L7000. However, it was later reworked to support the Honeywell L5200 as well. Honeywell L5200 panels updated using the tool will be seen by AlarmNet360 as L5210 panels moving forward. Updating to the latest firmware can be important for using an LTE radio.

March 28 - No Activity Alerts from TC2
Total Connect 2.0 made it easier to monitor your loved one with their new "No Activity Alerts". This feature allows users to receive text and/or email notifications whenever no system activity occurs within a set period of time. The feature can be very useful for monitoring a loved one who may have trouble getting around. If you receive a "No Activity Alert", then you know to check on them.

April 1 - Alarm Grid SiXTH Sensor
Our April Fool's Day joke was a big hit, as we announced our very own SiXTH Sensor for the Honeywell Lyric Security Panel. This sensor uses a Device Type of "Paranormal Detector" and a special Response Type of "Bruce Willis". It will alert the security system as soon as it detects any otherworldly paranormal activity. Begone other-dimensional spirits!
April 9 - Honeywell LTE-IV Available
This was a big day for Honeywell VISTA System users, as the Honeywell LTE-IV became the first-ever dual-path LTE & IP communicator available for these panels. The Honeywell LTE-IV provides connectivity with AlarmNet360 through both the Verizon LTE Network and through a wired ethernet connection. A Honeywell LTE-IA with service from the AT&T LTE Network & IP was later released.

April 10 - First Look at Resideo ProSeries 7" All-In-One Plus
Alarm Grid had a great time at ISC West 2019. The biggest news during the event was the unveiling of the upcoming Resideo ProSeries Panel. This yet-to-be-released system represents the next generation in security technology. Alarm Grid expects some big things out of this panel once it is made available. We hope that it will be released sometime in 2020.

April 12 - Interview w/ Jeremy McLerran of Qolsys
Another big moment during our ISC West 2019 experience was interviewing Qolsys Director of Marketing Jeremy McLerran to pick his brain about the Qolsys IQ Panel 2 Plus System. The Qolsys IQ Panel 2 Plus is still our top security system as of the end of 2019. Being able to check out the Qolsys booth and the rest of ISC West was a great experience, and you can expect more in 2020.
April 25 - Alarm Grid Mini Window Stickers
Our mini window stickers quickly became a fan favorite! We have had larger window stickers available for quite some time. But we got many requests for smaller window stickers that are easier to place. And now we have mini window stickers. You can get adhesive-backed mini stickers in single, 5-packs, and 10-packs. Adhesive-front stickers also come in single, 5-packs, and 10-packs.

May 15 - Tennessee Ends False Alarm Fines for Monitoring Companies
Tennessee Governor William "Bill" Lee signed a law that stops local governments from fining alarm companies for any false alarms that occur. Additional, local Tennessee governments can no longer charge monitoring companies for alarm permits. Only end users can be charged for excessive false alarms and for alarm permits. This makes it easier for monitoring companies to provide service.

May 21 - Total Connect 2.0 Update 2.12.4
Resideo updated Total Connect 2.0 to version 2.12.4. This update made it possible to see the current status for smart home devices across multiple locations. Users who use Total Connect 2.0 across multiple residences and/or businesses really appreciated this update, which made it easier to quickly check the status for their programmed home automation accessories.

June 18 - Lyric Firmware Update MR9
Lyric Firmware Update MR9 is still the system's latest firmware version as of the end of 2019. This firmware version made it possible for the Lyric System to support the Honeywell LYRICLTE-V Verizon LTE Communicator, which was released later in 2019. End users can check out the release notes for MR9 if they want to learn more about the latest firmware for the Lyric Alarm Panel.

June 26 - End of 3G Activations
The security industry made great strides in 2019 in helping end users make the transition to LTE communicators. AlarmNet began stopping 3G communicator activations on Wednesday June 26, 2019. Alarm.com followed suit and stopped allowing 3G activations after Sunday June 30, 2019. Users looking to get started with cellular monitoring should make sure to get an LTE communicator.

July 19 - Alarm Grid's 7th Birthday
Alarm Grid celebrated its 7th anniversary as a company on Saturday July 20, 2019. Our team enjoyed the occasion a day prior by partaking in some "team-building" exercises. We thank all of our customers for their continued support throughout the years, and are looking forward to continuing to offer exceptional alarm monitoring service in years to come.

July 30 - 2GIG GC3e Released
2GIG had a great year in 2019 by releasing their much-anticipated 2GIG GC3e System. This panel brought back all of the same great features of the original 2GIG GC3, along with the added support for encrypted sensors. In addition to the GC3e, 2GIG also released the new 2GIG GC2e a couple of weeks prior. The 2GIG eSeries Encrypted Sensors were released shortly after the 2GIG GC3e.
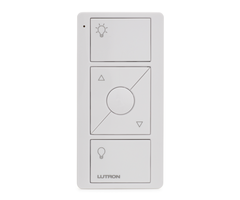
 August 28 - Lutron Caseta Smart Bridge PRO 2
The Lutron Caseta Smart Bridge PRO 2 was a great addition to the Alarm Grid smart home lineup. This central hub allows users to integrate their Lutron Lighting Devices with the Alarm.com platform for greater flexibility in designing a truly interconnected home. In addition to Alarm.com, the Lutron Caseta Smart Bridge PRO 2 can also be used with HomeKit, Alexa, Google Home, Nest, and more.
September 3 - Hurricane Dorian Scare
Alarm Grid was forced to close its main headquarters for a day due to Hurricane Dorian being in close proximity. Thankfully, the storm missed our headquarters, and our remote offices picked up the slack while our main office employees weathered the storm. Our thoughts go out to everyone in the Bahamas who was adversely affected by this powerful and deadly storm.

September 5 - Qolsys IQ Panel 2 Plus Firmware 2.4.0
Firmware Version 2.4.0 for the Qolsys IQ Panel 2 Plus was very exciting, as it brought some great new features to the system. These new features included improvements to the panel's general user interface (UI), global arming for system partitions, Alarm.com Smart Scene control, enhancements for IQ Remote Keypads, home automation updates, and so much more.
September 18 - Alarm.com Wellness Sensors
Alarm.com began offering its own lineup of wellness sensors designed for use by elderly and mobility challenged users. This lineup included a bed sensor, a chair sensor, an emergency call button, and even a wellness camera. Alarm.com soon followed this up with their very own wellness platform that is available for users of the Alarm.com security and automation platform.

September 20 - Interlogix to Shut Down Alarm Business Following 2019
Interlogix shocked the security industry by announcing that they would cease their operations in North America at the end of 2019. The company had just released its new Interlogix Simon XTi-5i System and its own lineup of Interlogix Encrypted Sensors. Alarm Grid and Alarm.com plan to continue supporting any existing Interlogix Systems for monitoring service.

September 20 - Qolsys to Begin Manufacturing IQ Panel 2 Plus in America
We were really excited to learn that Qolsys would begin manufacturing their Qolsys IQ Panel 2 Plus System in the United States. This was made possible thanks to the new partnership between Qolsys and Foxconn Industrial Internet (FII). The IQ Panel 2 Plus will be assembled at the FII facility in the Wisconn Valley Science and Technology Park in Mt. Pleasant, WI.

September 25 - Honeywell Home 6290W Touchscreen Keypad
Honeywell VISTA users received a fresh new keypad option with the release of the Honeywell Home 6290W Touchscreen Keypad. The device features a beautiful 7-inch touchscreen display that makes it easier for new users to operate a VISTA System. The full-color menus, clean design, and responsive touchscreen controls, make the keypad an absolute joy to use. WIFI capability allows it to take advantage of OTA Firmware updates.

September 27 - Qolsys IQ Hub & IQ Router Announced
Some of our biggest news for the year came at the 2019 Qolsys Summit when Qolsys announced both the IQ Hub and the IQ Router. The upcoming IQ Hub Alarm System should make top-quality home security accessible to more users than ever before. We also love the attached high-end speaker that turns the panel into a full-blown music player with the Alarm.com Sonos Integration.

October 1 - Honeywell Home VISTA-21iPLTE Released
The Honeywell Home VISTA-21iPLTE is the successor to the Honeywell VISTA 21iP. This new wired panel supports special plug-in LTE communicators, such as the Honeywell LTE-21V, that can be used without disabling the panel's built-in IP communicator. This way, you can unlock dual-path connectivity for your Honeywell VISTA-21iPLTE System with just a simple plug-in module.
October 4 - DSC PG9936 PowerG Smoke & Heat Detector
DSC released the new DSC PG9936 PowerG Smoke & Heat Detector, which is the replacement to the older DSC PG9916. The DSC PG9936 will work with any system that supports PowerG Sensors, including any version of the Qolsys IQ Panel 2 Plus, and any DSC PowerSeries NEO w/ added wireless transceiver. The sensor supports one-go-all-go connectivity for PowerG Smokes.

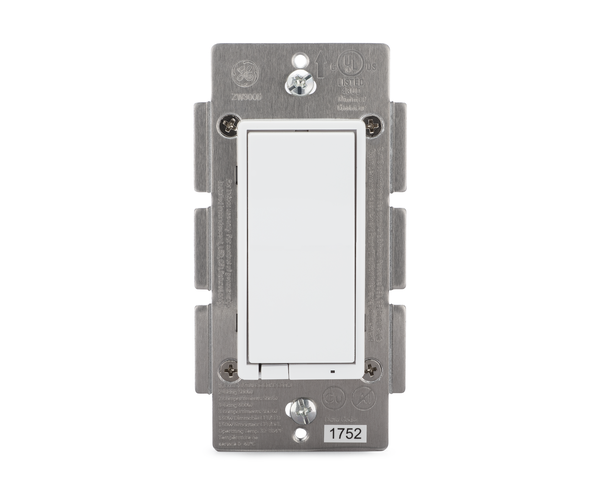
October 15 - In-Wall Z-Wave Dimming Switches from GE
Alarm Grid began offering two (2) new in-wall Z-Wave dimming switches from GE. The unique aspect of these new in-wall dimmers is that neither one requires a neutral wire. The new GE Z-Wave Dimmers include the GE 14299 Z-Wave Plus Dimmer and the GE 45717 Z-Wave Classic Dimmer Switch. These switches make it easier for older homes to get started with smart lighting.
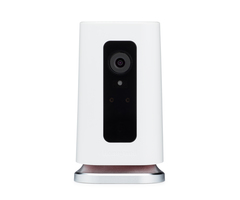
October 25 - Alarm.com ADC-V723 Outdoor Camera
Alarm.com unveiled their new flagship outdoor camera with the ADC-V723. The ADC-V723 supports 1080p recording capabilities with High Dynamic Range (HDR) for clearer and more detailed video captures. Its 117° field of view allows the device to cover a larger area than other similar cameras. Alarm.com also later released their new flagship indoor camera, the ADC-V523.

October 29 - Alarm.com Smart Z-Wave Plus Water Valve
Another big release from Alarm.com was the Alarm.com ADC-SWV100 Smart Water Valve. This Z-Wave Plus Water Valve is compatible with nearly any alarm panel that supports Z-Wave devices. The smart water valve is specifically designed for use with the Alarm.com Water Management Add-On Package that makes it super easy for Alarm.com users to monitor their water usage.

October 31 - New Alarm Grid Headquarter Sign
Alarm Grid celebrated the Halloween holiday by getting a new sign for its main headquarters. The workers putting up the sign did a great job, and we're thrilled with the end result. We're certainly proud of our office, and we are happy that we can help it stand out a little bit better. And of course, we want to thank our customers who helped make this possible.

November 1 - Alarm Grid Halloween Celebration
We also had quite the Halloween bash inside our office as well. We had some tasty treats, and we put up some fun decorations to get into the Halloween spirit. Some of our team members decided to dress up. Jarrett won our annual costume contest with his T-Rex costume. Congratulations Jarrett. We are hoping for an equally fun Halloween celebration next year in 2020.

November 13 - Qolsys IQ Panel 2 Plus Firmware 2.4.2
Firmware Version 2.4.2 for the IQ Panel 2 Plus represents the latest firmware version as of the end of 2019. The update fixed various issues that affected the IQ Remote and certain PowerG Sensors when used with the Qolsys IQ Panel 2 Plus. We recommend upgrading to the newest available firmware as soon as possible for optimal system performance.

November 28 - Alarm Grid Thanksgiving
Alarm Grid team members had a nice Thanksgiving break in late November, as we all got to spend the holiday with loved ones and friends. Like always, we're grateful to our customers who help make all of this possible. We even made a special Happy Thanksgiving holiday video for everyone to watch. Please check it out when you have a chance!
December 20 - Reduced Pricing On IQ Panel 2 Plus PowerG Kits
Alarm Grid was able to reduce the prices on all of its Qolsys IQ Panel 2 Plus PowerG Kits just in time for the holidays. This was thanks to a reduction in cost for the DSC PG9303 Door/Window Contacts, which are included in every kit. Our Qolsys IQ Panel 2 Plus PowerG Kits provide everything you need to get started with alarm monitoring. We have 12 kits to choose from!

December 23 - Top 100 Most & Least Burgled US Cities
We capped off the year by presenting lists of the Top 100 Most and Least Burgled Cities in the United States. Homes without alarm systems are 300% more likely to be burglarized than homes with security systems. Additionally, 4 out of 5 convicted burglars admit to checking if a home has an alarm system before committing a burglary. You can view our full burglary infographic here.

We hope that you enjoyed keeping up with the Alarm Grid Home Security Blog in 2019, and we look forward to continuing in 2020. If you ever need to reach us for help or assistance, you can email support@alarmgrid.com or call (888) 818-7728. Remember that our support hours run from 9am to 8pm ET M-F. Check our blog for holiday hours. We look forward to hearing from you!


 As we mentioned earlier, the 2GIG GC3e has a built-in Z-Wave Plus controller for you to start adding
 If you are considering a new Qolsys IQ Panel 2 Plus System, then the one big thing you will want to keep in mind is that there are three (3) different versions of the system. This refers to which legacy daughtercard is installed inside the panel. The legacy daughtercard determines which wireless frequency is supported by the system for using wireless
 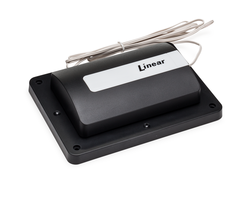 There are other miscellaneous accessories you might also want to use with the Qolsys IQ Panel 2 Plus. If you want an external keypad, then the

