Resideo Posts

Posted By

Hi DIYers! We're back with another video recap, this time covering the newest videos that were posted last Thursday and Friday. Our video team put up six (6) videos this past week, with Joe, Jarrett, and Jorge all having two (2) videos. Let's take a look at the newest Alarm Grid videos!

Alarm grid inside security stickers

Adding a Siren to a Honeywell VISTA Alarm System

Joe is enthusiastic as he teaches you how to add a hardwired siren to a Honeywell VISTA Security System. Adding a siren is important for making sure that all building occupants are alerted to an intrusion or fire. Luckily, the VISTA Systems make it very easy to add a siren, as you can just connect it to panel terminals 3 & 4. You can also daisy-chain multiple sirens together. Just make sure you do not exceed the power limit of 2A.


Changing the Date and Time on a Honeywell VISTA System

Joe shows you the very exciting task of changing the date and time on your Honeywell VISTA Security System. This is something that you will normally do when setting the panel up for the first time. You will also need to do it when Daylight Savings Time occurs, as the panel cannot update the time on its own. Powering down the panel completely at any time will remove the date and time settings and require you to readjust. You should use an Alphanumeric Keypad for this job.


Dual-path Monitoring and the VISTA-21iP

Jarrett, the nice young man you all love so much, talks about dual-path monitoring options for the VISTA-21iP System. Although the VISTA-21iP has a built-in IP communicator, you cannot simply add a cellular communicator to achieve dual-path connectivity. Instead, you must disable the internal IP communicator and add either a Honeywell LTE-IV (Verizon LTE & IP) or a Honeywell LTE-IA (AT&T LTE & IP) for dual-path service. Remember that the new VISTA-21iPLTE System supports plug-in LTE communicators for enabling dual-path functionality.


Using the Honeywell L7000 With SmartThings

Jorge shows off his automation expertise by teaching you how to pair a Honeywell L7000 System with Samsung SmartThings. In order to complete this integration, the L7000 must have a Honeywell L5100-ZWAVE module installed. We recommend pairing all your Z-Wave devices with your SmartThings Hub before adding the L7000 as a secondary controller. Any Z-Wave device that is paired with the L7000 should be excluded from the network and then paired with SmartThings. This will ensure the best possible results when the integration is complete.


Using the Honeywell L5210 With SmartThings

Jorge continues to impress by explaining how the Honeywell L5210 System can be used with Samsung SmartThings. This is done by setting the L5210 up as a secondary Z-Wave controller for your SmartThings Hub. Any Z-Wave device that is paired with your SmartThings Hub will be pushed over to the L7000. This will let you control them both from the panel and from SmartThings. Any Z-Wave Plus device that is used in this configuration will retain its Z-Wave Plus functionality, as it is still ultimately paired with the SmartThings Hub.


Monitoring Requirements for Using Total Connect 2.0

The ever-appreciated man of amazement Jarrett explains the monitoring requirements for accessing Total Connect 2.0. This interactive monitoring and automation platform is used exclusively with Honeywell and Resideo Security Systems and Total Connect 2.0 IP Cameras. Any system used with this service must be connected with the AlarmNet360 Servers for monitoring service. This will require an alarm monitoring plan, such as one offered from Alarm Grid. Only Honeywell Systems set up for IP and/or cellular service can be used in this manner.

Tags: , , ,

Comments


Posted By

We have learned that there are some temporary server issues affecting the Total Connect 2.0 service. These issues may lead to "latched" alarms and/or trouble conditions. Users may also experience delays using the TC2 platform and have trouble logging into their accounts during this time.

As a result of these issues, users may find that system alarms and trouble conditions are becoming "latched" on their Total Connect 2.0 account. This means that these events are still appearing on TC2, even though the issue has been cleared locally. You should be able to clear these events by using the "Refresh Status" button on TC2. If you find that you cannot clear these events, then you should email us at support@alarmgrid.com so that we can clear them for you. Please note that other TC2 functions, such as remote access and system alerts, should still be operating as normal.

Alarm Grid has reported these issues to Resideo's AlarmNet360 division, and the problem is being addressed at this time. We expect the matter to be resolved as soon as possible. We will provide an update when the matter is fixed. Stay tuned to our blog for updates.

Update: Resideo has reported that the issue has been resolved as of about 5:30pm ET.

Tags: , ,

Comments


Posted By

Hi DIYers! We're here to cover our video recap. Our video production team released four (4) new videos. Alarm Grid Team Members Jorge and Jarrett each had two (2) videos apiece. We are sure that these new videos will assist you with using your security system. Let's check them out!

Alarm grid inside security stickers

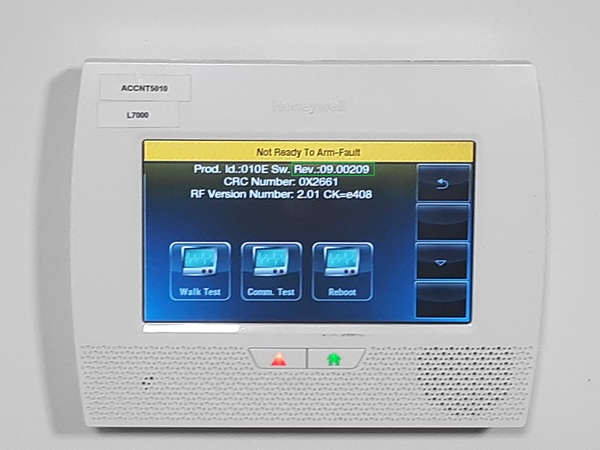
Finding the Revision Number on the Honeywell L5210

Jarrett shows you how to find the Revision Number for a Honeywell L5210 System. This same process also applies to other Honeywell LYNX Touch Systems, including the Honeywell L7000. You might need to find the Revision Number for one of these systems to determine if a certain communicator will work with it or not. Newer version of the Honeywell L5100-WIFI Card, the Honeywell LTE-L57A (AT&T LTE) and theHoneywell LTE-L57V (Verizon LTE) all have minimum firmware revision requirements.


Adding a Qolsys IQ Panel 2 to My Local WIFI

Jorge explains the process for adding a Qolsys IQ Panel 2 Plus to a local WIFI network. The IQ Panel 2 System has a built-in WIFI card for this purpose. The panel uses this WIFI card for communicating with Alarm.com. However, Alarm.com requires that the system's built-in cellular communicator is activated for monitoring service. As a result, Alarm Grid customers need a Gold or Platinum Level Plan if they want to use this panel for monitoring service. Since the IQ Panel 2 has both built-in WIFI and cellular, it is dual-path ready right out of the box.


The Qolsys IQ Panel 2 and Partitioning

Jorge discusses partitioning for the Qolsys IQ Panel 2 Plus. This system can support up to four (4) partitions. The partitioning feature must be enabled from Installer Settings before it can be used. Once partitioning is enabled, each system zone can be assigned to one of the four partitions. Each partition can be Armed and Disarmed individually and assigned a different set of user codes. This is perfect for restricting access to only a certain portion of the security system for each user code.


DSC Wireless Sensors and the Lyric Panel?

Jarrett smiles as he tells you the unfortunate news that the Honeywell Lyric Controller cannot support DSC Wireless Sensors. The DSC Wireless Sensors come in two (2) different varieties. There are the 433 MHz non-encrypted DSC Sensors and the 915 MHz DSC PowerG Sensors, which utilize 128-bit AES encryption. The Lyric System does not have a wireless receiver capable of supporting either of these sensor types. But there is still some good news, as the Lyric can support 345 MHz Sensors from Honeywell and 2GIG and Honeywell SiX Series Sensors.

Tags: , , , , ,

Comments


Posted By

Resideo is currently in the process of pushing automatic OTA firmware updates to all active AT&T LTE Communicators. The updating process is ongoing, and we are not sure how long it will last. You should not notice any changes to your monitoring service or your Total Connect 2.0 account.

Honeywell lyric lte a at and t lte cellular communicator for the

If you recall a few months ago, we announced that Resideo was pushing down automatic over-the-air (OTA) firmware updates to LTE communicators. Resideo started with the Verizon LTE Communicators, and now they are updating the AT&T LTE Communicators. This is a very similar update with no major differences.

Just like before, Resideo is expected to perform this update cycle in batches. Units that were registered first will have the update performed first. This will continue in sequential order until all active Resideo AT&T LTE Communicators have been updated. Any new AT&T LTE Communicator activated during this time will be placed at the end of the queue. If an update fails, that communicator will be pushed to the next batch to try again.

Remember, the communicator must be active and connected with the AlarmNet360 Servers in order for the update to go through. Any communicator that is not active will not be able to receive the update. This includes any communicator installed inside a panel that is currently powered off. Try and keep your panel powered on at all times to ensure that the update can go through successfully.

The following Resideo Communicators are affected by this update:

It is possible that your panel may reboot as part of the updating process. However, you should not notice any other changes. Additionally, the following Contact ID messages may be generated during the process:

Contact ID
Description
E365 Cell Software Update Start
R365 Cell Software Update Finish
E966 Cell Software Update Failed
E903 Code Update Start
R903 Code Update Finished
E904 Code Update Failed
E339 Power On Reset

If you have any questions regarding this update, please do not hesitate to email us at support@alarmgrid.com. Remember that our support hours are from 9am to 8pm ET M-F. We look forward to hearing from you and answering your questions!

Tags: , , , , , , , , , ,

Comments


Posted By

Hi DIYers! Today, we are happy to unveil the Honeywell Home VISTA-21iPLTE. This is the newest hardwired system from the VISTA Series by Resideo, and it is essentially replacing the existing VISTA-21iP System. The big addition is its ability to support special plug-in LTE communicators.


The Honeywell Home VISTA-21iPLTE is actually the same as a VISTA-21iP System, except that the 21iPLTE board has been upgraded to support new plug-in LTE communicators. This includes the Honeywell Home LTE-21V with Verizon LTE (available now).

This new plug-in module is just like the older Honeywell VISTA-GSM4G Communicator, which is conveniently plugged into the VISTA-21iP board. The only difference is that the LTE-21V supports LTE connectivity. This is important for anyone looking to use cellular communication with a security system.

The reason you want to use an LTE communicator with your alarm system is that it offers superior speed and reliability when compared with older 3G and CDMA networks. Also, these older networks are in the process of being shut down. By going with LTE, you are providing a long-term solution for your panel.

Just like the existing VISTA-21iP, the new VISTA-21iPLTE has a built-in IP communicator, which is basically the equivalent of a Honeywell 7847i Communicator. Even if you don't add a cell module to the VISTA-21iPLTE, you will still be able to connect it with AlarmNet for IP monitoring and access to Total Connect 2.0.

Honeywell vista gsm4g alarmnet vista 21ip cellular alarm monitor

But, adding a cellular communicator is very important for dealing with internet outages. If the internet goes out and you don't have a cellular backup, then your 21iPLTE will lose connectivity with the AlarmNet360 Servers. Maintaining this connection is necessary for properly utilizing any monitoring service. This makes cellular backup crucial!

By connecting your VISTA-21iPLTE Panel with AlarmNet360, you will also be able to control your system through Total Connect 2.0. This is an interactive monitoring and automation platform that you can access from nearly anywhere using your phone. Make sure you choose a monitoring plan with TC2 service!

If you plan to use cellular communication with your VISTA-21iPLTE and Alarm Grid, then you will need a Gold or Platinum Level Plan (Self or Full). This is needed to activate the cellular radio and connect it with AlarmNet360. You can find more information about all our monitoring plans on our monitoring page.

Once you have access to Total Connect 2.0, you will be able to control your 21iPLTE System from any location with network access. You can use Total Connect 2.0 to arm and disarm, check current system status, control Z-Wave devices (controller required), view IP cameras (video monitoring required), and so much more!

Honeywell vista 21ip internet alarm control panel open

As far as functionality is concerned, the VISTA-21iPLTE is just like like a VISTA-21iP. Other than the added support for the LTE-21V, they are the same panel. As a result, almost any specification that applies to the VISTA-21iP also applies to the VISTA-21iPLTE.

The VISTA-21iPLTE is capable of supporting up to 64 total zones. However, you can only use eight (8) hardwired zones out of the box. To use additional wired zones, you will need to add Honeywell 4219 Expansion Modules. To use wireless sensors, you will need a wireless receiver, such as the 6160RF Keypad.

By adding up to five (5) 4219 Expansion Modules, you can use up to 48 hardwired zones on the VISTA-21iPLTE. Keep in mind that Zones 2 through 8 support zone doubling. Zone 1 is a special zone for use with 2-wire smokes. That is why it does not support zone doubling, although it can be used as a burglary or environmental zone if 2-wire smokes are not needed. You can have up to 16 2-wire smokes on the zone.

Adding a compatible wireless receiver will let you use wireless 345 MHz sensors from the Honeywell 5800 Series. A standard wireless receiver will only support uni-directional (one-way) devices. But a wireless transceiver like the 6160RF will also let you use bi-directional devices. Up to 56 wireless zones can be used. The number of available wireless zones depends on the number of wired expansion zones being used.

It is important to keep in mind that the total number of zones (wired and wireless) can never exceed 64. Additionally, zones 49 through 64 on a VISTA-21iPLTE are designated as key fob zones. But you can use these zones with any wireless sensor, as long as you have a wireless receiver added.

Honeywell 6160rf alphanumeric alarm keypad with integrated transceiver

There are also some other accessories you can add to a VISTA-21iPLTE System. First and foremost, you will want a keypad for controlling the system. As stated earlier, the Honeywell 6160RF is a great option. If you don't plan to use wireless sensors, then the standard Honeywell 6160 will work just as well.

You might also consider getting a touchscreen keypad for the system. These can be easier to use than push-button keypads. But just remember that only push-button keypads can backdoor into programming. The new Honeywell 6290W is a great option. Or you could go with the Tuxedo Touch which will also add Z-Wave functionality.

There are limits to the number of keypads you can use with the system. Up to eight (8) push-button keypads can be added. Touchscreen keypads count as AUI devices, and the VISTA-21iPLTE will only support a max of four (4) of these. Keep in mind that the Total Connect 2.0 service also counts as an AUI device!

Speaking of Z-Wave, a Z-Wave controller is needed if you want to use Z-Wave devices with the system. Adding a Tuxedo Touch is a great way to add Z-Wave capabilities. If you already have a keypad, then the standalone Honeywell VAM was an option, but it has recently been discontinued. Remember, you can control all Z-Wave devices through TC2.

Ultratech 1240 alarm control panel battery backup 12v 4 dot 5ah

Lastly, the system comes with its own transformer for supplying power. You will still need to supply a backup battery like the UltraTech IM-1250F1. Power cabling is not included with the VISTA-21iPLTE system, so you must add your own. We recommend using 18-gauge wiring, or even better, a Honeywell LT-Cable.

We would also like to mention that the VISTA-21iPLTE supports two (2) partitions, along with a third common partition. It also supports other miscellaneous features like Quick Arming, Scheduling, up to 48 unique user codes, 100-event event log, two (2) low-current trigger outputs, chime functionality, and more.

The VISTA-21iPLTE System and the LTE-21V LTE Communicator are both available for purchase now from the Alarm Grid website. This system is great for anyone looking for a simple, yet effective hardwired panel. It will certainly serve as a long-lasting addition to your home or business and help keep you safe.

If you have any questions about the system, please email us at support@alarmgrid.com. We will check your email at our earliest convenience and reply as soon as possible. You may also call us at (888) 818-7728. Remember that our support hours are 9 am to 8 pm EST M-F. We look forward to hearing from you!

Tags: , , , , , , , , ,

Comments


Posted By

Hi DIYers! Today, we're going to talk about a new product from Resideo, the Honeywell Home 6290W 7" Touchscreen Keypad. This is the newest keypad for Honeywell VISTA Systems. It offers some exciting new features and a beautiful, sleek design that is sure to impress. Let's check it out!


Countless users have had Honeywell VISTA Security systems in their homes and businesses for many years. And it's no surprise considering what great alarm systems they are. But we hear all the time of users wanting to find a way to upgrade from a regular push-button keypad. Resideo has recognized this, and they have continued to offer various touchscreen keypads for their VISTA Systems. The newest of these is the Honeywell Home 6290W.

The Honeywell Home 6290W features an eye-catching, modern design that is sure to fit in nicely with any decor. We expect this clean, straightforward look to be used with future security systems as well. The keypad's 7" Wide Super VGA touchscreen, 1024 x 600 resolution, and backlit display all help to make this keypad easy to use and navigate. You will surely appreciate the keypad's tablet-like design and its thin profile that leaves it less than 1" off the wall when mounted.

There is a lot to love about the performance of the keypad as well. The keypad features a console mode that allows you to operate the device like you would for an Alphanumeric Keypad. This is great for deep-level programming. However, you will still want to keep your push-button keypad around in case you ever need to backdoor the system. Other features include quick arming, WIFI connectivity for firmware updates, a digital picture frame function, and full voice and chime.

The Honeywell Home 6290W Keypad is available from Alarm Grid now! If you have any questions about this keypad, please reach out to us by emailing support@alarmgrid.com. Keep in mind that our support hours are Monday thru Friday, 9am to 8pm EST. We look forward to hearing from you!

Tags: , , , ,

Comments


Posted By

Hi DIYers! We have a quick video recap today, with four (4) new videos this week. Three videos featuring Jorge were uploaded on Thursday, September 19th. Another featuring Joe was uploaded a day later. We hope these videos help you out. Let's take a look at the newest videos from Alarm Grid!

Alarm grid inside security stickers

Finding the Installer Code on a VISTA-21iP

Jorge explains what to do if you do not know the Installer Code on a Honeywell VISTA System. You use the command [Installer Code] + [800] to enter programming. If you do not know the code, then you should first try the default code of 4112. If that doesn't work, then you might try to get in using the backdoor method. If the backdoor method fails, then you should try asking the previous monitoring company or system owner for the Installer Code.


Setting Up TC 2.0 on a Phone

Jorge shows you how to set up Total Connect 2.0 on a phone. The Total Connect 2.0 Mobile App is available for Android and iOS devices. You can get it for free from the Google Play Store or the Apple App Store. Once you have the app, you can login using your Total Connect 2.0 account, just like you would from the website. If you don't have access to Total Connect 2.0, then you might want to check out one of our monitoring plans to get access. Remember, TC2 is for Honeywell Panels only.


Linking a Honeywell Lyric Alarm System to HomeKit

Jorge explains the process for linking a Honeywell Lyric with Apple HomeKit. This will let you use the system with the rest of your HomeKit network. You can also get notifications regarding system activity, and you can control your system using Siri voice commands from your iPhone. For best results, you will want to have a proper HomeKit Hub established. You will also want to continue to use Total Connect 2.0 alongside HomeKit, as TC2 will provide more detailed alerts for the Lyric System than HomeKit.


Programming the 5800COMBO to a VISTA Panel

Joe teaches you how to enroll a Honeywell 5800COMBO with a Honeywell VISTA Panel. In order to use this wireless 345 MHz sensor from the Honeywell 5800 Series, you must add a wireless receiver to the system. This combination sensor will provide the smoke & heat detection, carbon monoxide detection, and freeze detection. Each function will require its own wireless zone on the system. You can also program a additional zones for maintenance detection and end of product life detection.

Tags: , , , , ,

Comments


Posted By

Hi DIYers! Welcome to another Alarm Grid Video Recap, this time covering videos published on September 5th & 6th. We have a big recap this time, with eight (8) new videos being published. Jarrett, Jorge, and Joe all make appearances. Let's get right into it and check out the new videos!

Finding the CRC on a Honeywell-Resideo Wireless Alarm System

Jarrett explains how to find the CRC code for a wireless Honeywell or Resideo System. The CRC code is a 4-digit code that is unique to the panel's IP communicator. Along with the 12-digit MAC address, the CRC code is very important when activating a system for alarm monitoring service. You should make sure to write the code down and save it in a safe place once you have obtained it. You may need this code again at a later time.


Explaining the 6F Message on an Alarm Keypad

Jorge talks about the "6F" message that can appear on a wired keypad for a Honeywell VISTA Alarm System. This code is actually "bF", which stands for "backup failure". The message indicates that there is a problem with the system's communicator. The "bF" message will only appear on a Fixed English Keypad, like a Honeywell 6150. An Alphanumeric Keypad like a Honeywell 6160 will instead display "Check 103, Long Rng Trbl", which means the same thing.


Arming-Disarming the Qolsys IQ Panel 2 From Your Phone

Jorge shows you how to arm and disarm a Qolsys IQ Panel 2 Plus System using your phone. This is done using the Alarm.com service. The Qolsys IQ Panel 2 Plus includes integrated LTE and WIFI communicators for connecting with Alarm.com. You just need to have the system activated with an alarm monitoring plan that includes access to the Alarm.com platform. You can then use the Alarm.com Mobile App on Android and iOS devices to arm and disarm remotely.


Replacing a Honeywell 1321 Transformer with a 1361 Transformer

Joe is back, and he answers the question of whether or not you can replace a Honeywell 1321 Transformer with a Honeywell 1361 Transformer. The answer is that you can always replace a 1321 with a 1361. However, you cannot always replace a 1361 with a 1321. This is because the 1361 supplies more power than the 1321. A setup that was using a Honeywell 1361 Transformer for power might not receive enough power from a 1321 Transformer used in its place.


Displaying the MAC ID On a Honeywell Wireless Alarm System

Jarrett teaches you how to find the MAC ID on a Honeywell Wireless Alarm System. This applies to any Honeywell Panel with an IP communicator. To find the MAC address, you will need to enter programming. This requires providing the Installer Code for the system. Remember that the default Installer Code on most Honeywell System is 4112. The MAC address and MAC CRC are found within the Comm Diagnostics Menu. Clicking on Communication ID Numbers will display the codes at the top of the screen.


Devices Used With a 2GIG XCVR2-345 Transceiver on a Go!Control GC2

Jorge talks about the 2GIG XCVR2-345 and the devices that are used with it. The 2GIG XCVR2-345 is an add-on accessory for the 2GIG GC2 System. This communicator is what allows the system to work with bi-directional devices. These are devices that must both send and receive signals with the GC2 System. Some of the devices that require the use of a 2GIG XCVR2-345 include the 2GIG Go!Bridge IP Communicator and the 2GIG TS1 Touchscreen Keypad.


Monitoring and Controlling the Temperature On a Honeywell L5210

Jorge explains how you can monitor and control the temperature using a Honeywell L5210 Security System. For this to work, you will need a Honeywell L5100-ZWAVE Card installed inside the system. This is a Z-Wave controller that allows the system to support Z-Wave smart home devices. From there, you can enroll a Z-Wave thermostat with the system. This will allow you to monitor and control the temperature for the building directly from a Honeywell L5210 Alarm Panel.


Programming the Alarm Monitoring Account Information on a Honeywell L5210

Jorge covers the process for programming the alarm monitoring account information on a Honeywell LYNX Touch System. This is an important step for setting up a system for alarm monitoring service. Completing this process will allow the system to communicate with the central station. Normally, an end user will only complete this process themselves if they are bringing the system over to a new monitoring company. This process only needs to be completed if the communicator has not been released by the old monitoring company.

Tags: , , , , ,

Comments


Posted By

Hi DIYers! Today, we wanted to let you know about some of the new security system kits that are available from the Alarm Grid website. We have new kits that feature the Resideo Lyric, the Qolsys IQ Panel 2 Plus (319.5 MHz, 345 MHz, and 433 MHz), the 2GIG GC3e and the 2GIG GC2e Systems.

Honeywell lyricpk10 lte enc encrypted at and t lte alarm system

Our system kits are perfect for anyone just getting started with alarm monitoring service. Each one includes a brand-new alarm panel, some door and window sensors, a motion sensor, an LTE cellular communicator, and a power cable. You can easily expand around any of these systems later on if needed. Just remember that you will need a monitoring plan to use one of these systems with Alarm Grid. A Gold Plan or higher is needed for cellular communication.

Now that you know a little bit about our kits, let's take a look at each new one individually:

Resideo Lyric w/ Verizon LTE Communicator Kits

Lyric Verizon-LTE 3-1 Kit


Lyric Verizon-LTE 10-1 Kit

  • Lyric System
  • LYRICLTE-V Verizon LTE Communicator
  • 10 Versa-2GIG Contacts
  • SiXPIR Motion
  • LT-Cable


Lyric Verizon-LTE 3-1 Encrypted Kit


Lyric Verizon-LTE 10-1 Encrypted Kit

  • Lyric System
  • LYRICLTE-V Verizon LTE Communicator
  • 10 SiXMINICT Contacts
  • SiXPIR Motion
  • LT-Cable


Qolsys IQ 319.5 MHz PowerG Kits

IQ Panel 2 319.5 MHz AT&T LTE 3-1 Kit


IQ Panel 2 319.5 MHz AT&T LTE 10-1 Kit
  • IQ Panel 2 Plus 319.5 MHz w/ AT&T LTE
  • 10 PG9303 PowerG Contacts
  • PG 9914 PowerG Motion


IQ Panel 2 319.5 MHz Verizon LTE 3-1 Kit


IQ Panel 2 319.5 MHz Verizon LTE 10-1 Kit
  • IQ Panel 2 Plus 319.5 MHz w/ Verizon LTE
  • 3 PG9303 PowerG Contacts
  • PG 9914 PowerG Motion


Qolsys IQ 345 MHz PowerG Kits

IQ Panel 2 345 MHz AT&T LTE 3-1 Kit


IQ Panel 2 345 MHz AT&T LTE 10-1 Kit

  • IQ Panel 2 Plus 345 MHz w/ AT&T LTE
  • 10 PG9303 PowerG Contacts
  • PG 9914 PowerG Motion


IQ Panel 2 345 MHz Verizon LTE 3-1 Kit


IQ Panel 2 345 MHz Verizon LTE 10-1 Kit

  • IQ Panel 2 Plus 345 MHz w/ Verizon LTE
  • 10 PG9303 PowerG Contacts
  • PG 9914 PowerG Motion


Qolsys IQ 433 MHz PowerG Kits

IQ Panel 2 433 MHz AT&T LTE 3-1 Kit


IQ Panel 2 433 MHz AT&T LTE 10-1 Kit

  • IQ Panel 2 Plus 433MHz w/ AT&T LTE
  • 10 PG9303 PowerG Contacts
  • PG 9914 PowerG Motion


IQ Panel 2 433 MHz Verizon LTE 3-1 Kit


IQ Panel 2 433 MHz Verizon LTE 10-1 Kit

  • IQ Panel 2 Plus 433 MHz w/ Verizon LTE
  • 10 PG9303 PowerG Contacts
  • PG 9914 PowerG Motion


2GIG GC3e Kits

2GIG GC3e Verizon-LTE 3-1 Kit


2GIG GC3e Verizon-LTE 10-1 Kit

  • 2GIG GC3e System
  • 2GIG LTEV-1-A-GC3 Verizon LTE Communicator
  • 10 2GIG DW10e Door and Window Sensors
  • 2GIG PIR1e Motion
  • LT Cable


2GIG GC2e Kits

2GIG GC3e Verizon-LTE 3-1 Kit


2GIG GC2e Verizon-LTE 10-1 Kit

  • 2GIG GC2e System
  • 2GIG LTEV1-A-GC2 Verizon LTE
  • Communicator
  • 10 2GIG DW10e Door and Window Sensors
  • 2GIG PIR1e Motion
  • LT Cable


All of these great kits are available from Alarm Grid right now. If you have any questions or need help choosing a system, please email us at support@alarmgrid.com. You may also call us during our regular business hours of 9am to 8pm EST M-F. We look forward to hearing from you!

Tags: , , , , , , , , , , , , , , , , , , , , , , , , , , , , , , , ,

Comments


Posted By

Hi DIYers! Today, we're going to present a helpful tip for Lyric users. Some of our customers have inadvertently discovered the Keypad Tamper Lockout feature on their Resideo Lyric Systems. We want to tell you about this feature and help prevent you from being locked out of your system.

Honeywell lyric controller encrypted wireless security system

We actually just released an FAQ the other day that explains this feature in full detail. You can read it at this link if you want to. But for now, we will cover some of the basics of the feature and how it applies to you. The Lyric Keypad Tamper Lockout feature stops the system from accepting any numeric key inputs (0-9) for 15 minutes whenever thirty (30) numeric keys are entered in a 15 minute period, without ever executing a valid command. Any further numeric key inputs during this 15 minute period will result in a long error tone.

Basically, if you are at your Lyric System, and you repeatedly try (unsuccessfully) to enter a valid code, then the Lyric will no longer allow you to keep trying. The purpose of this feature is to prevent someone from using brute force to try and access the system. While the feature can lead to frustration if you ever accidentally lock yourself out, it is an important safety measure to prevent an intruder from ever getting into your system.

Obviously, locking out an intruder is a good thing. But unfortunately, some users may find themselves in the same boat. This often happens because a user swears that they remember their code, when they really do not. They will keep trying to enter the same incorrect code. And once they reach 30 incorrect inputs without entering a valid command, they will become locked out. The user will not be able to try again until 15 minutes have passed. Or until the system has been reset via a complete power cycle.

Another common reason for this to happen is because of a misunderstanding of the Guest Code. The Guest Code is only able to disarm the system when it was the code used to arm the system in the first place. A user may give the Guest Code to someone, arm the system with their usual Master Code, and then expect that individual to disarm the system with the Guest Code later. The visitor will try (repeatedly) to disarm using the Guest Code, without success. And they will inevitably find themselves locked out with the tell-tale long error tone.

Unfortunately, there is no way to disable the feature. It's just something you have to accept with the Lyric System. How can you prevent yourself from being locked out? It's simple. Just make sure you remember your code! If you enter the correct code within 30 inputs, then you won't become locked out. And if you think that you might have trouble remembering a code, you can always use a key fob or Total Connect 2.0 to disarm your system instead. It's also worth mentioning that key fobs and TC2 will STILL WORK if you have activated the Keypad Lockout feature.

If you want to learn more about this feature, you can always check out the FAQ we mentioned earlier. We also invite you to email us at support@alarmgrid.com with any further questions you might have. Remember, we offer free support for all monitored customers. We look forward to hearing from you!

Tags: , , ,

Comments