Alarm Grid is excited to announce that we are making several new features available for monitored customers with access to Alarm.com for central station service. These include an In-App Panic, Alarm Cancel/Verify buttons, Subscriber ON/OFF Testing, and Zone Syncing with the central station.

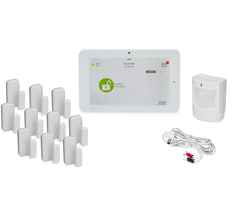
The new features will be available to any Alarm Grid monitored customer with central station service whose monitoring plan includes access to the Alarm.com platform. In order to use most of these features, you will need to download the Alarm.com Mobile App, which is available for free from the Google Play Store and the Apple App Store. This app is great for operating your Alarm.com Security System from virtually anywhere.
By making these features available, we are hoping to improve accessibility and make it easier to control your system and communicate with the central station using the Alarm.com Mobile App. These features will be complementary as part of your Alarm Grid monitoring plan, and they will not result in any changes to your current monthly bill. Our team plans to automatically enable the features for all of Alarm.com customers with central station service.
We have been working very closely with our central station partner Criticom Monitoring Services (CMS) in recent weeks to get the features ready for our customers. As always, CMS has been excellent to work with, and we are confident that we will be able to make a seamless transition for the rollout. We expect to have the features implemented and ready for use sometime during the first week of October.

Let's now take a look at the new Alarm.com features and how you can use them to get the very most out of your security system.
The Alarm.com In-App Panic Function will allow you to send a distress signal to the central station in the event of an emergency. By opening up the Alarm.com Mobile App, you will be able to trigger a Panic and let the central station know that you need help right away. The type of Panic(s) functions that are available will depend on the alarm panel you are using. These can include Audible Police, Silent Police, Fire, and Auxiliary Panics.
When using this feature, Panic Functions are classified as either Silent or Audible. This is based on the panel you are using. An Audible Panic will also be sent to the alarm panel so that a warning message can be displayed on the screen and any programmed sounders and sirens can be activated. Conversely, Silent Panic will result in no message being displayed on the panel, and the system will not produce any sounds.
The table below shows the different types of Panic functions and whether they are Silent or Audible for various Alarm.com Systems. Note how some panels will support both Silent and Audible options for a Police Panic. You will be able to choose the type of Panic to trigger within the Alarm.com App. Remember that Panic availability is determined by the panel you are using and is independent of panel programming. Alarm.com Panels without any true Panic button capabilities will only have a Silent Police Panic available.
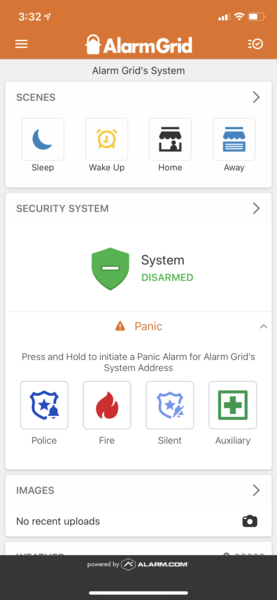
To use an Alarm.com In-App Panic, open the Alarm.com App, and expand the Panic option found within the Security System card. This option will have orange text and an exclamation mark (!) inside of a triangle icon. You can then press and hold the desired Panic function button for three (3) full seconds to trigger the Panic. Once triggered, you will have a three (3) second countdown during which you can cancel the Panic signal. After this time has elapsed, the notification will be sent to the central station right away so that help can arrive as soon as possible. Keep in mind that help will be sent to the location of the security system when the In-App Panic function is used.
The Alarm.com Cancel Alarm and Verify Alarm buttons are designed to promote a more streamlined process when communicating with the central station during an alarm event. Not only can the Cancel/Verify feature help ensure a quicker response during an emergency, it can also help prevent false alarms and unnecessary dispatch in situations where no help is needed. The feature is optional, and a central station operator will still respond to an alarm normally if no input is made. But it can be very helpful when used properly.
In order for the buttons to be appear, two (2) conditions must be met. The first condition is that a programmed zone on the system has indicated an alarm condition. The second condition is that Alarm.com has received the alarm signal from the panel. Once both events have occurred, the green Cancel Alarm and the red Verify Alarm buttons will both appear at the top of the Alarm.com Mobile App. The buttons will only appear if the user is logged into an Alarm.com profile with Master-Level authority. You will know to check the app because of the text, email, and/or push notification you received about the alarm, based on your notification settings.
You have two (2) minutes to activate either the Cancel Alarm or Verify Alarm function after the buttons have appeared. The two minute timer comes from an estimate of how long it normally takes a central station operator to receive an incoming alarm, process it, and request emergency dispatch to the location. Remember that this is only an estimate. In some cases, a fast-acting central station operator might be able to perform pre-dispatch phone calls and request help before this time period has expired.
Activating the Cancel Alarm or Verify Alarm function is very simple. Just press and hold the corresponding button for thee (3) full seconds. The green Cancel Alarm button is on the left, and it informs the central station that the alarm occurred by accident and to not send any help. The red Verify Alarm button is on the right, and it tells that central station that the alarm is legitimate and to request dispatch immediately. Make sure you are very careful when using this feature to avoid making the wrong input.
Keep in mind that the central station and/or the local authorities might still call you to check in, even after receiving a Cancel or Verify message. The feature is simply used to quickly and efficiently transmit a signal to the central station to let the operator know what action they should take. It is also important to note that if multiple users from different logins try to make a selection, then only the first selection to go through successfully will be seen. Any other user who attempts to make a selection will get a message stating that another Master user has already responded.
Note: Alarm Grid's Central Station Partner Criticom Monitoring Services (CMS) will not process Alarm.com In-App Cancel Commands for Fire and Medical Alarms. CMS will follow the usual operating procedure for the account, even if an In-App Cancel Command is sent for a Fire or Medical Alarm Event.

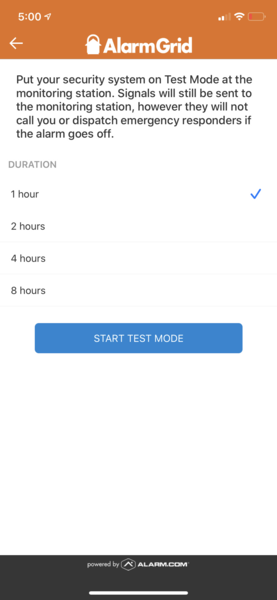
The Subscriber ON/OFF Test feature allows a user to conveniently place their system on Test Mode with the central station through the Alarm.com Mobile App. When the system is in Test Mode, a central station operator will know to not request emergency dispatch to the location in the event of any incoming alarms. By using the Subscriber ON/OFF Test feature, your system will be placed on Test Mode for a set duration of time (1, 2, 4, or 8 Hours). Once you are finished, you can manually end the test or just wait for the timer to expire.
This false alarm prevention method serves as an alternative to calling the central station directly or using the MyAlarms.com feature to put your system on Test Mode. It is very important to always put your system on Test Mode prior to performing any action that may trigger any signal on your system that may normally result in an emergency dispatch . This includes testing any life-safety sensor, such as a smoke detector or carbon monoxide sensor, or testing the panic function on a key fob.
When you activate Test Mode using the Alarm.com App, a signal will be logged to the central station that will inform operators that the system is on Test. If an alarm occurs on your system, then an operator will still see the alarm. But they will also see the notification stating that your system is in Test Mode, and they will know not to contact you or request dispatch. Once the time period you have specified expires, or the mode is exited manually, then the Test Mode notification will disappear, and the central station operators will know to respond to any incoming system alarms in the usual manner.
In order to access this feature, open the Alarm.com Mobile App, and login to your account. Click the Menu Icon (three horizontal bars), and then select Monitoring Settings. Choose the option System Test Mode. You will be able to choose a Test Mode duration of 1, 2, 4, or 8 Hours. Your selection will be indicated with a checkmark. You can then press the blue Start Test Mode button to begin. A grey Stop Test Mode button will then appear if you want to exit Test Mode before the duration expires.
Okay, this last feature is more for us than it is for you. But we still wanted to let you know about the Zone Sync function, as it changes the way that we will set up your Alarm.com Security System with the central monitoring station. Basically, it allows the Alarm.com servers to handle the process of transferring the zone description and other information from the security system to the central station during account creation and/or whenever the system's zones are updated. This information includes zone numbers and names that you have provided for zones on your Alarm.com account.
Traditionally, the process of transferring information from a security system to the Alarm.com servers had to be completed manually by a monitoring company. And really, that is still the case. The only difference now is that we can have Alarm.com automatically update the central station with the zones and their respective names, rather than having to type or write them out ourselves. An end user is still encouraged to contact us whenever they update any of the zones on their system so that a Zone Sync can be performed and we can be sure the new or edited zones get the proper dispatch instructions. We advise using the email mentioned at the end of this post for this purpose.
Get Started With Alarm.com
As we mentioned earlier, we plan to enable these features for all our Alarm.com customers with central station service sometime during the first week of October. These features will be enabled automatically, and no action is needed on your part if you are monitored with Alarm Grid for access to Alarm.com. You do have the option to opt out of any of these features if you want, but there is very little reason to do so. Remember, these new features are all complementary, and they will not increase your existing monthly bill.
If you are not yet monitored, and you are looking to start service with Alarm.com, then we are happy to help you get started. Your new service will include access to these new features. Any new customer wanting to start service, as well as any existing customer wanting to opt out of one or more of these features, should email us at support@alarmgrid.com. We will check your email during our regular business hours of 9am to 8pm ET M-F and reply back as soon as we can. We look forward to hearing from you and helping you use Alarm.com!


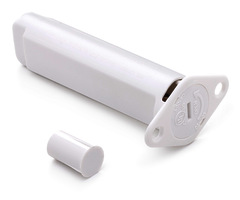


 Freeze sensors alert your system when the temperature in the building drops to a dangerously low level, usually due to the HVAC system being broken. Having one of these sensors in your home or business is crucial for monitoring the building while you are away. The consequences of having below-freezing temperatures in your home or business can be dire. The pipes can freeze, and major damage can occur. Installing a freeze sensor is small price to pay to prevent this from happening.