DIY Security Systems Posts

Posted By

You might be checking your calendar because it's Friday, and this is a video recap, and we usually save those for Mondays. Well we had four (4) videos from earlier this month that we never managed to recap, so we figured why not now? The topics today are VISTA Panels and the Tuxedo Keypad.

Honeywell VISTA System: Factory Defaulting

I show you how to Factory Default a Honeywell VISTA Security System. This process is very simple. You just get into programming with the command [Installer Code] + [8] + [00], with the default Installer Code being 4112. You can press [*97] to perform the default. The panel will beep three (3) times to confirm. You should also press [*96] to default the panel account and Computer Station ID (CSID). You can then press [*99] to exit programming. You can perform the default on an Alphanumeric Keypad, a Fixed English Keypad, or a Tuxedo Touchscreen Keypad in its Console Mode.


Honeywell Home Tuxedo: Local Scenes Using Sunrise & Sunset

I explain how you can create local smart scenes on a Honeywell Home Tuxedo Keypad to be set with time-based triggers for the local sunrise or sunset time. In the upper-right corner of the main Tuxedo screen, there is a weather display. If you click on this, then you can set the ZIP Code for the keypad. The Tuxedo will use this ZIP Code and its WIFI connection to get the daily sunrise and sunset time for any scenes set to trigger that way. If the Tuxedo loses its internet connection, it will just use the last recorded sunrise time and sunset time.


Honeywell Home Tuxedo: Setting Up Web Server & Remote Access

I show you how to set up web server access so that you can control the Tuxedo Keypad from a web browser. After setting up the feature by entering a username and password into the designated section of the Tuxedo, you can enter the Tuxedo IP Address into the web browser of an IP-connected device to access a login screen. The device used must be on the same network as the Tuxedo Keypad. Provide the username and password that you set up at the Tuxedo. This will open an interface resembling the old style Tuxedo Touch, and you can use that you control the Tuxedo and the connected VISTA.


Honeywell Home Tuxedo: Web Interface Cannot Include/Exclude Z Wave Devices

I explain that you cannot include or exclude Z-Wave devices when accessing the Tuxedo Keypad from a web browser, also known as the Tuxedo Web Interface or Tuxedo Virtual Interface. Although you can perform almost all of the same commands from the virtual Tuxedo Web Interface as you can from the Tuxedo Keypad itself, you cannot add or remove Z-Wave devices. This is because the necessary menu option for adding and removing Z-Wave devices is not present inside the Tuxedo Virtual Interface. You can only add and remove Z-Wave devices by interacting with the actual Tuxedo Keypad itself.

Tags: , , , , , , , , , , , , , , ,

Comments


Posted By

With the 2GIG Edge now available, users have access to some features we have never seen before in home security. One feature that really stands out is the system's facial recognition capabilities. This is the first ever panel from Alarm Grid to support facial recognition disarming!


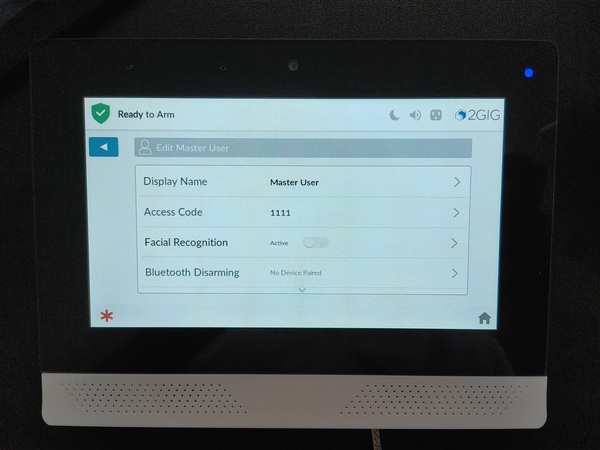
The 2GIG Edge facial recognition feature is set up when you go to configure a user for the system. You can also configure it for the Master User, which is likely what you will want to do, along with changing the code away from its default of 1111. This is probably one of the first things you will do after getting the 2GIG Edge Security System, so consider this to be a bit of a starter's guide as well.

And don't forget that the feature is totally optional to use. If you don't want your 2GIG Edge System storing your "facial biometrics", then you don't have to. But if you do decide to set up the feature, we'll tell you right away, it works very well, and it's super convenient. It is also important to mention that all facial biometric information is only stored locally at the panel. This information is neither shared nor stored with Alarm.com in any fashion. Up to ten (10) users on a single 2GIG Edge Panel can be set up with the Facial Recognition feature, so do keep that in mind if you have a large number of users set up with your 2GIG Edge. But with that of the way, let's get started setting up the Facial Recognition feature on the 2GIG Edge!

What you need to do is access the User's Menu. Begin by clicking the Settings Icon (the gear) in the bottom-right corner. Then provide the Master Code (default 1111) or the Installer Code (default 1561). Then choose Users. And just like that, you are in the Users Menu.


You can click the Add User button in the bottom-right corner to create a new user. But if you haven't configured the Master User yet, then that's what you should do first. To configure the Master User, just click on the pencil icon next to it. You will be taken to the menu where you can adjust a variety of different settings.


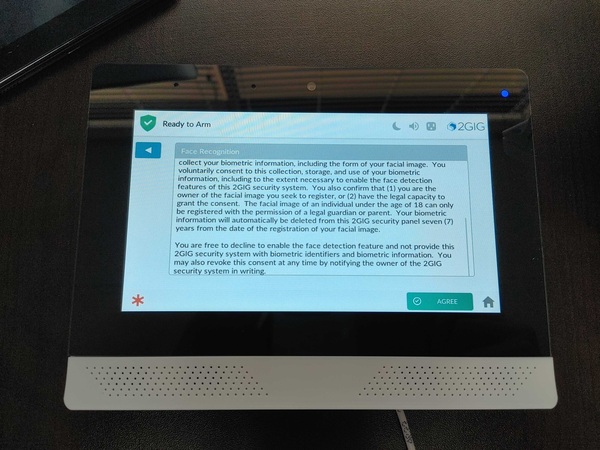
From here, you can set a custom Display Name if you want a more personalized touch than "Master User". But today, we're going to focus on the facial recognition feature. You can see that it is disabled by default, so you should go and enable it by setting the toggle bar to green. And once you do, you will be greeted by the Facial Recognition Disclaimer Screen. Read through it, and assuming you agree, then click the Agree button in the bottom-right. You have to scroll all the way through it, or else you won't be able to click the Agree button, as it won't be illuminated.


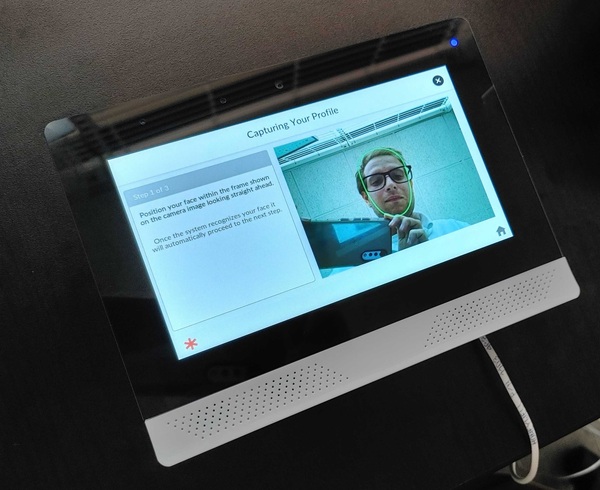
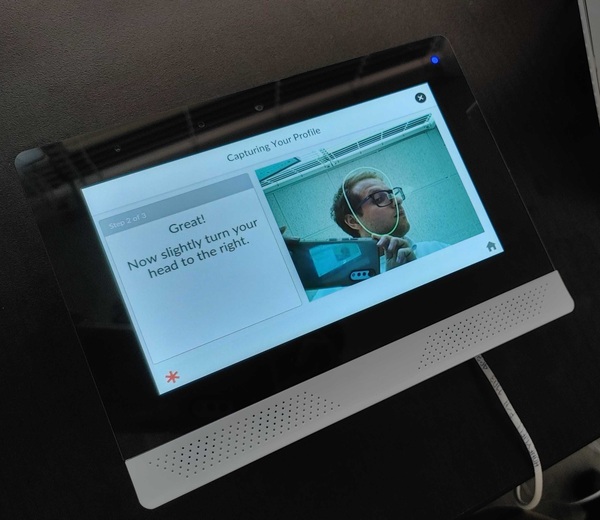
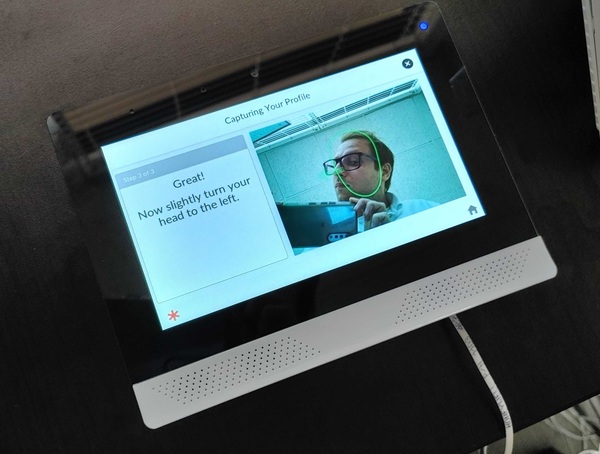
Then you will need to capture your facial profile. You start by pressing the Begin button. You will need to position your head into the outlined box. Then once it recognizes your face, the outline will turn green. You will be asked to look to the right, and it will detect the movement. Then you will be asked to look to the left. Again, the movement will be detected. Oh, and when you go to do this yourself on your own 2GIG Edge, you don't need to have your phone in the photo. I was just trying (with varying degrees of success) to capture the moment in a series of photos. If you just complete the process normally as 2GIG intended, it's very easy.

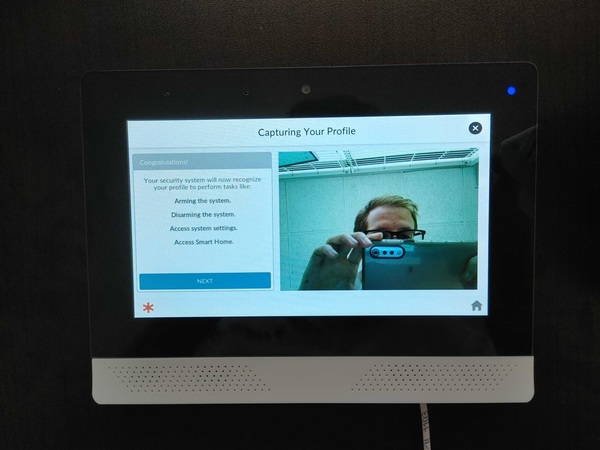
You want to be very careful when capturing your facial profile - definitely more careful than me trying to pull double-duty by trying to take photos of the process at the same time! Make sure your face fits as nicely in the outline as possible. Feel free to move your head closer or further away from the panel if you need to. Then, when asked, turn slightly to the right, and then slightly to the left, and you will be all done! It only takes a matter of seconds. You will get the "Congratulations" message, and the feature will be in effect. And if you feel concerned that maybe you did a shoddy job, you can always reconfigure your 2GIG Edge Facial Profile later on. If you find that the system is having a tough time recognizing your face, then repeating this process (and doing it carefully) can make all the difference.


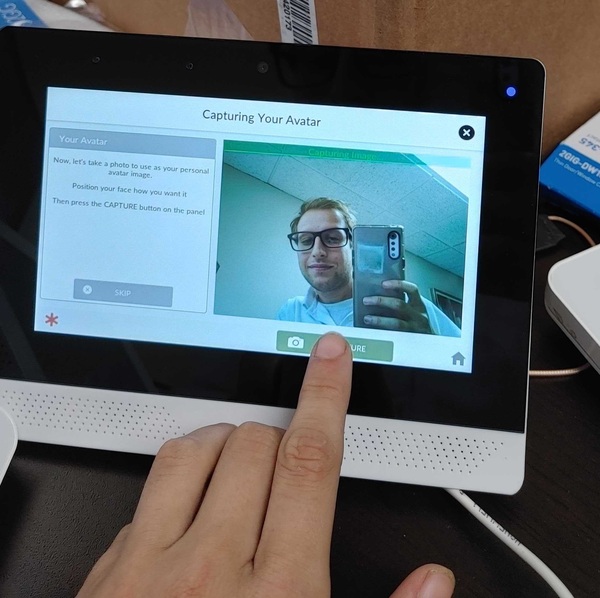
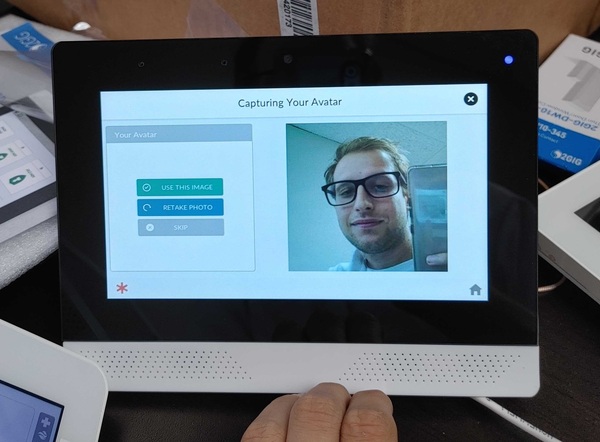
Once you click Next, you will be taken to a screen where you can choose to watch a tutorial video about how the Edge uses facial recognition. It may be helpful for you to get the very most out of the feature. Or you can skip it if you feel like this guide is sufficient. But you will still need to take an "Avatar" photo. Again, I'm a one-man team, so I tried to take a photo of myself trying to take a photo of myself (I never thought I'd write that sentence). Considering the circumstances, I think my "Avatar" turned out pretty nice!


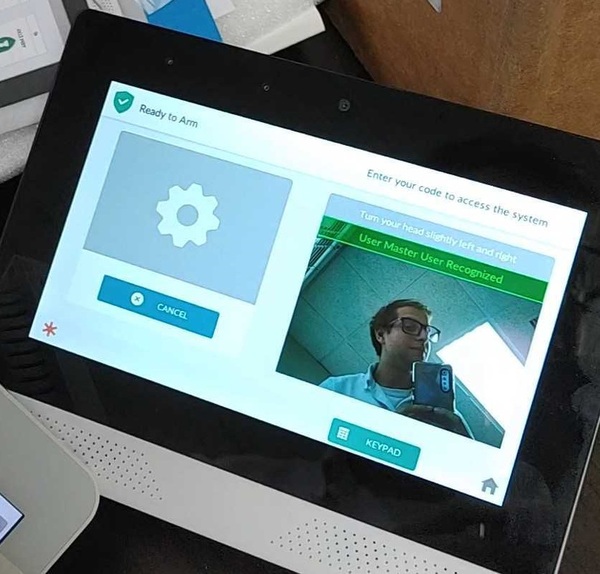
If you're satisfied with your appearance, you can choose Use This Image. Or if you're a perfectionist, feel free to Retake Photo. If you decide that you can't take a good photo to save your life, then you can choose to Skip the step. But after that, facial recognition will be ready to go. If you did this for the Master User, you can even use facial recognition to get into Master-level programming. Whenever the system needs a code, the panel camera will activate. You just position your head, look left and right (like you're suspicious), and you will get in. Now the real question - can I take a photo of myself passing a facial recognition test?

Disclaimer - I cheated. That shot above is actually a video frame. The "User Master User Recognized" message only appears on the screen for a split-second, much too fast for an amateur self-cameraman like me to take a proper photo. But let's focus on what really matters here. This feature actually works VERY well. You can see it recognized me quite easily. And don't worry about it being a security risk. NOBODY else in the Alarm Grid Office could disarm with my facial profile. We had someone else try. They don't have the same "facial profile" as me, so the Edge wouldn't acknowledge them. But my face is able to trigger it quite easily.

You can use facial recognition to arm, disarm, and even enter into Master-level programming when a code is needed. Just be careful to set up your "facial profile" properly, and the 2GIG Edge will take care of the rest. If you have any thoughts on the feature, please share them down below in a comment. And stay tuned for more content from Alarm Grid coming soon!

Tags: , , , , , , , , , , , , , ,

Comments


Posted By

Qolsys has released the long-awaited Firmware Version 2.6.0. This will be the base version for the Qolsys IQ Hub and will allow users to configure the new IQ WIFI Mesh Router from the touchscreen of the IQ Panel 2. These are only a couple of the new features. This is truly an exciting update!

We've been talking about the Qolsys IQ Hub, well, forever, it seems. But honestly, it's been "coming soon" for over a year now. We are so glad that the wait is almost over. The Qolsys IQ Hub will truly be a DIY dream. Qolsys has taken a "see no green" approach to this panel, meaning there is no reason to open the panel fully, so you should never see the green printed circuit board (PCB). It won't even have screw terminals! The battery will be easily end-user replaceable with a minimum of "deconstruction" to the alarm panel itself. Some of the best features of the IQ Panel 2/2+ will be available in this new panel, such as Bluetooth disarming, and Alarm.com Camera Streaming at the panel.

A couple of things have been removed though. It will not have a built-in camera, nor will it offer 2-way voice capability. The IQ Hub is meant to be a slightly less expensive alternative to the IQ Panel 2 or 2 Plus, and to the Qolsys IQ Panel 4 that we should be seeing later this year. Initially, the IQ Hub will support PowerG Wireless Sensors, but later, there will be 319.5 MHz, 345 MHz, and 433 MHz options available. Each IQ Hub is intended to support only one (1) RF frequency.

You might be saying, "I thought this was a blog about Firmware Version 2.6.0?" Well, it is. But the fact that we have Firmware Version 2.6.0 available now means that the full release of the Qolsys IQ Hub won't be far behind. The Qolsys IQ Hub is scheduled for a Q2 2021 release. Aside from all the new features and improvements for the IQ Panel 2 Plus itself, another exciting capability that is added in this firmware release is the ability to control and configure the new Qolsys IQ Router through the IQ Panel 2 or 2 Plus Touchscreen.

The Qolsys IQ Router is also slated for release in Q2 of 2021. This is a mesh router system that will support up to eight (8) nodes, and both 2.4 GHz and 5 GHz networks. What's great about this product is that it allows a user to create a WIFI subnet inside their regular network. Any devices that use WIFI can be attached to the network, not just security devices, and multiple nodes (up to 8) can be added to strengthen the mesh network. If you change internet providers or even just internet equipment, you simply unplug the IQ Router from the existing router, plug it into the new router, and all of the WIFI devices will remain connected to the WIFI sub-network without having to reconfigure any of them. These are two upcoming products associated with the release of Firmware Version 2.6.0 that we're really looking forward to.

Below you'll find some of the additional new features supported on Firmware Version 2.6.0:

New Features:

  • Support for DSC hardwire keypads (HS2LCD, HS2ICN) via the CORBUS on the PowerG Hardwire to Wireless Translator (PG9WLSHW8) with Firmware V 1.1. Also added new PGM system triggers for Police, Fire, Aux & CO emergency.
  • Support for DSC NEO Wire-Free Keypads HS2LCDWFx, HS2LCDWFxENG.
  • Support for new V4 PowerG Daughter Card.
  • Panel now supports remote Z-Wave Smart Start integration from Alarm.com.
  • This update includes the critical firmware2 fix that resolves an issue where certain panels would automatically reboot with previous firmware applied.

Fixes & Improvements

  • Added a setting to allow the panel to send 1 or 10 images taken by PowerG Image Sensor Cameras (PG9934P, PG9944, NEXT CAM, PG2, NEXT CAM K9-85 PG2, BW-IRC, BW-IPC, TOWER CAM PG2, BW-ODC) during an alarm event to Alarm.com. Previously, ten (10) images were stored locally at the panel, but only the first image was sent to Alarm.com.
  • Added a setting allowing alarm dealers to select a specific time for Communication Tests to be sent to the monitoring station. If no selection is made, the time will be randomized.
  • Added a setting for detection direction on PG9902 Outdoor Curtain PIR. Users can choose left to right, right to left, or both.
  • Added the ability to disable PowerG activation LED on devices that have one in order to conserve battery.
  • Added Partition support for EN Grade 2 Panels.
  • Improved 700-Series Z-Wave performance on UK & EU Panels.
  • Bluetooth Disarm now available for UK & EU Panels.
  • Added language support for Spanish (Spain), French (France), Finnish, and Polish.
  • Added support for European date format: DD.MM.YYYY.
  • Improved cellular strength matching between Panel and Alarm.com for Latin America.
  • Silent and Audible Panics now report separate CID codes to central station.
  • Duress Alarm and Silent Police Panic can now be dismissed from Alarm.com.
  • Improvements to PowerG Wireless keypad functionality (WS9LCDWFx).
  • Keyfob arming now follows the Auto-Bypass setting on the panel.
  • Duress codes from KP-140 & KP-141 now transmit to Alarm.com.
  • Corrected an issue where a PG9905 Temperature Sensor would send double alarms for the same event.
  • Fixed an issue related to virtual device integration on the panel, which includes Liftmaster Garage Door control from the panel UI, and Solar Integration from Alarm.com. See TSB 201026 for additional details.

Into each life, a little rain must fall. It's not all good news, although, this is more of an inconvenience than actual bad news. Because Firmware Version 2.6.0 also contains the important firmware2 fix, it must be downloaded and installed from the Qolsys Server. The server has some logic built-in that allows it to tell if the panel being updated requires the firmware2 fix, or not. For this reason, much like Firmware version 2.5.5, Qolsys is not making this firmware file available for download. This means that Alarm Grid can't host it on our site.

What this means for the end-user is that in order to get 2.6.0, your panel must have a WIFI connection. Once it does, you have two ways in which you can get the firmware. You can request it from your alarm dealer, and they can push the update to your panel from Alarm.com. This will be a free update. As long as your panel has WIFI 24/7, this is a simple and no-fuss way to get your panel updated. Just remember, if for some reason your panel loses WIFI, the update won't go through. Alarm.com will not allow the panel to be updated via a cellular-only connection. You can also follow the instructions below to request the update via Patch Tag.

If your panel happens to be in an area where there is no WIFI, maybe it's a hunting or fishing cabin, or a second home where WIFI is not readily available, then you may be able to use your cell phone as a mobile hotspot and fool the panel into thinking it's connected to WIFI. The amount of data in this file is about 250 MB according to Qolsys. Alternatively, you may be able to move the panel to a spot that has WIFI available just long enough to perform the upgrade. In a situation like this, you need to be in control of when the update begins, so in this case, you would want to use the "Patch Tag" method of updating. To do so, once your panel has a WIFI connection, do the following:

Follow these instructions after making sure your panel is on version 2.0.1 or higher. If the panel is on 2.5.0 or 2.5.1, the user must first update to 2.5.3 before running the update for 2.6.0:

  • Touch the small gray bar in the center at the top of the Home screen on the panel.
  • Touch “Settings”
  • Touch “Advanced Settings”
  • Enter a valid Installer or Dealer Code (defaults are 1111 and 2222 respectively)
  • Touch “Upgrade Software”.
  • Touch “Patch Tag” and enter: iqpanel2.6.0 then touch “OK”.
  • Important: If you need to install 2.5.3 prior to this update, the Patch Tag for that version is: iqpanel2.5.3. Run that update before running the Patch Tag for 2.6.0.
  • Touch “Upgrade Using Network”. If the panel is connected to WIFI, the system will begin downloading the update, it will be installed when the download completes. Once the update begins Do Not Touch The Screen! The update will take about five (5) minutes, and the panel will reboot as a part of the process. When the panel returns to the home screen and the Green LED at the right lights, the process has completed.

What do you think about the new Qolsys firmware, and the new products they have in the pipeline? Share your thoughts in the comments below. Is there a security topic you'd like to see us discuss? If so, leave a comment and we'll be happy to cover any security-related topics of interest. As always, we look forward to hearing from you!

Tags: , , , , , , , , , , , , , , , , , , , , , , , , , , , , , , , , , , , , , , , , , , , , ,

Comments


Posted By

It's always a great start to the week when there's a new Alarm Grid video recap! We have six (6) new videos to check out this time. I had to step in front of the camera again, as others continue to work from home. It will be a bit longer before others return. But anyway, here are the videos.

Interlogix Simon XTi & XTi-5: Setting Installer Code to Default

I show you how to set the Installer Code on an Interlogix Simon XTi or Interlogix Simon XTi-5 to its default setting. The default Installer Code for these systems is 4321. This is actually the same default code as the default Dealer Code for these systems. The only way to have the same Installer Code and Dealer Code on an Interlogix Simon XTi or Interlogix Simon XTi-5 is to keep both of the codes at their default setting of 4321. If you change either code, then you must factory default the system to get both codes back to the default.


IQ Panel 2 Plus: Setting Installer Code to Default

I show you how to set the Installer Code on a Qolsys IQ Panel 2 Plus back to default. This system has a default Installer Code of 1111. Alarm Grid recommends keeping the code at its default so that you do not become locked out of programming. If you forget the default code, you can always look it up later. Keeping the Installer Code at the default does not present a security risk because you cannot disarm the system with that code. To reset the Installer Code, you must know either the current Installer Code or the current Dealer Code.


Connecting August Smart Lock Pro to WIFI

I show you how to connect the August Smart Lock Pro to a WIFI network. To do this, you will need an August Connect WIFI Bridge. Alarm Grid sells a bundled kit that comes with both devices. Connecting your August Smart Lock Pro to WIFI will allow you to control the lock remotely through the August Home App when your phone is outside of Bluetooth range. The only other ways to control the lock remotely are outside of the August App through Apple HomeKit or Z-Wave. The August App switches to WIFI automatically once you are outside of Bluetooth range.


Using August Smart Lock Pro With Apple HomeKit

I show you how to configure the August Smart Lock Pro for use with Apple HomeKit on an Apple iOS device. All HomeKit communication for the August Smart Lock Pro occurs through wireless Bluetooth connectivity between the lock itself and a dedicated HomeKit Hub. The dedicated HomeKit Hub can be an Apple iPad, an Apple HomePod, or an AppleTV Gen 4 or higher. You must keep the dedicated HomeKit Hub within Bluetooth range at all times for proper connectivity. The lock cannot use WIFI to communicate with the HomeKit Hub, even if an August Connect WIFI Bridge has been configured.


Wired Alarm System: Power Cycling

I show you how to power cycle your hardwired security system. Power cycling, or a power cycle reset, involves powering the system down and then powering it back on. There are a few reasons you might do this. If you are adding new hardware, such as a new keypad or a new alarm monitoring communicator, then you must power down your system first, and then power it back on after the hardware is installed. You might also power cycle as a general troubleshooting step. Most wired alarm panels require you to manually remove and restore power to fully power cycle.


Wireless Alarm System: Power Cycling

I show you how to power cycle your wireless security system. The reasons for power cycling a wireless system are usually the same reasons you would power cycle reset a wired alarm system. These reasons include making hardware changes and general troubleshooting. But for a wireless system, there is often a menu option you can use to reboot the system, without needing to manually drop and restore AC power and battery power. You should refer to the installation manual for your wireless alarm system to learn how to reboot through a menu selection, as it differs between systems.

Tags: , , , , , , , , , , , , , , , , ,

Comments


Posted By

After much anticipation and speculation, the 2GIG Edge Alarm System is finally here! We have the Edge Panel available in two (2) cellular communicator options (AT&T or Verizon), plus complete 2GIG Edge System Kits, and various alarm system accessories exclusively for use with the Edge.


If you have been keeping up with the Alarm Grid blog, then you probably already know that the Edge is perhaps the single most highly anticipated thing we have ever seen out of Nortek Control and 2GIG. The state-of-the-art wireless all-in-one (AiO) panel retains virtually all of the same great features and capabilities of the 2GIG GC3e System that came before it, including a 7-inch LCD touchscreen for easy and seamless navigation, 100 wireless zones, support for 2GIG eSeries Encrypted Sensors, and legacy 345 MHz sensors (both Honeywell 5800 and 2GIG 345 MHz), the ability to build and customize up to four (4) individually controlled and operated Smart Area Partitions, One-Touch Arming, Chime & Voice functionality, Alarm.com connectivity, a digital slideshow picture frame, and much more.

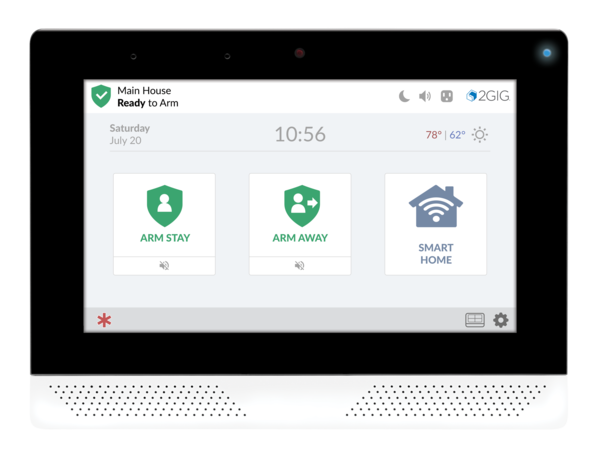
But what makes the 2GIG Edge different and unique is its new features. First of all, the Edge has a completely refreshed design for a 2GIG Panel, as it is the first system from 2GIG to break away from the traditional all-white panel. Instead, the Edge comes in a black design that looks impressively modern and fits in nicely with almost any setting. We're also pleased to say that 2GIG was able to fit more hardware into the Edge Panel, putting it in on par with the Qolsys IQ Panel 2+ panels. This includes a built-in glass break detector, a front panel camera that offers facial recognition, and an 85 dB sounder for alarm events.

One noteworthy difference with regard to 2GIG Edge facial recognition is that it can be used for automatically arming and disarming the system upon detecting the user's face, which is not possible on the IQ Panel 2 Plus. Other familiar IQ2+ features also offered with the Edge include optional automatic Bluetooth disarming for your phone, panel live-streaming for compatible Alarm.com Cameras, and full connectivity with the Alarm.com security and automation platform.

Perhaps one of the most important aspects of the 2GIG Edge is the fact that it has a built-in LTE cellular communicator. This is used for connecting the system with Alarm.com, since ADC requires that all systems using their services have an active cellular communication path. This is in addition to the internal WIFI card for the 2GIG Edge that is also used for communicating with Alarm.com. Using cellular and internet communication together on a security system is often referred to as dual-path connectivity, and it is great because it helps to ensure that the system stays monitored during any type of communication outage. But while internet connectivity is technically optional, cellular communication is required. This means that you will need a monitoring plan that includes cellular communication to get the 2GIG Edge monitored. Some monitoring plans you may consider include the Gold and Platinum Level Plans from Alarm Grid (Self or Full). You can learn all about Alarm Grid monitoring plans in this comprehensive blog post.


As we mentioned before, the cellular communicator for the 2GIG Edge is built into the panel. While this might seem like a positive attribute, it is a bit of a double-EDGEd sword when you consider the issue more closely. On one hand, this means that there is no need to purchase a separate communicator for the 2GIG Edge. Everything needed for the system to connect with Alarm.com is built into the panel. But this also means that if something ever goes wrong with the communicator, then it will be necessary to replace the entire panel, rather than just simply swapping out the communicator. The same is true for the system's WIFI card. If it is damaged, then a completely new system is needed. There is also no word on how a built-in LTE cellular communicator will affect the system in the very distant future when LTE will inevitably face its own sunset. Fortunately, this is unlikely to be a concern for at least 15 to 20 years. We've also seen the Qolsys IQ Panel 2 Plus experience tremendous success while also opting for an integrated, irreplaceable LTE cellular communicator and WIFI card, so there's a good chance that the Edge will end up being just as successful. But we do want to give recognition to Resideo and their PROA7PLUS System for having the foresight to use fully replaceable LTE cellular radios (AT&T or Verizon), plus fully replaceable WIFI modules.

One thing new to the Edge that we have never seen on any other alarm control panel before is a 700-Series Z-Wave Controller. Also known as Z-Wave Plus Version 2, the 700-Series of Z-Wave Smart Home Automation promises significantly better wireless range and battery life, as well as much stronger wireless security when compared with previous iterations of Z-Wave technology. Although we haven't seen many 700-Series Z-wave devices hit the market just yet, it is worth mentioning that 2GIG recently released their own Z-Wave 700-Series Smart Thermostat, the 2GIG STZ-1. This smart thermostat can make a great addition to your new 2GIG Edge System and the automation network you plan to build around it. Remember that we have all sorts of Z-Wave lights and Z-Wave door locks available on our site for you to construct a complete smart home to make your life easier. But if you want to hold out a bit longer for the 700-Series Z-wave devices that will inevitably make their way to the marketplace sooner rather than later, then we don't blame you at all. And as you may have guessed, every Z-Wave home automation device that you pair locally with the 2GIG Edge will also be accessible remotely through Alarm.com once you get the system monitored with a plan that includes remote access.

With all of the introduction and explanation out of the way, let's take a look at the new products. First up is the base 2GIG Edge Panel, available in AT&T LTE and Verizon LTE:

If you are starting from scratch, then you might prefer to purchase one of our 2GIG Edge Starter Kits, which also include some sensors for you to pair with the system, as well as a Honeywell LT-Cable for easily powering the system. You can choose whether you want a fully encrypted kit with only encrypted sensors or a standard wireless kit, where the included door and window sensors don't utilize wireless encryption. Keep in mind that you can always upgrade to encrypted sensors later if you start out with a non-encrypted system. And also remember that you will need to decide whether you want your 2GIG Edge System to have an AT&T LTE Communicator or a Verizon LTE Communicator. This may be the most important consideration prior to purchase since the LTE communicator can't be replaced. Be sure to check coverage maps for the area where the panel will be used, and choose whichever carrier will have the best signal in the area.

Our system kits come in two (2) sizes. First, we will look at the 3-1 Edge System Kits that include three (3) wireless door and window sensors, and one (1) wireless motion detection sensor. These 3-1 Kits are best-suited for use in a smaller home or an apartment. Here are our 2GIG Edge 3-1 System Kits:

We also have our 10-1 Edge System Kits that come with ten (10) door and window alarm sensors, and one (1) motion sensor. This size kit is best used for a larger home or a small business. Again, the same equivalents apply to this size, so you have four (4) possible kits to choose from. Here are the 2GIG Edge 10-1 System Kits from Alarm Grid:

Lastly, we want to check out the system accessories for the 2GIG Edge. There are a few usual suspects here, including a replacement transformer and a replacement backup battery, plus a specially prepared power cord released by 2GIG. But we think the most interesting accessory is the wireless touchscreen keypad built exclusively for use with the 2GIG Edge Alarm System. Again in a similar fashion to the IQ Panel 2 Plus, the 2GIG Edge Remote Keypad mimics the system's display and can perform virtually any system function, much like the IQ Remote. But unlike Qolsys and the IQ Remote, 2GIG has made their remote keypad with an end-user replaceable battery, which is a huge improvement in our eyes.

2GIG AC1

Here are the 2GIG Edge System Accessories:

One final note about the 2GIG Edge is that there has been no indication that 2GIG intends to release a new "exclusive" sensor lineup for use with the system. Historically, this is a bit unusual, as you traditionally see a new security system (especially one as heavily promoted and anticipated as the 2GIG Edge) released alongside a new lineup of sensors designed specifically to accompany the system. Even the last major releases from 2GIG saw this, as the 2GIG GC2e and 2GIG GC3e became synonymous with the encrypted 2GIG eSeries Sensors. We only mention this because it's likely that some users out there will be actively looking for sensors to add to their new 2GIG Edge System, and they may be surprised to learn that there is no special 2GIG Edge Sensor Family. However, you still have a plethora of great sensor options to choose from, as the 2GIG Edge thrives in terms of backward compatibility. As we mentioned earlier, the system supports encrypted sensors from the 2GIG eSeries Lineup, plus non-encrypted Honeywell 5800 Sensors (uni-directional only) and 2GIG 345 MHz Sensors. If you are looking to expand upon your 2GIG Edge Alarm System, then those three (3) sensor families give you some awesome options to choose from!

The 2GIG Edge System, our 2GIG Edge System Kits, and the 2GIG Edge Accessories are all available now, and they can be purchased from the Alarm Grid website. Do you have any thoughts or questions about the 2GIG Edge? Leave them down below as a comment. We would love to get some discussions started on this super exciting new security system. Do you think the 2GIG Edge has what it takes to compete with strong systems like the Qolsys IQ Panel 2 Plus and Resideo PROA7PLUS? What aspect of the 2GIG Edge has you the most excited? Is there anything you would like to see in a future firmware update or patch for the Edge? Get the discussions started down below, as we look forward to hearing from you. And stay tuned to our blog for more security system news coming soon!

Tags: , , , , , , , , , , , , , , , , , , , , , ,

Comments


Posted By

If you have a new Alarm.com Security Camera or you are thinking about getting one, then you may want to know just how easy it is to get a camera online and paired with your personal Alarm.com account. Today, we're looking at the setup process for the ADC-V515, ADC-V523, and ADC-V723.


You may recall that the ADC-V515, ADC-V523, and ADC-V723 were our Top Alarm.com Camera Picks in a post we made a couple of months ago. These are indeed the cameras you will most likely be considering if you are a residential user. They're great because they can be powered with a simple plug-in adapter that comes included with each device, and they are also extremely easy to pair with the local WIFI in your home. Plus, the ADC-V515 and ADC-V523 Indoor Cameras can be rested on a desk, table, or countertop for a tools-free installation. The ADC-V723 Outdoor Camera needs to be hard-mounted, so you will have to break out the toolkit to install that one. But just drill a few holes and secure the camera's backplate using included screws, and that camera will also be ready to go.

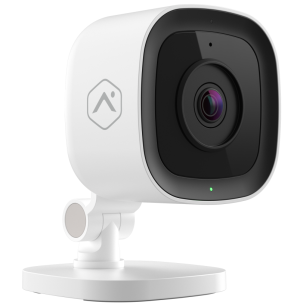
The other popular Alarm.com Camera for residential use is the ADC-V622, which is also sometimes called the Alarm.com Wellcam. Unlike the other three (3) cameras, Alarm.com markets the ADC-V622 for more of an "independent living" solution so that you can monitor a loved one. It can make a good security camera as well, though its applications are usually a bit different. Alarm.com also has a great lineup of commercial security cameras, which you can usually identify by having a C in the name (e.g. ADC-VC826). But for today, our focus is strictly on the three (3) main residential security cameras, the ADC-V515, ADC-V523, and ADC-V723. We may cover the other cameras in a future post as well, so stay on the lookout for that. But for now, besides the camera, the other things you need to get started are a home WIFI network and an alarm monitoring plan with video surveillance that includes access to Alarm.com, such as an Alarm Grid Platinum Plan. You can learn all about our monitoring plans in this post. Remember that you will only use Alarm.com Cameras if your security system supports Alarm.com, or if you choose to use a stand-alone video-only Alarm.com plan. If you have a Resideo or Honeywell Alarm System, then your system will most likely use Total Connect 2.0 instead of Alarm.com. In that case, there is a nice selection of TC2 IP Cameras you can choose from. But today, we're only looking at Alarm.com Cameras.

When you have a new Alarm.com camera, the first thing you will want to do is power it on. For the three cameras we're checking out today, the power adapter comes included. Most users find the stock setup to be sufficient, but Alarm.com does offer a convenient 9-foot extension cable called the Alarm.com ADC-VPE-9FT-W if you need an extra-long wire run to the nearest outlet. Alarm.com recommends extending the power wire no more than 100 feet. Once you plug the camera in, you can verify that it is receiving power by seeing that the camera's LED light has turned on.


The next step is to get the camera online. These are WIFI cameras that don't support wired ethernet options. You must get the camera connected to wireless WIFI internet. The ADC-V523 and ADC-V723 support both 2.4 GHz and 5 GHz networks. But the ADC-V515 only supports 2.4 GHz networks, and it will not support 5 GHz networks. Keep that in mind if you are using the ADC-V515. Each camera can be paired using AP Mode pairing or WPS pairing. Of these two methods, AP Mode pairing is more secure, and it is the method recommended by Alarm Grid. Check out any of the FAQs below for instructions on AP Mode pairing:

WPS, stands for WIFI Protected Setup. You can use WPS pairing as an alternate method for getting your Alarm.com Camera online. Although WPS pairing is usually seen as easier than AP Mode pairing, it isn't as secure, and it opens up the door for various network vulnerabilities. If you accept the risks, then we have guides showing WPS pairing as well.

Once your camera is online and has a solid green LED, all you need to do is pair it with your Alarm.com account. You can do this using the website or mobile app. Both methods are very easy, so it really comes down to preference as to which one you use. If you decide to pair through the website, then make sure you are using a compatible web browser for Alarm.com.

If you haven't tried out the Alarm.com Mobile App for controlling your system remotely, then setting up a camera through the mobile app can be an excellent way to show you how it works. Anyone with an Alarm.com account can use the mobile app at no extra charge, and you can conveniently download it for free from either the Google Play Store on Android or the Apple App Store on iOS. Then use one of these guides to pair your Alarm.com Camera:


We hope that you find these guides useful for setting up an Alarm.com Residential Camera. We will likely be covering the Alarm.com Wellcam ADC-V622 and the Alarm.com Commercial Security Cameras sometime in the near future, so stay on the lookout. Feel free to comment below to share your thoughts on Alarm.com Cameras. What do you like about them? Is there anything you'd love to see in future updates and releases? Leave a comment down below, and stay tuned for more content on security systems and cameras coming soon.

Tags: , , , , , , , ,

Comments


Posted By

Here at Alarm Grid, we try to help as many people as possible with their alarm system. Sure, we hope it will lead folks to choose us for their alarm monitoring needs. But it's also because we're simply helpful people. An alarm in your home or business should help quell fears, not cause them.

We've begun what I think of as "Silly Season". You may be familiar with this term from Nascar, but for us in the alarm industry, this is the time when a lot of home buying and selling occurs. During this time, we get a lot of calls that go something like this, "I just moved into a home with an existing alarm. We haven't been using it, but somehow it got armed, and now it's going off, and I don't know the code to disarm it. Please help!"

Moving into a new home is exciting, but it's also stressful and can be overwhelming at times. So, I've (Ms. Manners) put together this guide to help you, the person who moved out of the home in this scenario, to leave behind your alarm system in a way that's as stress-free as possible for all parties involved.

Ms. Manners Says: Notify Your Alarm Company

If your alarm system is monitored, be sure to notify your alarm company that you are moving out and that the system is staying behind. This may seem obvious, but many people assume that if they stop paying their monitoring fees, the alarm company will know they no longer want service and will cancel it on their own. This is not the case for a number of reasons! There may be contracts involved. There could be liability issues. So for many reasons - not the least of which is it's the polite thing to do - any time you wish to stop monitoring service to a particular address, you should notify the alarm monitoring company as soon as possible.

By notifying the alarm company, you do several things. You give them an opportunity to reach out to the new homeowner and introduce themselves. Hopefully, if you've had a good experience with your monitoring company, you will also put in a good word about them to the new homeowner. Both of these things give the company a leg-up when it comes to courting a potential new customer, and it also gives the new homeowner information based on your real-life experience, not just an advertisement in a new homeowner's mailer.

By notifying the monitoring company, you can also help to prevent any unnecessary dispatching of the authorities to this address. As bad as the scenario above is for the poor, uninformed new homeowner, it's worse for the police, fire, or EMS personnel who may respond to the alarm, which we know is false.

Remember, the person who signed up for the monitoring service at the address in the scenario above no longer lives there. That means the monitoring station is going to be calling people who have no idea what may be going on at this address (which is also an annoyance for the person receiving the call). In this situation, it is likely that the monitoring station MUST dispatch because if they don't (and there is some type of emergency) there may be repercussions for them. A monitoring station is always going to adhere to the adage, "Better safe than sorry." After all, safety is their business.

Ms. Manners Says: Default Users, But Not Zones

When you sell a house and the alarm system with it, you may think it's a good idea to set the alarm system back to factory default to allow the new homeowner a chance to program it as they see fit. Resist this urge! In most cases, what was your Front Door is now going to be their Front Door. What was your Kitchen Window is now going to be their Kitchen Window. John's Bedroom Window may become Jane's Bedroom Window, but this is a pretty simple thing to change and doesn't really call for the entire system to be set back to factory default.

When it comes to user codes, though, it is best to set these back to factory defaults. This will prevent the new homeowner from finding out what codes you used. After all, we are creatures of habit, and there's a good chance you'll use those same codes in your next system. Also, if you set the codes for the Installer and Master users back to their default, the new homeowner should easily be able to find out what they are by doing a quick search online. Then, if they find themselves in the messy scenario discussed above, they'll be able to get themselves out of it. Being able to get yourself out of a jam like this one can do wonders for your self-confidence.

System Manufacturers and their Default Codes

Panel Manufacturer Installer Code Master Code
Honeywell Vista (Non-polling) 4112 1234
Honeywell All-in-One 4112 1234
2GIG GC2 1561 1111
2GIG GC3 1561 1111
Qolsys 1111 1234
Interlogix Simon XT 4321 1234
Interlogix Simon XTi & XTi-5 4321 1234
DSC Impassa 5555 1234

Use the information in the table above to set the codes in your panel back to their default values. If you don't see your panel listed, you can likely find the information you need with a quick online search. Performing this process is the single most helpful thing you can do for the new homeowner when it comes to the alarm system!

Ms. Manners Says: Leave Behind Good Notes

Any information you know about your alarm system, such as the manufacturer and model, the default installer code, and the default master code - each of which hopefully you have programmed into your panel by this time - will be helpful for the new homeowner. A list of zone numbers and their descriptions is also very much appreciated by a new homeowner. Leave them a note, tucked behind the keypad, or on a kitchen counter. Give them the sequence of keys to enter to disarm the system, or better yet, if you have the opportunity, show it to them, and then leave them a note to back up your demonstration.

If you're willing, leave them your contact information so they can contact you in the event that something unforeseen comes up. This is particularly important if your system is somewhat complex and has multiple home automation features integrated with it. I promise the last thing the new homeowner wants to do is bother you if they can avoid it. Everyone at Alarm Grid has talked with a frantic new homeowner who never even considered contacting the prior homeowner. It's usually something we suggest if we're unable to assist.

Fortunately, in most cases, we are able to assist, and we are happy to do so. This is just one of the many ways we make new friends here at Alarm Grid! I hope that anyone who is preparing to move out of a home and leave behind an alarm system will read this and use these suggestions to prepare.

If you happen to be moving into a home that already has an alarm system, and perhaps the previous homeowner didn't read this post, feel free to reach out to us. We're here Monday - Friday from 9:00 am to 8:00 pm Eastern Time. You can reach us via email, or by calling 888-818-7728.

Tags: , , , , , , , , , , , , , , , , , , , ,

Comments


Posted By

You may recall us briefly discussing the Alarm.com Camera Onboard Recording feature when it was announced that the ADC-SVR122 was being discontinued. Today, we're taking a closer look at the feature, what it entails, and how you can get started. Let's check out Alarm.com Onboard Recording!


Simply put, Alarm.com Onboard Recording allows a compatible Alarm.com Camera to record captured footage locally to a microSD card that is on board the camera. Since the camera is connected with the Alarm.com servers, the user can access the footage on the microSD card remotely using the Alarm.com website or mobile app.

Only footage that is still on the microSD card can be accessed. As the camera continues to record and store video, older footage on the card is deleted to make space. You must access and save any important footage on the microSD card before it is deleted and lost forever. Many Alarm.com users have found that onboard recording is a nice alternative to using a streaming video recorder (SVR) device.

There are many things to keep in mind when thinking about Alarm.com Onboard Recording. The first thing you should consider is which Alarm.com Cameras support the feature. Alarm.com has expanded compatibility quite a bit since this feature was first released.

Compatible cameras include select indoor cameras, outdoor cameras, commercial cameras, and video doorbells. Remember that you will need a monitoring plan that includes both video surveillance and access to Alarm.com to use any of these cameras. Examples of compatible plans include an Alarm Grid Platinum Level Plan (Self or Full) or an Alarm Grid Video Only Plan. Learn about monitoring plans here.

The following Alarm.com Cameras support Onboard Recording with Smart View. If necessary, the camera firmware is updated automatically when an Onboard Recording schedule is created for it.

Camera Model Minimum Firmware
To Use Feature
Maximum SD Card Size And
Required Firmware Version
ADC-V515 0.0.5.096+ 1.5 TB on firmware version 0.0.5.728+
ADC-V516 - 1.5 TB on firmware version 0.0.3.104+
ADC-V523/523X 0.6.1.151+ 1.5 TB on firmware version 0.8.6.060+
ADC-V723/723X 0.6.1.151+ 1.5 TB on firmware version 0.8.6.060+
ADC-V724/724X - 1.5 TB on firmware version 0.8.6.060+
ADC-V730 - 1.5 TB on firmware version 05009+
ADC-VC727P - 1.5 TB on firmware version 0.8.6.060+
ADC-VC827P - 1.5 TB on firmware version 0.8.6.060+
ADC-VC847PF - 1.5 TB on firmware version 0.8.6.060+
ADC-VC838PF - 1.5 TB on firmware version 0.8.6.060+
ADC-VC728PF - 1.5 TB on firmware version 0.8.6.060+
ADC-V729/V729AC/VC729P - 1.5 TB on firmware version 0.8.6.060+
ADC-VDB775 - 1.5 TB on firmware version 04016+
ADC-V530 - 1.5 TB on firmware version 0.0.2.066+
ADC-VC7398PA - 1.5 TB on firmware version 5.0.1+
ADC-VC8498PA - 1.5 TB on firmware version 5.0.1+
ADC-VC8498PA/VC8498PVT - 1.5 TB on firmware version 5.0.1+
ADC-VC8295PA/VC8295PVT - 1.5 TB on firmware version 5.0.1+
ADC-VDB770* 02234+ 512 GB on firmware version 02234+

*Note: The ADC-VDB770 is not compatible with audio recording and playback for 24/7 Onboard Recording. Live View and Cloud Recordings still work with audio as expected.

Once you have a compatible camera, you can then start thinking about which microSD card you want to use. Alarm.com recommends using a high-quality microSD card designed for surveillance. Most supported models can use a card up to 1.5 TB, while the ADC-VDB770 supports cards up to 512 GB. For 4 MP recording schedules, the microSD card must be at least 128 GB. For recording schedules using 2 MP and lower resolutions, the minimum supported size is 32 GB. Alarm.com lists the following microSD cards as compatible:

  • Western Digital Purple microSD cards, 64 GB to 1 TB
  • Micron Industrial Memory cards, 32 GB to 256 GB
  • Samsung Pro Endurance, 128 GB and 256 GB
  • SanDisk High Endurance
  • SanDisk Max Endurance, 32 GB to 256 GB
  • SanDisk Video microSD cards, 32 GB to 1.5 TB
  • Transcend 460T, 64 GB to 256 GB

Additionally, you should check out the following FAQs from Alarm Grid that show you how to install the microSD card for some of the compatible ADC Cameras:

Below you'll see the location of the SD Card slot for each camera model:

Camera Model SD Card Slot Location
ADC-V515 Bottom side of the camera near the QR code and MAC address.
ADC-V516 Bottom side of the camera near the QR code and MAC address.
ADC-V523/523X Behind the rubber tab on the bottom side of the camera near the QR code and MAC address.
ADC-V723/723X Behind the door on the bottom face of the camera near the QR code and MAC address.
ADC-V724/724X Behind the SD card door on the bottom face of the camera, next to the speaker and WPS/Reset button.
ADC-V730 Behind the SD card door on the bottom face of the camera, next to the speaker and WPS/Reset button.
ADC-VC727P Behind the door on the bottom face of the camera near the QR code and MAC address, next to the reset button.
ADC-VC827P Under the camera cowl and the microSD label.
ADC-VC728PF Behind the door on the bottom face of the camera near the QR code and MAC address, next to the reset button.
ADC-VC838PF Behind the door on the side of the camera, next to the reset button.
ADC-VC847PF Under the camera cowl and microSD label.
ADC-V729/V729AC/VC729P Behind the SD card door on the right side of the camera body.
ADC-VDB770 On the back of the doorbell near the bottom, below the battery housing.
ADC-VDB775 On the left side of the doorbell under the SD card slot cover when looking at the doorbell from the front.
ADC-V530 Behind the silicon tab on the bottom side of the camera near the QR code and MAC address.
ADC-VC7398PA Behind the door on the bottom face of the camera near the QR code and MAC address, next to the reset button.
ADC-VC8498P/8498PA Under the camera cowl, in the labeled SD card slot.
ADC-VC8295P Under the camera cowl, in the labeled SD card slot.

After selecting the proper plan, a compatible camera, and a recommended microSD card, make sure your monitoring company enables the "Onboard Recording with Smart View" feature on your account. You will not be able to set up the feature on your account until this option has been enabled. Once you have the Onboard Recording feature set up and running, accessing the recorded footage is very simple. You can use the Alarm.com website or mobile app for this task. We recommend checking out our FAQ on Viewing Alarm.com Onboard Recorded Video from an SD Card for more information.

What do you think of the Alarm.com Camera Onboard Recording feature? Are you glad to see it available for more Alarm.com Cameras? Leave a comment down below, and share your thoughts. And stay tuned to the Alarm Grid Blog for more security system news coming soon!

Tags: , , , , , , , , , , , , ,

Comments


Posted By

In preparation for the upcoming 2GIG Edge Security System, Alarm Grid has finished building the product pages for both the AT&T LTE and Verizon LTE versions of the 2GIG Edge Alarm Panel. We now have more information than ever on what looks to be a truly state-of-the-art alarm system.

If you check the two product pages linked above, you will see that the 2GIG Edge is currently marked "discontinued". It will stay that way on our site until we have it available for purchase. But at least now, you can check out the page and see all of its great specifications and capabilities. Needless to say, it has a ton to offer. You could say that we're on the edge of our seats waiting.

We would like to take a moment and discuss some of the more noteworthy specs of the 2GIG Edge. Just like its 2GIG GC3e predecessor, the 2GIG Edge supports the same sensor lineups, included the encrypted 2GIG eSeries Sensors, the 2GIG 345 MHz Sensors, and the Honeywell 5800 Sensors. It also supports up to 100 zones, which is the same as the GC3e. There is a possibility that 2GIG might release a new sensor lineup of devices built exclusively for use with the Edge, but we have not seen any confirmation one way or another.

A very interesting discovery about the 2GIG Edge is that its internal LTE cellular communicator cannot be replaced, much like what we have already seen with the Qolsys IQ Panel 2 Plus. For us, this is a mixed bag, or a double-edged sword, if you will. On one hand, this means that you don't have to buy a communicator separately, and you will not have to install one inside the panel. But unfortunately, this means that you must replace the entire panel in the event that something goes wrong with the communicator. It also means that we may someday see all the 2GIG Edge Systems go offline at the same time due to a possible "LTE Sunset" that may happen someday in the future. That said, such an LTE Sunset wouldn't happen for a very long time.

Other features for the 2GIG Edge include its built-in WIFI, and its integrated Z-Wave Plus V2 700-Series Z-Wave Controller. That's right, this is the first system we know of to support Z-Wave 700-Series. That in itself is really exciting, as we expect this panel to be an unquestioned champ when it comes to automation. Alarm.com connectivity has also returned with the Edge, and you get all of the benefits of that platform once you get the system monitored with a proper service plan. This includes the ability to interface with smart home voice assistants like Google Assistant, Amazon Alexa, Amazon Echo, Siri Shortcuts, and so much more!

We won't go too in-depth on every new feature right now, but you can expect facial recognition, optional automatic Bluetooth disarming, Alarm.com Camera streaming, one-touch arming, emergency panic buttons, disarm photos, over-the-air (OTA) firmware updates, and so much more to be available with the 2GIG Edge. This is truly a great system to look forward to, and we hope that waiting doesn't push you over the edge of insanity.

We have some other 2GIG Edge accessories you can check out on our site right now, though none are currently available for purchase. We will be expanding upon these product pages as we learn more. These include:

Please comment below with any thoughts or questions you have about the 2GIG Edge. Are you excited about this system? Let us know. And stay tuned to our blog for more security news and updates coming real soon!

Tags: , , , , , , ,

Comments


Posted By

New products keep coming! We have two (2) new Qolsys IQ Panel 2 Plus Kits. There is the Qolsys QK9201-AK2P-840 with Verizon LTE and the Qolsys QK9202-AK2P-840 with AT&T LTE. Both are 2-1 PowerG Kits with a 319.5 MHz IQ2+ System, one (1) PG9914 Motion, and two (2) PG9303 Door/Window Contacts.

What makes these new kits different from our other IQ2+ System Kits is that these are 2-1 Kits (2 Door/Window Sensors + 1 Motion) with PowerG Sensors. Our other 2-1 offerings, the Qolsys QK9201-AK2C and the Qolsys QK9202-AK2C include Qolsys S-Line Sensors, rather than the PowerG Sensors included in these new kits. And all the other Qolsys IQ Panel 2 Plus PowerG Kits were in 3-1 or 10-1 sizes. But thanks to these new kits, you can now get a new 2-1 IQ2+ Kit with PowerG Sensors! These are fantastic wireless sensors that can work from up to 2,000 feet away from the IQ Panel 2 Plus System in open air, and they utilize 128-bit AES encryption for great security.

Your one choice with these two new kits is whether you want the 319.5 MHz IQ Panel 2 Plus w/ Verizon LTE or the 319.5 MHz IQ Panel 2 Plus w/ AT&T LTE. Other than the cellular carrier, these two kits are exactly the same. When deciding between AT&T and Verizon, just go with whichever network offers more reliable service in the area where the system will be used. Check coverage maps if you are unsure. Please note that we do not have 2-1 Qolsys IQ Panel 2 Plus Kits for the 345 MHz IQ Panel 2 Plus or the 433 MHz IQ Panel 2 Plus. Only the 319.5 Mhz version is available in a 2-1 kit.

With the Qolsys QK9201-AK2P-840 or Qolsys QK9202-AK2P-840, you get all of the same great benefits as any other brand-new IQ Panel 2 Plus System. This system supports up to 128 wireless zones, Z-Wave Plus technology, and a plethora of great features like optional automatic Bluetooth disarming, security camera live-streaming, four (4) configurable partitions, and so much more. By activating the system with a cellular monitoring plan that includes access to Alarm.com, you will be able to control the system from anywhere in the world using your phone.

We hope that you find these new 2-1 Qolsys IQ Panel 2 Plus PowerG Kits useful. They are great for any small home or apartment, where only a few sensors are needed. We also recommend these kits for previous Interlogix System users who are looking to upgrade to a newer 319.5 MHz system. Please comment below with your thoughts on these new kits. Remember to stay tuned to the Alarm Grid blog for more security news coming soon!

Tags: , , , , , , , , ,

Comments