Honeywell Lyric 5800MINI Kits Now Available!
PostedIf you own a Lyric system and have not already done so, please read this important update regarding AlarmNet360 changes that affect your panel. It may be time for an update!
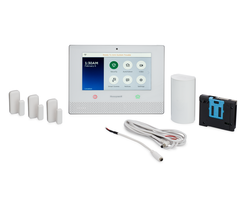
Alarm Grid is proud to announce that new Honeywell Lyric System Kits are now available! These new kits come included with Honeywell 5800MINI Door/Window Sensors, which are easy to enroll and install. Now is the perfect time to get started with a new Honeywell Lyric Security System!

Customers can choose between the Honeywell LYRIC5800PK Kit and the Honeywell LYRIC5800PK10 Kit. The LYRIC5800PK Kit includes three (3) door and window sensors and one (1) motion sensor. This is a good kit for a smaller home or an apartment where not many sensors are needed. If you have a larger home or business, then the LYRIC5800PK10 Kit is most likely the preferred option. That kit includes ten (10) door and window sensors and one (1) motion sensor. Of course, both kits can be easily expanded upon if needed. The Lyric supports 345 MHz Honeywell 5800 Sensors, 2GIG 345 MHz Sensors, and 128-bit AES encrypted Honeywell SiX Series Sensors.
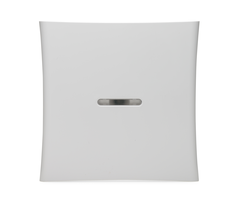
Previously, Alarm Grid offered Lyric System Kits that featured the VERSA-2GIG Door and Window Contacts. The Honeywell 5800MINI Sensors offer the exact same performance, and they have an identical appearance. The only difference is that the Honeywell 5800MINI Sensors have a red circuit board, while the one for the VERSA-2GIG is yellow. But with the cover closed, you won't be able to see the difference. Both sensors enroll in the same manner, and they both provide excellent function as door and window contacts.
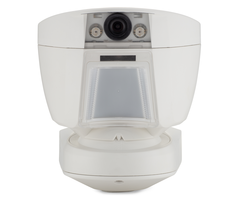
We have included some other accessories with these kits to help you get started. Both kits feature the Honeywell SiXPIR Motion Sensor. This passive infrared (PIR) motion detection sensor offers a coverage area of 40 feet by 56 feet, and it provides pet immunity for small animals weighing up to 80 pounds. As this sensor is part of the SiX Series lineup, it utilizes 128-bit AES encryption for enhanced wireless security. This military-grade encryption makes it nearly impossible for others to hack or takeover. And since the Lyric System supports up to 128 wireless zones, you will have no problem expanding on the system later if needed.
For monitoring service, the Lyric comes with a built-in WIFI card. This allows the system to connect with the AlarmNet360 Servers, provided that you obtain an appropriate monitoring plan. You should also make sure that your monitoring plan includes access to Total Connect 2.0, as that will really unlock some exciting features and capabilities for your system. By accessing TC2 through a web browser or mobile app, you can arm and disarm your system, control Z-Wave home automation devices, check system status and more. Speaking of Z-Wave, the Lyric Panel includes a built-in Z-Wave controller for adding devices like lights, locks and thermostats. You can create Total Connect smart scenes for automatic operation of these devices based on predetermined system events.
But perhaps the biggest benefit to the Lyric Alarm System is its ability to be used with Apple HomeKit. This is an interactive platform for iOS users that offers some impressive features when paired with a Lyric Alarm Panel. You can have your HomeKit devices respond automatically based on certain events of your Lyric System. And if you have a compatible HomeKit Hub, such as an iPad or an Apple TV, then you can control your Lyric System remotely using Siri voice commands sent from your iPhone. Simply put, this integration is awesome, and you will surely want to take advantage of it as much as possible! Just remember that you need to have the Lyric activated for monitoring service in order to enable it with Apple HomeKit.
We are sure that you will love your new Lyric System Kit. The panel is super easy to operate, and you will love its 7-inch full-color touchscreen display. And it looks great whether mounted on a wall or rested on a desk or table using the Honeywell LCP500-DK Desk Mount. If you have any questions about our new Lyric 5800MINI Kits, or if you want to learn more about our monitoring plans, please reach out to us by emailing support@alarmgrid.com. We operate support hours from 9am to 8pm ET M-F. We look forward to hearing from you!


 The Honeywell Lyric Alarm System is currently our top pick as a HomeKit Security System. This is a very powerful alarm panel that includes support for 128 wireless zones, a built-in 7-inch full-color touchscreen, integrated WIFI, support for encrypted
  At first glance, the DSC Iotega looks like an exceptional HomeKit System. It supports 128 wireless zones, and you can use